| You can use iTunes to listen to music other people create and use an iPod to take that music with you wherever you go. But, what if you want to make your own music? Maybe you are a budding musician with dreams of making it to the top and creating music that other people will use iTunes to listen to? Or maybe you just want to create some soundtracks for your own projects, such as a slideshow you will put on DVD. That's where the amazing GarageBand application comes in. If you have musical talent, you can use this application to create, record, and mix your own music. If you have no musical abilities whatsoever (I am definitely in this camp!), you are in luck because you can use GarageBand to create some pretty interesting music without being able to play a note yourself. In this chapter, you'll get a fairly basic overview of GarageBand and will learn enough to create a simple (or not so simple) song using the standard musical tools that GarageBand provides. You'll also learn how to export the music you make to other applications, such as to iTunes so you can listen to it over and over or to iMovie HD to use as a soundtrack. You won't learn about GarageBand's more advanced capabilities, such as recording from instruments you play, creating your own GarageBand instruments, and so on. TIP To get more detailed information on GarageBand, open its Help system and click Getting Started. The GarageBand manual in PDF format will open and you can read about GarageBand in more detail.
GarageBand is part of the Apple iLife suite of applications (this chapter is based on GarageBand version 2.0). To be able to use GarageBand, you need to obtain and install the iLife suite (see the following sidebar). When you launch GarageBand, you'll be prompted to start a new project or open an existing one. Obtaining and Installing iLife Apple's iLife suite includes five amazing applications, four of which are not part of the standard Mac OS X installation (GarageBand, iPhoto, iMovie, and iDVD) that are a must-have for any Mac OS X user. (iTunes is part of the standard Mac OS X installation and is also included in the iLife suite.) There are two ways you can get a copy of iLife. One is to buy a new Mac because iLife is installed on all new Macs. The other is to purchase the suite from Apple or from an authorized Apple reseller. Priced at $79, this suite is an excellent bargain too. The system requirements for iLife vary depending on which applications you are going to install and how you are going to use them. In order to install GarageBand and iDVD, your Mac must have a DVD drive. If your Mac doesn't have a DVD drive, you can install the other applications from the installation CD included in the iLife package. In order to be able to create DVDs with iDVD, you need to have access to a DVD burner, such as an Apple SuperDrive. Some of the advanced features of GarageBand and iDVD require a G4 of G5 processor. Installing the iLife applications is simple, you just place the appropriate disc (DVD or CD) in your Mac and run the iLife installer. Use the standard installation to install all parts of each application or use the Customize option to select parts not to install (such as the themes from previous versions of iDVD). Each application will be installed within the Applications folder. Before you start using these applications, run the Mac OS X Software Update application (choose Apple, Software Update) to ensure that you are using the most current version of each application. |
Starting a New GarageBand Project When you create a new project, you'll use the New Project dialog box to name the song you are creating, choose the save location, and configure the song you are creating (see Figure 20.1). By default, the project is saved to a GarageBand folder located in the Music folder in your Home folder; however, you can choose to change this. Figure 20.1. Use the New Project dialog box to create and configure a new song in GarageBand. 
In the New Project dialog box, use the controls to configure the following aspects of the song you are going to create: Tempo The tempo is the relative speed of the song. Drag the slider to the right to create a faster song or to the left to create a slower one. You can also type the number of beats in the beats per minute (bpm) box. Don't be too concerned with getting the tempo set correctly here because you can always change the tempo later if you decide you want your song to be faster or slower. Time Signature Use the Time pop-up menu to choose the time signature of your new song. The time signature is the relationship between beats and measures in your song. This is measured by two numbers separated by a /. Explaining how to choose the right time signature to use is beyond the scope of this book and my musical knowledge; the 4/4 time signature is a standard one so use that unless you know enough to be able to choose something else. Key The key of a song is the central note of the piece to which all the other notes in the song relate. Use the Key pop-up menu to choose the key for the new song; C is the default key. Scale You choose the scale to be used for the key you selected; there are two options: major or minor. Use the pop-up menu to the right of the Key pop-up menu to set the scale for your song.
NOTE Like tempo, you can change the time signature, key, and scale for your song later.
When you have configured your new song, click Create. You'll see the GarageBand window that is separated into a number of areas, each of which contains a set of tools that enable you to work with your project (see Figure 20.2). By default, you'll see that the Grand Piano software instrument has been selected for the first track in the song. Figure 20.2. If you aren't used to working with a music application, GarageBand might look confusing to you at first, but you'll quickly learn how to you can use it to create your own tunes. 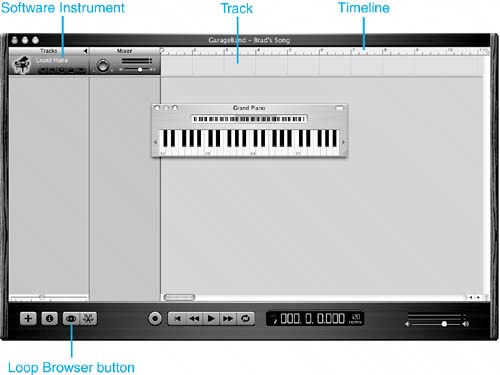
Understanding a GarageBand Project Each GarageBand project (better known as a song) you create includes one or more tracks. Each track can contain music from one of the following sources: Loop GarageBand includes loops, which are pre-created snippets of music, that you can add to your song to add depth to it, give it rhythm, and so on. The loops provided in GarageBand allow you to create complex music by taking advantage of music created by real musicians. You can use the loops that come with GarageBand in anyway you see fit. Software instrument GarageBand includes a mind-boggling number of software instruments that you can play and record in a track of your song. Even if you can't really play an instrument, you can create a series of notes that sound good to you and the use GarageBand's tools to transform those notes into a track that even a musician might mistake for real music. Real instrument If you have a real musical instrument, you can record its output in GarageBand. Because of space and other limitations (namely, that I can't play an instrument), you won't find any more information about this option in this chapter.
You create a song by building each track the song will contain using the sources listed previously. After you have tracks in place, you mix those tracks so they come together in beautiful harmony. After you have tuned your song to your liking, you can export it and use it in a number of ways. TIP To get rid of the Grand Piano track that is created automatically when you start a new project, select it by clicking it and press Delete. You can get rid of it later if you wish to.
|