Customizing Your Email
| Mail provides many tools you can use to customize various aspects of your mail. These include customizing the Mail window, organizing your email, sorting your email, and automating your mail with rules. Customizing the Viewer WindowYou can customize the Viewer window by using the commands shown in Table 15.1.
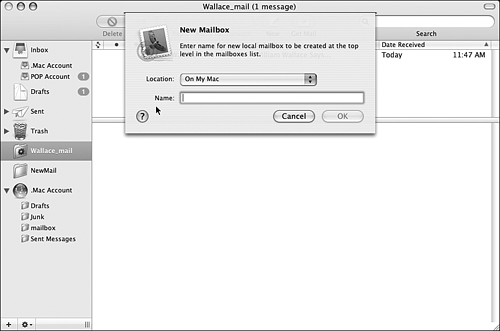
NOTE Remember that you can also customize the Message List window by moving the columns to change the order in which they appear, resizing them, changing the column by which the pane is sorted, and so on, just as you can in Finder windows in the List view. Organizing Your EmailThere are a number of ways to organize your email, including using mailboxes, smart mailboxes, and smart mailbox groups. Using Mailboxes to Organize Your EmailYou can create your own mailboxes to organize your messages. The mailboxes you create are also shown in the Mailbox pane. You can also create nested mailboxes to create a hierarchy of mailboxes in which you store your messages.
The mailbox will be created and will appear in the Mailbox pane. If you have created a mailbox that contains other mailboxes, you can use its expansion triangle to expand or collapse it. In Figure 15.20, you can see that I have created a folder called Receipts that is nested within a folder called Mail To Keep. You can also see that I have a .Mac account and its folders are shown under the .Mac mailbox. Messages you place in folders stored on a server count against your storage limit on that server, so it is generally a better idea to create folders on your Mac instead. Figure 15.20. Folders under the On My Mac icon are stored on your computer; folders under a server's icon, such as the .Mac mail account in this figure, are stored on that server.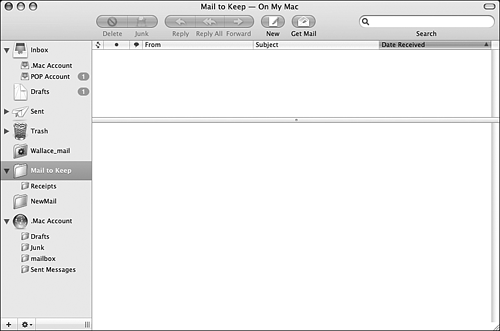 You can move messages from one mailbox to another in the following ways:
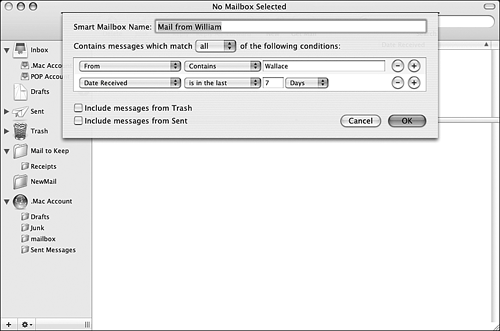
Using Smart Mailboxes to Organize Your Email
To create a smart mailbox, complete the following steps:
TIP To change the conditions for an existing smart mailbox, open its contextual menu and select Edit Smart Mailbox. Use the resulting Smart Mailbox sheet to make changes to the smart mailbox. Using Smart Mailbox Folders to Organize Your Smart MailboxesIf you want to organize your smart mailboxes, you can create a smart mailbox folder and then place your smart mailboxes within it (you can't put smart mailboxes within regular mailboxes/folders):
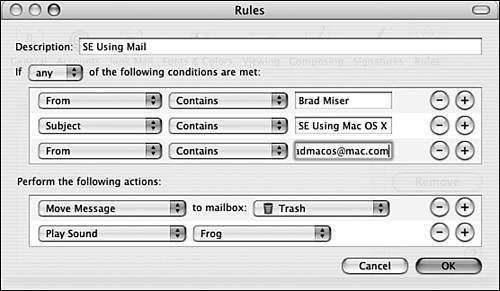
Configuring and Using Rules for EmailYou can automate the handling of your email by configuring and using rules. For example, you might want to create a mailbox for the mail related from a certain person and have that mail automatically transferred into that mailbox (you could use a smart mailbox to do this, too). Or, you might have the messages from a mailing list to which you are subscribed placed in a specific mailbox for later reading. To create and implement rules, you use the Rules pane of the Mail Preferences window:
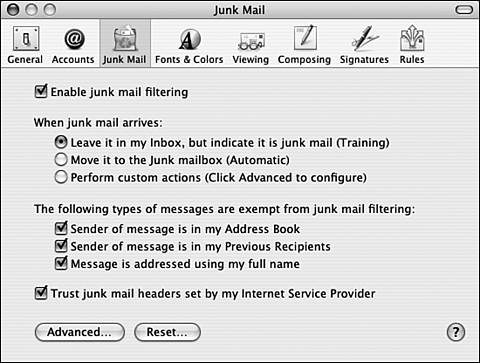
NOTE If you apply a color in a rule, that rule appears in that color in the Rules pane. Messages already in a mailbox that meet the rule's criteria are also shown in the color applied by the rule. You can use the Edit and Duplicate buttons to edit or duplicate rules and the Remove button to delete rules. Any future messages you receive that meet the criteria for a rule are acted upon by that rule. You can also manually apply rules to messages by selecting messages and selecting Message, Apply Rules (Option- TIP Manually applying rules is a good way to test your rules to ensure that they do what you intended. Handling Junk MailUnfortunately, no matter how careful you are with your email address, it might eventually get on a junk mail list. And after it gets on one such list, it will get on many, and your inbox will overflow with junk mail. Fortunately, Mail includes some built-in tools for dealing with junk mail. TIP Although Mail's Junk mail feature is a good way to deal with spam, it doesn't eliminate spam. See the sidebar at the end of this section for recommendations about how to deal with spam more effectively. You can configure Mail's Junk feature via the Junk Mail pane of the Mail preferences dialog box (see Figure 15.23). Figure 15.23. Use the Junk Mail pane to configure Mail's junk feature.
The Junk feature has four modes. In the Disabled mode, the Junk Feature is inactive and doesn't do anything. You can disable this feature by unchecking the "Enable Junk Mail filtering" check box on the Junk Mail pane of the preferences dialog box. In the Training mode (which is the default mode), Mail applies its Junk rules to your messages. This causes Mail to color the message brown or gold (depending on your color perception), indicating that Mail thinks the message is junk. You use this mode to fine-tune the Junk Mail feature so it correctly filters your messages to identify the junk. When you view a message that has been correctly identified as junk, don't do anything. When a message has been identified as junk but it isn't, click the Not Junk button. If you find a message that is junk, but Mail has not identified it as such, click the Junk button on the toolbar. You can place the Junk Mail feature in the Training mode by clicking the "Leave it in my inbox, but indicate it is junk mail (Training)" radio button. After some time has passed and you are confident that Mail's Junk filter is working properly, you can move into Junk Mail's Automatic mode. When you do so, Mail creates a Junk folder in the Drawer and prompts you to ask whether it should move all the identified junk mail to this folder. Click Yes. You move into the Automatic mode by clicking the "Move it to the Junk mailbox (Automatic)" radio button. When the Junk feature is in the Automatic mode, it moves all the messages it identifies as junk into the Junk folder. You should review the contents of this folder periodically to ensure that no messages you want to keep are in this folder by mistake. If there are messages you want, move them to a different folder. Then delete all the messages in the Junk folder. You can also use the Custom mode to configure the rules used by the Junk filter. To use this mode, click the "Perform custom actions (Click Advanced to configure)" radio button. Then click the Advanced button to open the Advanced configuration sheet. If you click the Advanced button, you move to a Rules sheet and the default Junk rules are ready to edit. (Mail's Junk Mail feature is actually just a special mail rule.) You can change this mail rule just like any rule you create on the Rule pane to change how Mail handles junk mail. If you open the Junk rule, you see that this is simply a rule that acts on any messages that are from people who are not in your Address Book, are not on your Previous Recipient list, are not addressed to your full name, or are marked as Junk. In the Training mode, this rule changes only the color of the messages. In the Automatic mode, it moves the messages to the Junk folder. By checking the related check box on the Junk Mail pane of the preferences dialog box, you can exempt email messages from the Junk Mail filter in the following situations:
If your Internet service provider (ISP) provides junk mail headers that attempt to identify junk mail by its own rules and you want Mail to recognize and use those headers, check the "Trust Junk Mail headers set by my Internet Service Provider" check box. If you click the Reset button, the Junk Mail feature is returned to its default state. This also removes any learning the filter has done so you have to repeat the training process. The End of SpamWith all due respect to Mail's Junk feature, there are certain circumstances in which providing your email address is likely to result in your address being obtained by a spammer. And after it gets into one spammer's hands, it will get into lots of spammers' hands and you will start receiving dozens or even hundreds of spam messages every day. The only real way to stop spam is to stop using the email address that has been spammed. Junk mail filters, such as Mail's Junk feature, are really only a way to make dealing with spam easier; they don't eliminate the spam from your life. Several situations should be considered to have high risk of your address being spammed. One is public discussion forums, such as on websites, in newsgroups, in chat rooms, and so on; in fact, getting spammed from these locations is guaranteed. Another is when you are shopping online; many online retailers have valid privacy policies that allow you to opt out of your address being provided to others, but some don't have such policies. Another is any time you are asked for an email address, such as when you are taking a survey, registering for a "free" prize, and so on. Providing an email address in any of the situations will likely get you spammed. If that happens and you use an email address for work or to keep in touch with people, you aren't likely to want to change the address you use. There is a solution to this dilemma: You can create "disposable" email accounts for use in the situations that are more likely to result in an addressed getting spammed. If that happens, you can simply stop using the spammed email account and create another disposable account to use in the high spam risk situations. Meanwhile, you can keep your permanent email address close the vest by providing it only to people you know or to companies that you are sure are legit and won't sell your address to spammers. There are many sources of good disposable email accounts, including the following:
NOTE You might have noticed that I provide my email address in this book, which is bradmacosx@mac.com. I like to receive email from readers, and spammers aren't likely to read a book to get a single address. So, even exposing an email address in a public place like a book isn't all that risky. However, I use the practice described in the last bullet in the previous list to manage my own email. For example, I have an email address for personal email and another disposable address I use when shopping online (mostly Mac stuff and DVDs). If that address ever gets spammed, I can just delete it and create a replacement. |
EAN: 2147483647
Pages: 317