| After you know how much space you need to store all your music (the size of your iTunes Library) and how much space is available on your iPod (its disk capacity), you can choose how you want to build and manage your iPod's music library. Understanding Your Synchronization Options Three basic options are available for managing the library of music on your iPod: Automatically update all songs and playlists When you use this method, the entire process is automatic; iTunes ensures your iPod's music library is an exact copy of your iTunes Library each time you connect your iPod to your computer. This is the ideal method because you don't have to do any additional work and you always have all your music on your iPod. Automatically update selected playlists only When you use this method, iTunes still manages the update process for you, but it updates only the specific playlists you select. This option is useful when you have more music in your iTunes Library than will fit on your iPod and don't want to have to manually update your iPod's music. Manually manage songs and playlists When you use this method, you manually move songs and playlists onto your iPod. This option is mostly useful in special situations, such as when you want to use the same iPod with more than one computer.
The first time you connected your iPod to your computer, an automatic method was used to move songs onto your iPod. However, if there were more songs in your iTunes Library than could be stored on your iPod, some slight of hand was done by iTunes so you wouldn't have to get into the details of this process before listening to music on your iPod. In that case, iTunes created a playlist containing a selection of your music that would fit on your iPod and iTunes moved that music to your iPod so you could listen to it. After the first time, you need to choose the synchronization method you want to use. Finding the right method for you is a matter of preference, but I can provide some general guidelines for you. note  | Even if you have enough space on your iPod for all your iTunes music, you can still choose one of the other update options if it suits your preferences better. |
If all the music in your iTunes Library will fit onto your iPod (the space required for your iTunes Library is less than your iPod's disk capacity), I recommend you use the option Automatically update all songs and playlists. This option is the easiest because it requires literally no work on your part. Each time you connect your iPod to your computer, the update process is performed automatically and you will have your complete music collection available on your iPod. That's because with this option, your entire iTunes Library is moved to your iPod along with the playlists you have created. So, even if some music is not part of your playlists, it still gets moved onto the iPod. If the size of your iTunes Library is larger than the disk capacity of your iPod, managing the music library on your iPod is slightly more difficult. If your iPod isn't large enough to store your entire Library and you take full advantage of iTunes playlists to create collections of music to which you listen, using the option Automatically update selected playlists only is a good choice. After you choose the playlists you want to be updated, iTunes handles the process of keeping them up-to-date for you so you don't have to think about it each time you connect your iPod to your computer. Of course, you need to make sure you create and can select playlists that contain the music you want to be able to listen to on your iPod. This can require some effort, but because playlists are so useful, you will likely do that work anyway so you can listen to them on your computer. And, be aware that only music in the selected playlists is moved onto your iPod. Finally, if you don't use a lot of playlists or you simply want to choose the specific music you want to place on your iPod, you can use the manual method to do so. caution  | If you use the same iPod with more than one computer, you need to be careful before selecting one of the automatic methods. When you use an automatic method, iTunes will copy its Library onto the iPod. When it does this, it will also remove any songs on the iPod that aren't in its Library so the music on the iPod is an exact copy of the music in the iTunes Library. If you share the iPod on more than one computer, you should not use the Automatically update all songs and playlists method for both computers if you have different music in the iTunes Library on each computer. Fortunately, you can leave one computer set to automatic and the others set to manual. |
After you have determined how you want to manage your iPod's music library, you need to configure iTunes to implement your decision. Understanding How iTunes Updates Playlists on the iPod When iTunes updates a playlist on your iPod, it takes a "snapshot" of that playlist and places it on the iPod. If you change the playlist in some way, the next time you update your iPod, the previous "snapshot" is replaced by the new playlist. For example, suppose you have a smart playlist that is dynamic and plays the 50 songs you have played most frequently. As you listen to songs in iTunes, the contents of that playlist change to reflect the songs you have listened to. When that playlist is moved to the iPod, it contains the songs as they were in the playlist when you performed the update. The playlist on the iPod will remain unchanged until you perform the next update. At that time, if the contents of the playlist have changed, the revised playlist will replace the one currently stored on the iPod. The same principle applies when you make changes to a playlist manually. For example, if you sort a playlist to change the order in which songs play, that order will be reflected in the playlist when you update it onto your iPod. If you change the order of the songs in the playlist again in iTunes, the next time you update the iPod, the songs will play in the new order on the iPod. Using the Automatically update selected playlists only option, when iTunes moves a playlist from its Library onto an iPod, it moves only the songs in that playlist onto the iPod. This can sometimes be confusing. For example, if you purchase an album by a specific artist and then include only some of the songs on that album in a playlist that gets moved to an iPod, only those songs by that artist in the playlist get moved onto the iPod. As an example, this can be confusing the first time you browse your iPod by artist and can't figure out why a song you know you have by that artist is not on your iPod. tip  | By default, when iTunes performs an update, it moves all the songs from each affected source onto the iPod. If you don't want specific songs to be moved onto an iPod, open the iPod Preferences dialog box and check the Only update checked songs check box. If a song's check box is not checked, it won't be included in the music moved onto the iPod during an update. |
Configuring iTunes to Automatically Update All Songs and Playlists Choosing the "fully automatic" method is automatic in itself, in that this is the default option. However, should you ever need to choose this option, you can do so with the following steps: 1. | Connect your iPod to your computer (remember Chapter 2!). iTunes will open automatically and the iPod will appear on the Source list.
| 2. | Select the iPod on the Source list and click the iPod Options button (see Figure 6.4). You'll see the iPod pane of the iTunes Preferences dialog box. If you use a Mac, make sure the Music tab is highlighted.
Figure 6.4. To choose an update method, select the iPod and click the iPod Options button. 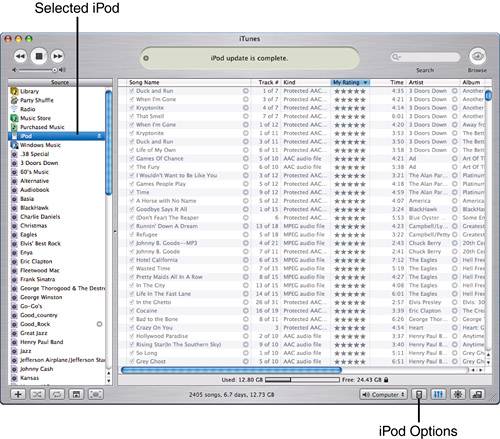
| 3. | Click the Automatically update all songs and playlists radio button (see Figure 6.5). On a Windows computer, the Music tab must be selected to see this option.
Figure 6.5. The iPod Preferences dialog box enables you to configure the update process for your iPod. 
tip | There are two other ways to open the iPod pane of the iTunes Preferences dialog box. One is to open the iPod's contextual menu and choose iPod Options. Another is to open the iTunes Preferences dialog box and click on the iPod pane. |
| 4. | Click OK. The dialog box will close, and the update will start. If your iPod can store all the music in your Library, the process will continue until the update is complete. The next time you connect your iPod to your computer or update the iPod with a command, iTunes will attempt to update its Library automatically. As long as there is enough space on your iPod, you won't need to do anything else.
note | If you use a Windows computer, you won't see the Contacts or Calendars tab shown in Figure 6.5. These options are available only on a Mac. |
If your iPod doesn't have enough room to store all your music, you'll see a warning prompt telling you so. iTunes will offer to choose a selection of songs to put on the iPod.
If you click Yes in this dialog box, iTunes will create a special playlist called nameofyouripod Selection, where nameofyouripod is the name you gave your iPod when you configured it. This playlist contains a selection of music from your iTunes Library that will fit on your iPod. iTunes will move the music in this playlist onto the iPod to complete the update.
If you don't change the update option, iTunes will update this playlist (and only this playlist) each time you connect your iPod to your computer. (iTunes actually changes the update mode to Automatically update selected playlists only and chooses the nameofyouripod Selection playlist on the playlists list in the iPod Preferences pane.) You can use this playlist just like the others in your iTunes Source List, such as adding songs to it, removing songs from it, changing their order, and so on.
If you click No in the dialog box instead, the update will be aborted and you'll have to use one of the other update options.
|
Every time you connect your iPod to your computer, the update will be performed. You will see the update information in the Information area of the iTunes window, and the iPod icon will flash red. When the process is complete, you will see the iPod update is complete message in the Information area and the OK to disconnect message will be displayed on the iPod's screen. Then, it is safe to disconnect your iPod from your computer. Of course, you should leave the iPod connected until its battery is fully charged. You can also activate the update manually, such as when you have added or changed the music in your Library (maybe you created a new playlist) after the automatic update was complete. You can do this by opening the iPod's contextual menu and selecting Update Songs. Or, you can select File, Update Songs on name ofyouripod, where nameofyouripod is the name of your iPod. This will perform the same update that is done when you connect your iPod to your computer. Configuring iTunes to Automatically Update Selected Playlists To have iTunes automatically update selected playlists only, use the following steps: 1. | In iTunes, create the playlists you want to place on your iPod.
| 2. | Connect your iPod to your computer. It will appear on the Source list, and an update determined by the current update option (such as fully automatic) will be performed.
| 3. | Select the iPod for which you want to set an update option and click the iPod Options button. The iPod Preferences dialog box will appear.
| 4. | Click the Automatically update selected playlists only radio button (see Figure 6.6). (If you use a Windows computer, the Music tab must be selected to see this option.) Just below this button you will see a list of all the playlists configured in your iTunes Library. Next to each is a check box. If that box is checked, that playlist will be updated automatically; if that box is not checked, that playlist will be ignored.
Figure 6.6. You can choose the playlists that are updated automatically by checking their check boxes. 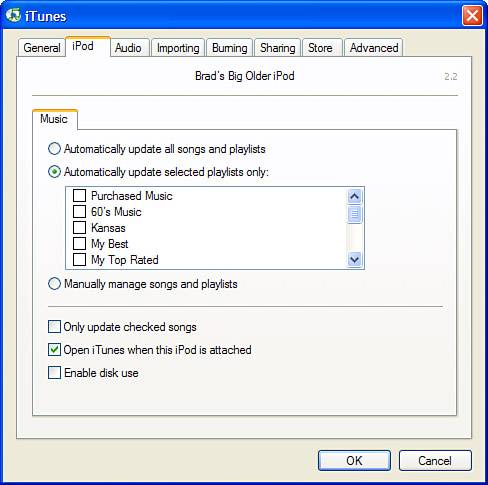
| 6. | Click OK.
If the playlists you selected will all fit on the iPod, the dialog box will close and the playlists you selected will be updated on your iPod. The next time you connect your iPod to your computer, the playlists you selected will be updated automatically and you can skip the rest of these steps.
note | When you change the update method, you will see a warning prompt telling you that the current music on the iPod will be replaced by the new update method. This should be what you expect, so just click OK to clear the prompt. |
If the playlists you selected are too large to fit on the iPod, the update will start but a warning dialog box will appear (see Figure 6.7). Click OK to stop the update; the update can't continue because iTunes doesn't know what music to move to the iPod.
Figure 6.7. When you see this, the playlists you selected for automatic update won't fit on your iPod. 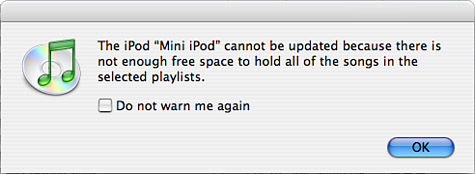
In this situation, you have two choices. You can deselect some of the playlists until the selected ones fit on your iPod, or you can remove songs from the selected playlists until they fit. (Remember that the only way to remove songs from smart playlists is to change their criteria.)
|
note | If you use the Automatically update selected playlists only option, smart playlists are even more useful because their content can be dynamic (see Chapter 18, "Creating, Configuring, and Using Playlists"). For example, you can create a playlist that automatically contains all the new music in your iTunes Library. If you choose to have this playlist updated automatically, each time you connect your iPod to your computer that playlist will be updated and so your newest music will always be placed on your iPod. |
Configuring iTunes So You Can Manually Manage Songs and Playlists When you choose this option, you manually place songs and playlists on your iPod. To choose this option, do the following steps: 1. | Connect your iPod to your computer. It will appear on the Source list and an update determined by the current update option (such as fully automatic) will be performed.
| 2. | Select the iPod for which you want to set an update option and click the iPod Options button. The iPod Preferences dialog box will appear.
| 3. | Click the Manually manage songs and playlists radio button (on a Windows computer, this is located on the Music tab). You will see a prompt explaining that with this option, you must manually unmount the iPod before disconnecting it; read the information and click OK to close the prompt. (I'll explain what this means in a later section.)
| 4. | Click OK. The dialog box will close and a brief update will be performed. An expansion triangle will appear next to the iPod on the Source list, and all the playlists stored on it will be shown under its icon. You can then manually add or remove songs or playlists (the steps to manually move music onto an iPod appear in a later section).
|
|