Sharing Your iTunes Music with Others
| Setting up an iTunes computer to share its music is a two-step process. The first step is to connect your computer to a network or to use the Fast User Switching feature on a Macintosh computer. The second step is to configure iTunes to share your music. You can also use iTunes to see who is accessing the music you have shared. note
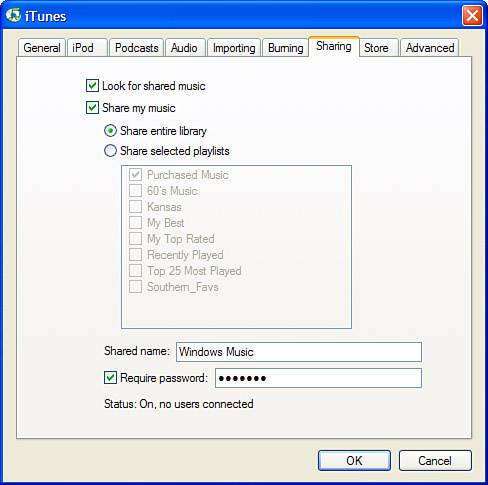
Connecting an iTunes Computer to a NetworkAs I wrote in an earlier note, this is not a book on networking, so I can't provide the information you need to connect computers together on a network. However, to enable sharing over a network, you must be connected to a network, which makes sense because the computers have to have some way to communicate with one another. The network over which you share iTunes music can be wired, wireless, or both, and it can include Windows and Macintosh computers. If you have such a network and your iTunes computers are connected to it, you are ready to share your music. Otherwise, you will need to build the network before you can share your iTunes tunes. Sharing Your Music with Other People Who Use Your MacIf you use a Mac, each user account can share its music with the other user accounts on the same computer (and on the network to which that Mac is connected). Share Libraries on the same Mac act just like Libraries stored on different computers that you access via a network. Using the Fast User Switching feature, you can leave iTunes running under one user account and someone else can log in under another use account and use iTunes to listen to music you share. Likewise, if another user shares her iTunes music and leaves iTunes running when you log in to your user account, you can access her music, too. For help configuring user accounts on a Mac, see my book Special Edition Using Mac OS X, v10.4 Tiger. Setting Up Your Computer to Share MusicTo allow other people to listen to the music in your Library, perform the following steps:
Knowing How Many People Are Using Your MusicYou can monitor how many people are using the music you are sharing by opening the Sharing pane of the iTunes Preferences dialog box (see Figure 21.2). At the bottom of the pane, you will see the current status of sharing (On or Off) and how many users are currently connected to your music. Figure 21.2. At the moment, the Status information at the bottom of the pane shows that one user is sharing the iTunes music on this computer.
The Status section shows only those users who are actually accessing your music by selecting it on their Source Lists. If they don't have your music selected, they won't be shown as being connected, even if they can see your music on their Source Lists. |

EAN: N/A
Pages: 194