| There are a number of ways to customize the columns (tags) that appear in the Content pane. What's more, you can customize the Content pane for each source. The customization you have done for a source (such as a CD or playlist) is remembered and used each time you view that source. note  | If you really get into finding and adding artwork for the CDs you import, tools are available to help you. If you use a Mac, one such tool is called CDCoverTool. While I haven't used it, you can try it for yourself by going to www.hillmanminx.net. |
You can select the tags (columns) that are shown for a source by using the following steps: 1. | Select the source whose Content pane you want to customize. Its contents will appear in the Content pane.
| 2. | Select Edit, View Options or press Ctrl+J (Windows) or  -J (Mac). You will see the View Options dialog box (see Figure 17.14). At the top of the dialog box, you'll see the source for which you are configuring the Content pane. (In Figure 17.4, it is a playlist called Johnny Cash.) You'll also see all the available columns that can be displayed. If a column's check box is checked, that column will be displayed; if not, it won't be shown. -J (Mac). You will see the View Options dialog box (see Figure 17.14). At the top of the dialog box, you'll see the source for which you are configuring the Content pane. (In Figure 17.4, it is a playlist called Johnny Cash.) You'll also see all the available columns that can be displayed. If a column's check box is checked, that column will be displayed; if not, it won't be shown.
Figure 17.14. You can set the columns shown in the Content pane with the View Options dialog box. 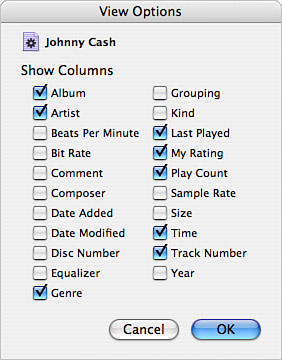
| 3. | Check the check boxes next to the columns you want to see.
| 4. | Uncheck the check boxes next to the columns you don't want to see.
| 5. | Click OK. When you return to the Content pane, only the columns you selected will be shown (see Figure 17.15).
Figure 17.15. If you could view all the columns in this Content pane, you would see that they correspond to the check boxes checked in the previous figure. 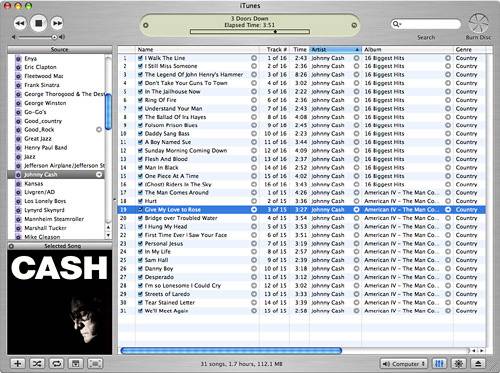
|
If you can't see all the columns being displayed, use the horizontal scrollbar to scroll in the Content pane. You can also use the vertical scrollbar to move up and down in the Content pane. Following are some other ways to customize the Content pane: You can change the width of columns by pointing to the line that marks the boundary of the column in the column heading section. When you do, the cursor will become a vertical line with arrows pointing to the left and right. Drag this to the left to make a column narrower or to the right to make it wider. The rest of the columns will move to accommodate the change. note | The only column you can't change (width or location) is the first one (which usually displays the track if you are viewing a CD or playlist and is empty when you are viewing your Library). |
You can change the order in which columns appear by dragging a column heading to the left or to the right. When you release the mouse button, the column will assume its new position and the other columns will move to accommodate it. As you learned when playing a CD, you can sort the Content pane using any of the columns by clicking the column heading by which you want the pane to be sorted. The songs will be sorted according to that criterion, and the column heading will be highlighted to show it is the current sort column. To change the direction of the sort, click the sort order triangle, which appears only in the Sort column. When you play a source, the songs will play according to the order in which they are sorted in the Content pane, starting from the top of the pane and playing toward the bottom.
The Absolute Minimum Hopefully, this chapter turned out to be more exciting than you might have expected based on its title. Although labeling your music might not be fun in itself, it does enable you to do fun things. Setting options for your music enables you to enhance your listening experience, and adding and viewing artwork is fun. Finally, you saw that the Contents pane can be customized to your preferences. As we leave this chapter, here are some nuggets for you to chew on: If iTunes can't find information about a CD, you can enter that information yourself by using the Info window you learned about in this chapter. If you want to check for information about a CD on command, select Advanced, Get CD Track Names. (You can also use this command if you turned off the preference that allows iTunes to automatically perform this task.) iTunes will connect to the Internet and attempt to get the CD's information. Occasionally, iTunes will find more than one CD that seems to be the one it looked for. When this happens, you will see a dialog box that lists each candidate iTunes found. Select the information you want to apply to the CD by clicking one of the candidates. You can submit track names for a CD, label the CD, and select it. Then select Advanced, Submit CD Track Information. The CD's information will be uploaded into the CDDB and will be provided to other people who use the same CD. When adding artwork to songs, you aren't limited to just the related album cover. You can associate any kind of graphics with your songs. For example, you can use pictures of the artists, scenes that relate to the music, pictures you have taken that remind you of the music, and so on. If you have looked at the figures in this chapter, you should be able to guess who at least two of my favorite artists are. Can you remember that far back?
|
|