Initial Configuration of the VPN 3000 Concentrator
| The VPN 3000 Concentrator does not ship with a default plug-and-play configuration; thus, some preliminary configuration is in order to initialize the concentrator. The initial configuration is a menu-driven command line interface (CLI) that is accessible via the RS-232 cable and 9-pin console port on the concentrator. The terminal settings should be set at 9600 baud, eight data bits, no parity, and one stop bit.
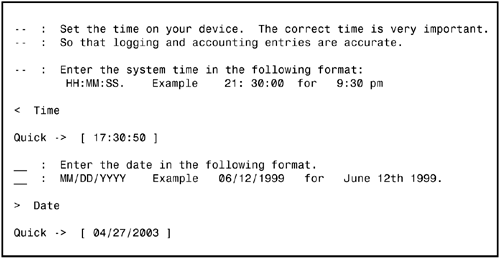
After you are connected, the concentrator prompts you for a login and password. The default administrator login and password for the VPN 3000 Concentrator is admin. The password is displayed as asterisk characters when you type in the field. Upon a successful login, the concentrator initiates its Quick Configuration setup dialog. The Quick Configuration is a utility that enables you to configure the minimal parameters necessary to initialize the VPN 3000 Concentrator. The preliminary configuration in this process is to input the time, date, and time zone settings for the VPN Concentrator. This may seem trivial, but it is an important step for accurate logging, as well as digital certificate validation (discussed in the next chapter). Figure 4.2 displays the opening dialog for the concentrator initialization and Quick Configuration. Figure 4.2. VPN 3000 CLI Quick Configuration screen.
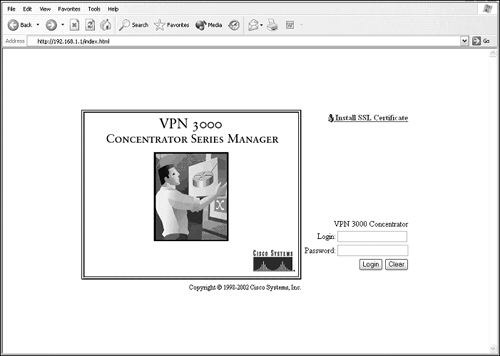
The next integral step in the setup dialog is the configuration of the private Ethernet interface. At this point, the setup utility requests the parameters for the IP address and subnet mask, as well as the speed and duplexing settings of the private interface. When you add a static IP address and subnet mask to the private interface, the remainder of the configuration can be managed by the GUI-based VPN 3000 Concentrator Manager. It is also possible to continue the Quick Configuration (as well as other configuration parameters) in the CLI by selecting Continue in the menu options. For time's sake, this example chooses to save the active configuration to file in the CLI and continue the Quick Configuration via the HTML-based Concentrator Manager. To access the Web interface to configure the VPN 3000 Concentrator, you must have at least Internet Explorer 4.0 or Netscape Navigator 4.5 browsers with cookies and Java scripts enabled. Once you open the Web browser, type the private interface address in the URL. For example, if the private interface's IP address is 192.168.1.1, then the URL in the browser should display http://192.168.1.1. When the Web page is loaded, the login display resembles Figure 4.3. Figure 4.3. 3000 Concentrator Manager login screen.
It is possible to secure the communications to the concentrator by installing a self-signed SSL certificate for your browser. By clicking on the hyperlink and installing the certificate, you can now establish a secure encrypted SSL session to the browser simply by adding https:// to the beginning of the address.
Following another login, you can resume Quick Configuration by setting static or DHCP-assigned IP addressing, speed, and duplex parameters for the public and outside (if applicable) Ethernet interface(s). After all interfaces are configured, click on the Continue button to display the next screen, which entails configuration options for the VPN 3000 Concentrator's system information. Namely, it enables you to assign a hostname, DNS server IP address, domain name for the concentrator, and a default gateway address to route traffic destined for other networks not defined in the concentrator's routing table. You can define the tunneling protocols that the concentrator is to utilize in the subsequent screen. By default, all tunneling protocols (PPTP, L2TP, and IPSec) are enabled. PPTP and L2TP do not require encryption by default and should be enabled for Microsoft Windows-based clients. IPSec must be enabled to support remote access sessions from the Cisco Unity client and other IPSec clients. In the next screen of the Quick Configuration, the Concentrator Manager enables you to decide which method(s) you want for IP assignment of remote clients. This IP address is assigned to the virtual interface of the IPSec tunnel, in contrast to the ISP IP address that is bound to the physical adapter (refer back to Figure 4.1). The options are as follows:
None of the options are enabled by default and at least one must be selected. During the initial stages of IKE negotiations, both IPSec devices must authenticate themselves to each other before establishing a tunnel. However, this is a device-level authentication and does not incorporate the individual user's credentials. The Cisco VPN 3000 Concentrator supports an extension to IKE, known as Extended Authentication (XAUTH), which prompts the client for a username and password during IKE negotiations. This user authentication typically occurs following device-level authentication of IKE phase 1. If the user's login and password are not authentic, the tunnel negotiations do not continue and unauthorized access to the private network is averted. The Quick Configuration addresses this feature by enabling you to choose a RADIUS server, NT domain controller, SDI (SecureID) server, and the concentrator's internal user database as means of authenticating users to the private network. In software release 4.0, the VPN 3000 Concentrator also supports authentication to an external Microsoft 2000 Active Directory server or a Unix/Linux Kerberos server. If you select an external server, the Manager displays the corresponding screen to input specific parameters for that server, such as IP address and port number.
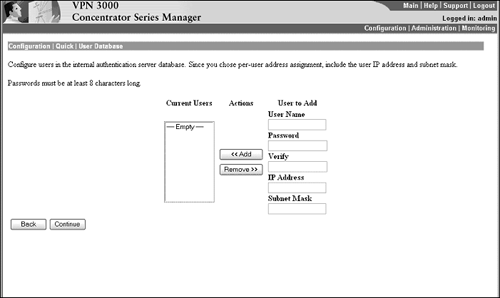
In instances where you decide to employ the concentrator's internal user database server, you must define at least one user and a group to which that user belongs to complete Quick Configuration. The concentrator can support a limited number of internal users and groups, depending on the model selected. The 3005 and 3015 can support 100 combined users and groups, the 3030 can support 500 combined users and groups, and the 3060 and 3080 can manage 1,000 combined users and groups. The Quick Configuration User Database screen, represented in Figure 4.4, is brought up so you can input users into the internal server database. If the concentrator is set up to use per-user IP address assignment (see previous IP Assignment bullet points), an additional box is presented for the IP address and subnet mask for that specific user. In addition, Cisco enforces a default strong password policy in which the password must be at least eight characters long. Figure 4.4. Quick Configuration internal user database.
After all remote access users have been added to the concentrator's internal server, the Quick Configuration setup directs you to the next screen that entails adding an IPSec tunnel group. This screen is displayed as long as IPSec was chosen as one of the tunneling protocols. This screen displays three important fields that you must configure. Those fields are as follows:
The last screen of Quick Configuration entails the Admin Password configuration. Cisco recommends you change this password immediately to reduce unsolicited access to the concentrator. After you click the Continue button on this screen, the Quick Configuration is completed and will not be seen again unless you default the concentrator configuration. Table 4.1 summarizes the screens and parameters that are set during the Quick Configuration dialog.
|
EAN: 2147483647
Pages: 185