Numbering Your Outline
3 4
For some of your documents, you might need to use Word's Outline Numbering feature. This enables you to choose one of Word's preset numbering schemes (seven are displayed by default) or create one of your own. When might you need to use outline numbering?
- You're creating a long paper that will be reviewed by other people. (Having the numbers is helpful for those times when Arnie in sales says, "Hey, I'm not sure I get what you're saying in paragraph 34.")
- You're drawing up a contract for a new associate to sign.
- You're drafting an outline for a book and want the chapters to be numbered automatically.
- You've finally decided to go back to finishing that dissertation.
Adding a Numbering Scheme
You can add numbers to an existing outline or you can create a numbered outline as you go. To add numbers to an outline you've already created, follow these steps:
- Display the outline to which you want to add numbers.
- Choose Format, Bullets And Numbering. The Bullets And Numbering dialog box appears.
- Click the Outline Numbered tab, as shown in Figure 11-12.
- Review the preset selections; click your choice, and click OK. The style you selected is applied to your outline.
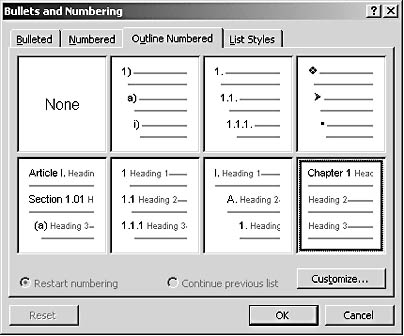
Figure 11-12. Word offers a number of preset outline numbering styles you can use as they are or customize to meet your needs.
You'll notice that the preset numbering schemes each include different character styles (some use numbers; some use symbols; some use a mix of numbers and letters, etc.). The preset numbering schemes act differently depending on which elements in your outline you want to number, as well. Table 11-3, gives you a quick look at the different preset numbering schemes in Word's outline numbering feature.
Tip - Display and hide outline numbers
You might want to use numbering in your outline only while the document is in its draft stages. While you're working on it and others are reviewing it, you might find it helpful to have numbers in the outline so that others can make references to sections without a lot of searching. When you're finished with the document and you're ready to finalize it, you can simply remove the numbering by selecting the entire document, right-clicking, and choosing Bullets And Numbering from the shortcut menu. On the Outline Numbered tab, select None and click OK.
Table 11-3. Preset Outline Numbering Schemes
| Scheme | Characters Used | Use |
|---|---|---|
| Numbers, letters, and Roman numerals | You're following a traditional outlining format. |
| Numbers | You have a multi-level document with multiple subtopics. |
| Symbol characters | You want to call attention to the major points in your document and don't need a more traditional numbering sequence. |
| Article and Section numbering plus letters | You're creating a paper that is a compilation of multi-level documents or a reference work of several fully developed pieces. |
| Numbers | You want to number main points and provide a numeric reference among subpoints. |
| Roman numerals, letters, and numbers | You want to use a traditional literary outline style. |
| Chapter numbering plus numbers | You're creating an outline for a book project and want only major headings labeled in the outline. |


Customizing the Numbering Scheme
If you're working on a unique project and you want to create your own numbering scheme, you can customize one of the outline numbering sequences to get what you want. To start the customizing process, follow these steps:
- Display the outline you want to number.
- Right-click in the work area. The shortcut menu appears.
- Click Bullets And Numbering. The dialog box opens.
- Click the Outline Numbered tab.
- Select the numbering scheme that's closest to the one you want and then click Customize. The Customize Outline Numbered List dialog box is displayed (see Figure 11-13).
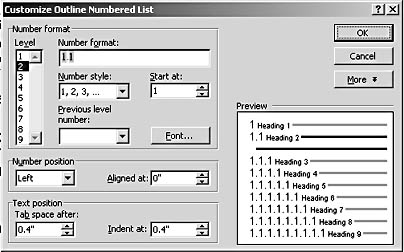
Figure 11-13. You can create your own outline numbering scheme based
on one of Word's preset styles.
Tip - Renumber safely
If you try one outline numbering sequence and then want to change to another, first remove the previous outline numbering sequence by displaying the Bullets And Numbering dialog box, clicking the Outline Numbered tab, clicking None, and clicking OK. That removes the numbering scheme from your outline. Now go back and repeat the steps to choose the numbering scheme you want. If you go directly from one numbering style to another, you might get unexpected results; occasionally Word changes outline levels and could introduce errors into your document.
Troubleshooting
The numbers in the numbered outline disappear
You're creating a numbered outline and you selected the style you want in the Outline Numbered tab of the Bullets And Numbering dialog box. But when you return to the outline, not all the headings are numbered as you selected. What's going on?
Word only "sees" and formats headings that are assigned to the built-in heading styles. If only a portion of your headings are formatted with the built-in styles, Word numbers only those headings. If you've created custom styles for your outline, you can still use those styles (and number them the way you want). In order to do this, you need to create a link that ties the custom style to one of Word's outline levels. Take care of creating this link by right-clicking in the work area and choosing Bullets And Numbering. Click the Outline Numbered tab and click Customize. In the Customize Outline Numbered List dialog box, select the outline level you want, click More (if necessary), and click the Link Level To Style down arrow. Choose the name of the style you used for the heading and click OK. Word links the style you selected to the outline level in the numbering scheme.
Selecting the Level
Word provides the option of customizing the different outline levels separately. Click the level you want to work with by selecting it in the Level list, on the left side of the Customize Outline Numbered List dialog box. In the Preview section, you see the outline level you've selected.
Tip - Change a portion of your outline
By default, Word applies to the entire document the changes you make in the Customize Outline Numbered List dialog box. If you want to apply a change only to a portion of your outline, however, you can display the dialog box, click More (if necessary) to display the advanced options, and click the Apply Changes To down arrow. Choose Current Paragraph to apply the changes to the paragraph at the insertion point, This Point Forward to apply the changes throughout the remainder of the document, or Selected Text to apply the changes only to the text that's selected.
Choosing Your Style
The number style you select determines whether the numbering scheme uses numbers, letters, words, or characters. You can choose from 16 different styles, which include several bullet styles and a picture bullet style. To choose the number style you want to use for your customized outline, click the Number Style down arrow in the Customize Outline Numbered List dialog box and click your choice.
Tip - Create legal briefs
If your work involves preparing legal briefs on a regular basis, you'll be pleased to know that there's a single option that can do the legal style numbering for you. Right-click in the Outline window and choose Bullets And Numbering from the shortcut menu. Click the Outline Numbered tab and click Customize. Click the More button in the Customize Outline Numbered List dialog box. Select the Legal Style Numbering check box. Finally, click OK, and Word renumbers your outline.
Controlling the Format of Outline Numbers
All the selections you make in the Customize Outline Numbered List dialog box, with the exception of the indent for a particular item, are shown in the Number Format box at the top of the dialog box. The number format controls the way your numbering scheme is displayed. If you want to use additional characters or words in your numbering scheme, enter them here. For example, you might want to use some of the following: (1) 1: 1 –New Item! ** 1 ** <1> ~ 1 ~.
As you make each change, the Preview window shows you how your new outline format will look. You can continue revising the format as many times as you want; Word doesn't record the change until you click OK.
Customizing Your Start Point
You also have the option of starting the numbering of your outline with a number other than 1. To choose a new number, click the Start At up and down arrows or click in the text box and type the number you want to use.
Tip - Link outline levels to styles
Don't want all these changes to go to waste? You can link the changes you make in your outline levels to corresponding styles in the style sheet of the current document. To do so, display the Customize Outline Numbered List dialog box, choose the Level style you want to use, and click the More button. Click the Link Level To Style down arrow and choose the style to which you want to link the outline level; then click OK.
Customizing the Font Selection
You aren't stuck with the fonts Word assigns by default—or even the fonts you've already used in your document heading styles—when it comes to customizing your outline. To select a different font, click the Font button in the Customize Outline Numbered List dialog box. When the Font dialog box appears, make your choices and click OK. The Number Format box and the Preview section in the Customize Outline Numbered List dialog box will reflect the changes you made.
Fonts for Outlines
Which fonts work best for intricate outlining? By default, Word uses Arial 18 for Heading 1, Arial 14 Bold Italic for Heading 2, and Arial 14 Regular for Heading 3. Pretty unexciting stuff. The point, however, when you're in Outline view, is to create something that's easy to read. Arial, while it's not going to make anybody's pulse race, is a straightforward, readable font.
The most readable fonts for text, according to typographically savvy designers, are serif fonts like Times Roman, New Century Schoolbook, and Garamond. The most interesting fonts for headings are often those that give a contrast to the rest of your document—so if you have page upon page of Times New Roman text, looking at an Arial heading isn't such a bad idea. Funny fonts that have personality, like Comic Sans, are great for an occasional attention getter but won't go far toward readability in an outline.
The best advice for choosing fonts for your particular outline is to try a few in your document to see which font best complements the text.
Changing Number and Text Position
If you're creating a custom outline and want to change the alignment and spacing of the numbers in your outlining scheme, you can make those changes in the Number Position section of the Customize Outline Numbered List dialog box. To change alignment, click the alignment down arrow in the Number Position section and make your choice. You can select Left, Centered, or Right.
To indent the text so that it's aligned where you want it, click the up or down arrow in the Aligned At box. You might want to increase the alignment value, for example, if you want the outline to be indented within another section of text or printed within a customized layout scheme.
newfeature! A new choice in Word 2002 enables you to control where you set a tab for text following an outline number. Now you can enter the spacing for the tab, which helps you with text alignment throughout the list series of your outline. The default setting is 0.4 inch; to increase the setting, in the Text Position section, click the Tab Space After up arrow or type the new value. To decrease the amount of space, click the down arrow or enter the setting you want.
Finally, you can change the amount of space by which you indent the text following the number or letter in your numbering scheme. If you're placing a phrase instead of a single character, you might want to increase the indent to give readers more white space as they read. Changing the text position simply requires entering another value in the Indent At box in the Text Position section. Again, the Preview section shows the change.
EAN: 2147483647
Pages: 337