Making Styles Work for You
3 4
Before you begin creating and customizing styles to suit your purposes, you should be comfortable using and applying existing styles. Word provides plenty of styles that you can use to format your documents while you hone your style skills. Incidentally, the quickest way to apply styles to documents is to use the styles that already exist. Don't be intimidated when it comes to using styles. In Word 2002, you can easily change all occurrences of a style. In fact, after you've applied styles, you'll be able to select and modify all instances of a style as well as clear formatting if you determine you'd rather not use a specified style. The next few sections look at how to apply, select, change, and clear existing styles.
Applying Existing Styles to Text
Logically enough, applying a style entails first specifying the element you want to format. You can specify text to be styled by clicking within a paragraph, selecting text within a paragraph or multiple paragraphs, or positioning the insertion point at the beginning of an empty paragraph in which you want the selected style to be applied when you type. After you've specified what you want formatted, you can perform any of the following procedures to apply an existing style to the text:
- Choose a style in the Style drop-down list on the Formatting toolbar. You can click the Style down arrow or press Ctrl+Shift+S to display the drop-down list and then use the Up Arrow and Down Arrow keys to navigate through the style options.
Tip
To avoid scrolling through the Style drop-down list, click the Style down arrow, and then type the first letter of the style name. Styles are listed alphabetically, so the list will jump to the style names starting with the typed letter. - Select a style in the Pick Formatting To Apply list in the Styles And Formatting task pane.
- Double-click the paragraph's existing style name in the Style Area, and choose a style in the Style dialog box.
- Press a preassigned keyboard shortcut (see Table 10-1) or a custom keyboard shortcut.
When you apply a style, the selected text is immediately reformatted in that style. If you find that the newly applied style isn't what you were looking for, you can replace it by applying another style or undo the formatting by clicking Undo on the Standard toolbar, pressing Ctrl+Z, or choosing Edit, Undo.
Troubleshooting
Character Formatting Disappears When I Apply a Style
When you apply a style, you might notice that manual formatting such as boldface, italics, and underlining disappears. For instance, if you apply the built-in Heading 1 style to underlined text, the text will be formatted as Heading 1 (Arial, 18 point), and the underline will be removed. To work around this default action, you can add boldface, italics, and underlining after you apply a style to selected text so that the manual formatting commands won't be lost.
Selecting and Changing All Instances of a Style
After you apply styles to your text, you can easily select all instances of a style whenever the need arises. In earlier versions of Word, you had to use the Find And Replace dialog box to find instances of a formatting style, and you were limited to finding instances one at a time—in other words, you couldn't select all instances of similarly styled text at once. In Word 2002, you can use the Style And Formatting task pane to quickly select all instances of a specified style. This new capability can considerably speed up a number of global style-related tasks. For example, you might want to select all instances of styled text because you want to replace one style with another style, or you might want to delete all text that appears in a particular style, or you might want to copy all similarly styled elements to a new document. Regardless of your reasons, you can select all instances of a style by following these steps:
- Click a paragraph that uses the style you want to select. (You can display the Style Area to simplify the process of selecting a paragraph that has been formatted with the sought-after style.)
- Click the Styles And Formatting button on the Formatting toolbar to open the Styles And Formatting task pane if it isn't already displayed.
- Click Select All, or hover the mouse pointer over the text in the Formatting Of Selected Text section, click the drop-down arrow, and choose Select All x Instance(s), as shown in Figure 10-5.
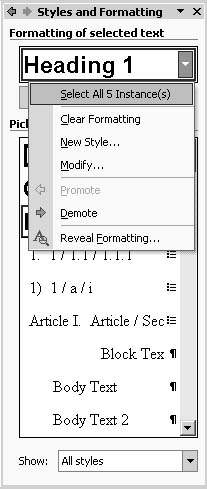
Figure 10-5. Using the Formatting Of Selected Text drop-down list, you can see exactly how many times a style is applied in the current document.
After you select all instances of text with a particular style, you can reformat the selected text by selecting another style in the Style drop-down list on the Formatting toolbar or by selecting a style in the Pick Formatting To Apply list in the Styles And Formatting task pane. You can delete all selected text with the specified style by pressing Backspace or Delete.
For information about modifying a style's settings, see the section "Modifying Existing Styles."
Clearing Formatting in Selected Text
In addition to simplifying the process of selecting all instances of styled text, the Styles And Formatting task pane enables you to quickly clear formatting commands. In this version of Word, both the Pick Formatting To Apply list in the Styles And Formatting task pane and the Style drop-down list on the Formatting toolbar include a Clear Formatting option. You can use this option to remove all formatting settings in selected text, paragraphs, or entire documents. To do so, follow these steps:
- Select the text or click within the paragraph you want to clear.
- Display the Styles And Formatting task pane (by choosing Format, Styles And Formatting).
- Perform any of the following actions:
- Choose Edit, Clear, Formats.
- In the Pick Formatting To Apply list in the Styles And Formatting task pane, select the Clear Formatting option.
- Select Clear Formatting in the Style drop-down list on the Formatting toolbar.
- Hover the mouse pointer over the text in the Formatting Of Selected Text drop-down list, click the down arrow, and select Clear Formatting.
After you clear the formatting, the text reverts to Normal style (Times New Roman, 12 point, left aligned, single spaced). If you realize immediately that you don't want to clear the formatting, click Undo on the Standard toolbar, press Ctrl+Z, or choose Edit, Undo.
Tip - Clear formatting
To clear all text formatted with a particular style, select all instances of the style (as described in the section "Selecting and Changing All Instances of a Style," and then select Clear Formatting in the Formatting Of Selected Text drop-down list in the Styles And Formatting task pane.
Troubleshooting
The Clear Formatting Option Isn't Shown in the Pick Formatting To Apply List
If you select text and then find that the Clear Formatting option isn't listed in the Styles And Formatting task pane, it might be because the All Styles option is selected in the Show drop-down list. By default, the All Styles view doesn't include the Clear Formatting option. To eliminate this little annoyance, click the Show down arrow, and choose Available Formatting, Formatting In Use, or Available Styles, all of which are configured to show the Clear Formatting option by default. The Clear Formatting option will be displayed near the top of the list after you change the Show setting.
EAN: 2147483647
Pages: 337