AutoCorrecting Your Typos Away
3 4
AutoCorrect is a terrific Word feature that anticipates your possible errors and corrects them—almost before you know you made them. AutoCorrect comes with a library of more than a thousand different items, and it learns from you as you go along. Are you forever typing yuor when you mean to type your? AutoCorrect will automatically reverse the characters in words it recognizes without any further action from you.
AutoCorrect locates a number of different types of problems in your document. You can relax and let the thoughts flow, knowing that Word will catch and correct the following types of situations:
- Problems with capitalization. If you accidentally type too many capital letters in a row, forget to capitalize the beginning of a sentence or a table heading, or enter the name of a day of the week in lowercase (tuesday), Word will fix it for you.
Note
The AutoCorrect feature that looks for and capitalizes words in table cells is new with Word 2002. - Problems with garbled typing. If your fingers get tied up in a knot when you try to type the word can and type acn instead, Word will untangle the characters for you.
- Problems with spacing. If your words run together, as in nextime instead of next time, Word will add the missing letter and character space.
- Inserting special symbols. Instead of going through the menu selections needed to insert a special symbol like a Wingding, you can rely on AutoCorrect to substitute the symbol for the text you type (replacing (r) with ®).
Tip - Check existing text
Although AutoCorrect doesn't go through and check words in an existing document against the items in the AutoCorrect list, you can download a macro from the Microsoft Knowledge Base that will take care of this for you. Go to http://www.microsoft.com and choose Support; then search for Knowledge Base Article number Q210869. This is a macro written for Word 2000, but it works in Word 2002 as well.
Controlling AutoCorrect
AutoCorrect is one of those great features that can cut down on the time and effort you spend ensuring the accuracy and professionalism of your documents. It can also get in your way at times, when you mean to enter a word in all caps, or you want to spell something incorrectly, or you purposefully lowercase the labels in a table. You have the option of changing AutoCorrect options one at a time, while you're working in your document, and all at once, by changing the selections in the AutoCorrect dialog box.
Working with AutoCorrect in Your Document
The first time you notice AutoCorrect might be when it has just changed something you've typed. Suppose, for example, that you began typing a sentence and neglected the first capital letter. AutoCorrect makes the change. You then have the option of continuing on and accepting the change or stopping and undoing it (assuming, of course, you meant to leave the character lowercase). To see your AutoCorrect choices after a change is made, follow these steps:
- Position the pointer over the word that was changed. A blue underline appears at the beginning of the word.
- Hover the mouse pointer over the line for a second, and the line changes to the AutoCorrect Options button. To the right of the button is a down arrow.
- Click the down arrow to see a menu of choices. These choices reflect the type of change that's been made and give you the option of undoing the change or changing other AutoCorrect options. (See Figure 6-13.)
- Click the command you want in the drop-down menu and Word makes the change. You can then continue with your text entry and editing.
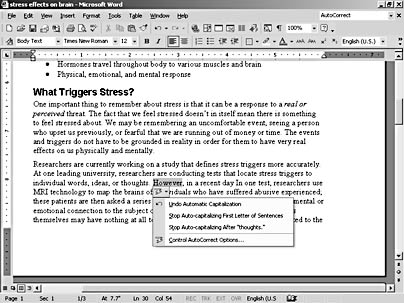
Figure 6-13. You can make changes to the way AutoCorrect does things while continuing to work in your document.
Setting AutoCorrect Options
It's good to know how to set the AutoCorrect options just the way you want them. You can control the items that AutoCorrect fixes; you can also create your own words and phrases AutoCorrect inserts (you can even add images in place of text, if you choose). You can have AutoCorrect pull correct spellings from the spelling checker as you type.
To open the AutoCorrect dialog box shown in Figure 6-14, choose Tools, AutoCorrect Options. The AutoCorrect dialog box allows you to control the various changes AutoCorrect makes for you. Table 6-2 describes your choices in the AutoCorrect dialog box.
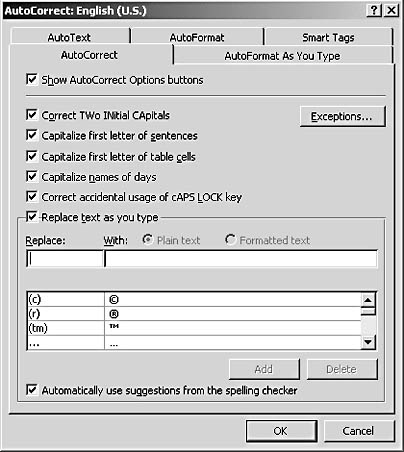
Figure 6-14. You can make changes to the way AutoCorrect does things while continuing to work in your document.
Table 6-2. Setting AutoCorrect Options
| AutoCorrect Option | Description | Use |
|---|---|---|
Show AutoCorrect Options Buttons | Displays the AutoCorrect Options button when a change is automatically made in your document | You want to be able to go back and undo AutoCorrect changes. |
Correct TWo INitial CApitals | Finds and changes any capitalization inconsistencies such as two capital letters in the middle of a word | You are not entering data with acronyms or unusual capitalization. |
Capitalize First Letter Of Sentences | Capitalizes the first word in a new sentence | You are typing sentences. |
Capitalize First Letter Of Table Cells | Capitalizes the data entered in the cells of a table | You want to capitalize table data. |
Capitalize Names Of Days | Capitalizes any full names of days of the week in your document | You want the days of the week to be shown traditionally; if you want days to occur lowercase as part of a design element, clear this check box. |
Correct Accidental Usage Of Caps Lock Key | Catches the accidental pressing of the Caps Lock key, releases it, and changes the erroneous capitalization of characters | You want AutoCorrect to watch for and catch unusual capitalization. |
Replace Text As You Type | Enables AutoCorrect to make changes as you type. If you disable this option, AutoCorrect will not make changes on the fly | You want AutoCorrect to make changes as you work. |
Replace: With: | Enables you to add your own AutoCorrect entries to the AutoCorrect library | You have words, phrases, text blocks, or graphics that you want to insert automatically in your document. |
Automatically Use Suggestions From The Spelling Checker | Looks for suggestions for misspelled words by consulting the spelling checker's dictionary | You want to include words and phrases the spelling checker recognizes as part of the AutoCorrect library. |
Exceptions | Enables you to "teach" AutoCorrect which items not to correct automatically | You have particular words, phrases, acronyms, or items that you don't want AutoCorrect to change. |
Adding AutoCorrect Entries
One of the great things about AutoCorrect, besides the fact that it catches your errors and makes you look good, is that you can cut down on data entry time by having Word automatically insert words, phrases, or even logos or graphics when it finds an AutoCorrect item you've entered.
For example, suppose that it's part of your company's policy to use the real company logo whenever the name of the company is shown in text. You can create an AutoCorrect entry that does that for you, automatically. Here's how:
- Start by creating the item you want to place in the document, complete with the formatting, coloring, and spacing you want.
- Select the item.
- Choose Tools, AutoCorrect Options. The AutoCorrect dialog box appears.
- Click Formatted Text in the Replace Text As You Type section if you've added formatting features to the word or phrase.
- Type the characters you want to use to trigger the replacement in the Replace box (see Figure 6-15).
- Click Add. Word then adds the new AutoCorrect entry to the list.
- Test it. Click in your document and type the characters you entered in the Replace box. AutoCorrect will place the new addition at the insertion point.
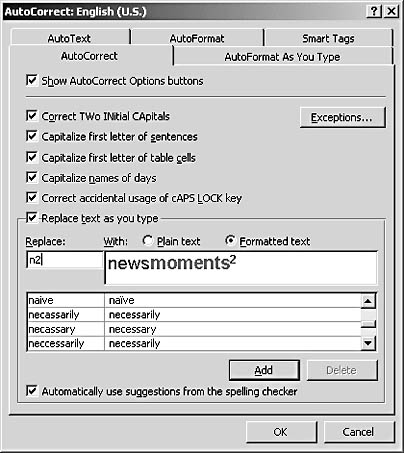
Figure 6-15. You can create AutoCorrect entries that replace the text you type with words, phrases, logos, graphics, and even blocks of text you enter.
Tip - Save keystrokes
You can use AutoCorrect to enter blocks of text you type often, saving you the trouble of retyping text over and over again. For example, if you include your organization's mission statement on everything you print, you can create an AutoCorrect entry that inserts the entire mission statement when you type the letters ms.
Replacing and Deleting AutoCorrect Entries
You can edit the AutoCorrect entries you create by simply recreating and then replacing them. For example, if you want to modify the logo you entered as an AutoCorrect item, you can simply make the change, select the item, and then enter the same trigger word in the Replace box on the AutoCorrect tab of the AutoCorrect dialog box. The button beneath the list changes from Add to Replace. Click Replace to add the new AutoCorrect entry in place of the original. Word will display a message box asking you to confirm the action. Click Yes, and the AutoCorrect entry is replaced.
You can delete entries in a similar way. Display the AutoCorrect dialog box and type the characters for the trigger item in the Replace box on the AutoCorrect tab. When AutoCorrect displays the item you want to delete, click it to select it; then click Delete.
Tip - Catch accidental deletions
A warning about deleting AutoCorrect entries, however: Word doesn't prompt you to confirm that you do, in fact, mean to delete the item. It's simply removed from the list. If you clicked Delete accidentally and want to save the AutoCorrect entry you've just deleted, you have one last chance—until you click OK or select another entry, AutoCorrect displays the item just deleted in the Replace and With boxes. You can click Add to add the item back to the list, if you catch the error in time.
Entering Exceptions
As great as AutoCorrect is, there will be times when you don't want it interfering with what you're trying to do. You might be typing a document full of chemical compounds, for example, or creating a list of access codes for the new mainframe. You don't want AutoCorrect to get in there and change the capitalization and perhaps your character order while you type. In this case, you have two options: You can disable AutoCorrect while you're working on this document, or you can create an exception to teach AutoCorrect what you don't want it to change.
Tip - Add exceptions automatically
If you've selected Automatically Add Words to List in the AutoCorrect Exceptions dialog box, Word automatically updates your list of selections if you press Backspace after Word AutoCorrects a word and then type the word as you want it to appear. If you use Undo, Word will not update your list with your change.
To enter AutoCorrect exceptions, you click the Exceptions button on the AutoCorrect tab in the AutoCorrect dialog box. The AutoCorrect Exceptions dialog box shown in Figure 6-16 appears.

Figure 6-16. You can teach AutoCorrect not to correct certain items that are unique to the documents you create.
AutoCorrect lets you create three different kinds of exceptions:
- First Letter capitalization controls abbreviations and the words immediately following them (For example, you might have a phrase such as "after the merging of Lake Ltd. and Smith Co.," in which the word "and" should not be capitalized.)
- INitial CAps allows you to enter words and phrases with unusual capitalization that you don't want changed. This might include company names or abbreviations or terms unique to your business or industry.
- Other Corrections enables you to add additional items you don't want AutoCorrect to change. This might include names, locations, unique spellings, and phrases that reflect terminology particular to your work.
To add an exception to one of the Exception lists, follow these steps:
- Display the AutoCorrect Exceptions dialog box, if necessary, by clicking the Exceptions button in the AutoCorrect dialog box.
- Click the tab for the exception type you want to enter.
- Click in the text box and type the item you want to add.
- Click Add to add the exception to the AutoCorrect Exceptions list.
- Click OK to close the dialog box and return to your document.
EAN: 2147483647
Pages: 337