Seeing What s Going On with RevealFormatting
3 4
In previous versions of Word, you could use the What's This? command in the Help menu to display formatting information about text at the insertion point. Word 2002 gives you the means not only to display but also to change formatting information with a few simple clicks.
To display the Reveal Formatting task pane, follow these steps:
- Select the text you want to work with.
- Choose Format, Reveal Formatting. The Reveal Formatting task pane appears along the right side of the screen. (See Figure 6-7.)
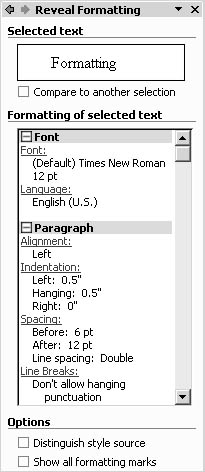
Figure 6-7. The Reveal Formatting task pane lists the various format settings for the text at the insertion point.
The Reveal Formatting task pane lists all the different format specifications for the selected text. The format items are divided into three groups:
- Font. This section includes format items that have to do with the characters used in the document, including the font type and size in use, as well as the language selected for the document.
- Paragraph. This section contains format items that control the paragraph choices for the selected text. These items list the selected paragraph style, the text alignment, indentation settings, and paragraph spacing (before and after spacing, as well as line spacing settings).
- Section. This section includes the format settings you use to control larger portions of the document, including overall margin settings, page layout choices, and paper selections.
Making Changes from Reveal Formatting
You can make formatting changes to the text at the insertion point right from the Reveal Formatting task pane. By simply clicking the formatting item you want to change (the links are shown in blue, underlined text), you can move directly to that dialog box. To make formatting changes directly from the task pane, follow these steps:
- Select the text for which you want to change the format.
- Choose Format, Reveal Formatting. The Reveal Formatting task pane appears.
- Click the formatting item you want to change. For example, click the Spacing link in the task pane. The Paragraph dialog box appears with the Indents And Spacing tab displayed, as shown in Figure 6-8.
- Make your changes as needed and close the dialog box. You are returned to your displayed document.
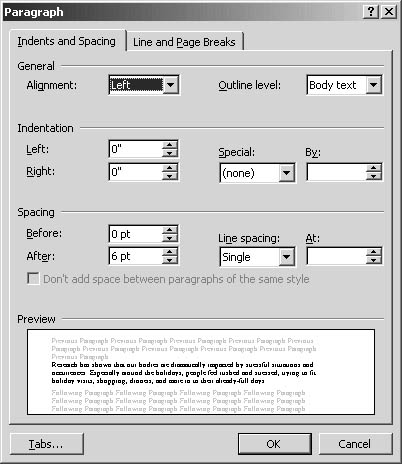
Figure 6-8. You can save time and effort by moving directly to the changes you want to make from the Reveal Formatting task pane.
Displaying Formatting Marks from Reveal Formatting
Do you work with formatting marks showing in your documents? For those times when you need to grab the last paragraph mark, move blocks of text from one section to another, or make sure you have only one space between words, you can display and work with paragraph marks in your document.
You can display formatting marks easily from the Reveal Formatting task pane by selecting the Show All Formatting Marks check box at the bottom of the task pane. The marks are then displayed in your document, as Figure 6-9 shows.
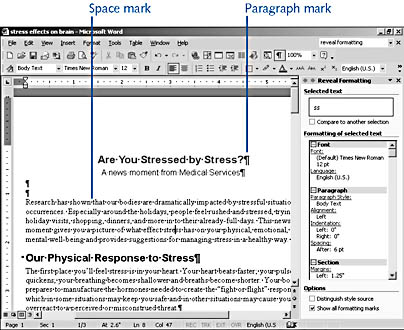
Figure 6-9. Display formatting marks by selecting the check box at the bottom of the Reveal Formatting task pane.
Changing the Displayed Formatting Marks
By default, all available formatting marks—tabs, spaces, paragraph marks, hidden text, and hyphens—are shown when you select Show All Formatting Marks in the Reveal Formatting task pane. You can change the marks that are displayed by following these steps:
- Choose Tools, Options. The Options dialog box is displayed. (See Figure 6-10.)
- Click the View tab, if necessary. In the Formatting Marks section, select the check boxes you want to include.
Tip - Avoid screen clutter
Some people are able to work with formatting marks on and barely notice them; others are distracted by the dots and symbols stuffed between words and paragraphs in their text. You can hide formatting marks quickly by clicking the Show/Hide button on the Standard toolbar.
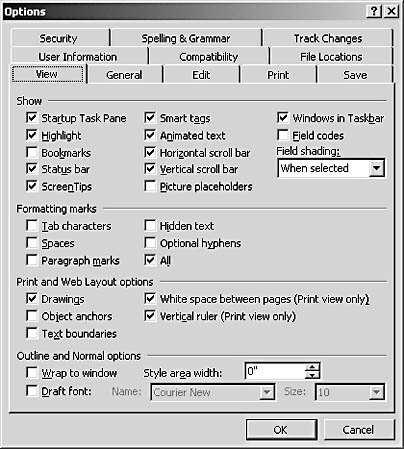
Figure 6-10. Switch to the View tab in the Options dialog box to change which formatting marks are displayed.
Comparing Other Text Formats
Another option available to you in the Reveal Formatting task pane is the ability to compare and contrast similar-but-different text styles. Have you ever spent time studying a heading, wondering why it doesn't look quite right when compared to another heading in your document? Now Reveal Formatting enables you to click on one text item and then compare it to another, showing the differences in font styles and sizes, spacing, and so forth.
To compare two text segments in your document, follow these steps:
- Select the text you want to start with. You can either select a block of text or simply click the mouse pointer in the text you want to use.
- Display the Reveal Formatting task pane, if needed, by choosing Format, Reveal Formatting.
- Select the Compare To Another Selection check box, just beneath the Selected Text box in the Reveal Formatting task pane. Another text selection box opens in the task pane, showing a duplicate of the text you selected.
- Now select the text to which you want to compare the original text. The task pane shows the formatting differences between the two selections, as Figure 6-11 shows.

Figure 6-11. The Reveal Formatting task pane displays the formatting differences between the two text selections.
Making Changes in Compared Text
Suppose that comparing two different types of heading reveals the need to reformat one type of heading throughout your entire document. Word gives you the means to do this easily. Right there in the Reveal Formatting task pane, you can choose the option that will modify every heading formatted with those particular settings throughout the rest of your document. To make this kind of change, follow these steps:
- Click the down arrow to the right of the compared text. A drop-down menu appears (see Figure 6-12).
You can choose Select All Text With Similar Formatting, which highlights all text in the document with the same specifications; Apply Formatting Of Original Selection, which applies the format of the first item to the second item; or Clear Formatting, which clears the formatting of the second item.
Tip - Find similar formats
When the Reveal Formatting task pane is not displayed, you can easily find and highlight all text with the same format as the text at the insertion point. Just right-click the text and choose Select Text With Similar Formatting from the shortcut menu. All similar text items throughout your document will be selected, and you can make your changes as needed.
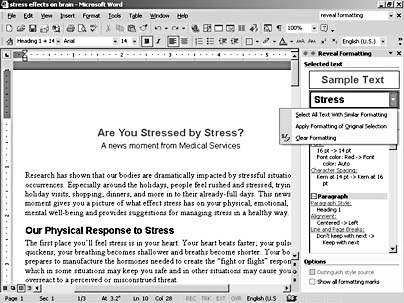
Figure 6-12. Select the action to take in the Reveal Formatting task pane.
- Choose the option you want and Word reformats the text accordingly. If you don't like the change, choose Edit, Undo to reverse your changes.
Where Did That Style Come From?
One final offering in the Reveal Formatting task pane that's worth a mention: You can find out what the source of a particular style is by selecting the Distinguish Style Source check box at the bottom of the Reveal Formatting task pane.
Selecting this check box causes Word to display the style from which the new style was created; for example, if a Note style applied to a segment of text in your document was created based on your Body Text style, the task pane will show you that information. That's helpful to know if you're planning to change the Body Text style at some point—you'll be able to see at a glance which other items in your document will be affected by the change.
EAN: 2147483647
Pages: 337