Formatting Text Efficiently
3 4
As with most Word tasks, you can format text using menu options, keyboard shortcuts, or toolbar buttons. In addition, you can set formatting options before you enter text, or you can apply formatting to existing text. One of the most common methods of formatting text is by using the buttons readily available on the Formatting toolbar, shown in Figure 5-1.

Figure 5-1. The Formatting toolbar is displayed by default; it provides quick access to the most frequently used formatting commands.
Tip - Add and remove toolbar buttons
You can easily add buttons to and remove buttons from the Formatting toolbar by clicking the down arrow at the right end of the Formatting toolbar, pointing to Add Or Remove Buttons, selecting Formatting, and then selecting the buttons you want to show or hide. The following Formatting toolbar buttons can be added: Grow Font, Shrink Font, Superscript, Subscript, and Language.
For more information about customizing toolbars, see Chapter 38, "Customizing Word and Maximizing Accessibility."
Using the Formatting toolbar is often the quickest way to get formatting results, but once you memorize the key combinations, keyboard shortcuts also enable you to format text quickly and efficiently. And although choosing menu options to format text is generally the slowest method, menus can provide more control and flexibility when you are formatting text as well as allow you to apply multiple formatting settings at one time.
Regardless of whether you use toolbar buttons, keyboard shortcuts, or menu options, the procedure is basically the same: you select the text you want to format (or position the insertion point where you want formatting to begin when you start typing) and then click the appropriate toolbar button, press the keyboard shortcut, or choose a menu option. In this section, you'll learn how to manipulate text using all three techniques.
Note
Most toolbar buttons and keyboard shortcuts are toggle commands, which means that you perform the same action both to apply and to remove a formatting attribute. For example, selecting unformatted text and pressing Ctrl+B (or clicking the Bold button on the Formatting toolbar) applies boldface formatting to the selected text, and then pressing Ctrl+B (or clicking Bold) again removes the boldface formatting from the selected text.
Specifying Fonts and Sizes
As you know, the world of documents embraces numerous fonts. Thus, it should come as no surprise that Word can handle thousands of Windows-compatible fonts, including Adobe PostScript fonts (if the Adobe Type Manager is installed) and TrueType fonts. The quickest way to specify a font is to select the text you want to format and then select a font in the Font drop-down list located on the Formatting toolbar, as shown in Figure 5-2. The Font drop-down list contains all the currently available fonts.
Note
The default fonts installed with Microsoft Office are all TrueType fonts. With TrueType fonts, the text displayed on your screen is the same as the text in your printed document.
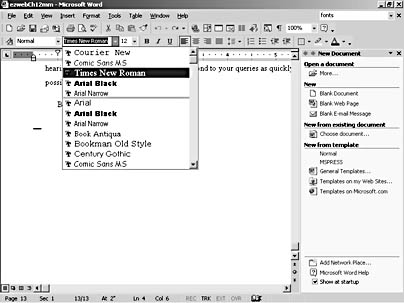
Figure 5-2. By default, the Font drop-down list displays font names in their respective fonts.
You can specify whether the font names in the Font drop-down list are displayed in their respective fonts or in plain text. To configure this setting, follow these steps:
- Choose Tools, Customize, and then click the Options tab in the Customize dialog box.
- Select or clear the List Font Names In Their Font check box.
Serif vs. Sans Serif Fonts
All fonts can be classified as serif or sans serif. You can easily differentiate between the two font types. Serif fonts add "hooks" to their letters, similar to the font used in the following paragraph's text. Examples of serif fonts are Times and Times New Roman. In contrast, sans serif fonts have plain-edged letters, like the font used to create the headings throughout this book. Examples of sans serif fonts are Arial and Helvetica. Using sans serif fonts for headings and serif fonts for body text is common practice in the print community because most readers find it easiest to read.
After you select a font for your text, you'll most likely want to specify a size. The quickest way to size text is by using the Size drop-down list, located to the right of the Font drop-down list on the Formatting toolbar (see Figure 5-1). As you probably know, font sizes are measured in points, and 72 points equals an inch. By default, the Size drop-down list provides a variety of common point sizes. To apply a font size using the Size drop-down list, you simply follow these steps:
- Select the text you want to resize.
- Click the Size down arrow, and select a size from the drop-down list.
If you want to use a font size not listed in the Size drop-down list, you need to do the following:
- Select the text you want to resize.
- Click the Size box to select the currently displayed font size (or press Ctrl+Shift+P), and then enter a new value.
You can enter half-point sizes in the Size box using decimal notation (for example, 10.5), and you can specify sizes as tiny as 1 point and as large as 1,638 points (which is approximately two feet high).
Tip
When you type large numbers in the Size box, don't include a comma separator—it'll only confuse Word and slow you down.
As a Word veteran, you won't be surprised to hear that you can also resize text using keyboard shortcuts. Table 5-1 lists the keyboard shortcuts you can use to change the font size.
Applying Multiple Font Attributes at One Time
Formatting toolbar buttons and keyboard shortcuts are great for simple formatting needs. But in other instances, you might want to take advantage of a not-so-readily accessible formatting effect (such as Emboss or Superscript) or apply a number of formatting attributes at one time. In those cases, a better approach would be to use the Font dialog box, shown in Figure 5-3. To format text using the Font dialog box, follow these steps:
- Select the text you want to format, click within the word you want to format, or position the insertion point where you want formatting to start when you begin typing.
- Choose Format, Font (or right-click the text and choose Font on the shortcut menu).
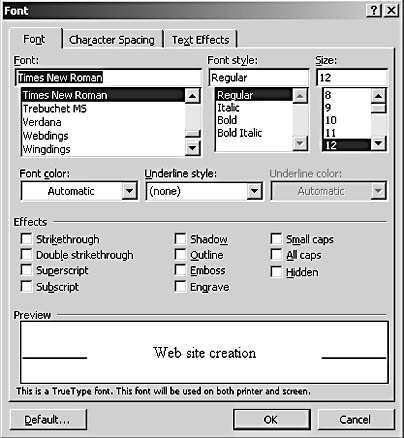
Figure 5-3. The Font dialog box enables you to select additional formatting effects as well as format multiple font attributes at one time, including font, size, color, and effects.
In the Font dialog box, you can specify the font name, font style (including italic, bold, and bold italic), size, underline style, effects, and more. The Font dialog box also contains a preview window, so you can see how your font selections will appear in your document.
Table 5-1. Keyboard Shortcuts for Sizing Text
| Keyboard Shortcut | Sizing Effect |
|---|---|
Ctrl+Shift+P, and then enter a font size or press the Up and Down Arrow keys to choose a font size from the Size drop- down list | Changes font size to a specified size |
Ctrl+] | Enlarges font by 1 point |
Ctrl+[ | Reduces font by 1 point |
Ctrl+Shift+> | Increases font to the next larger size in the Size drop-down list |
Ctrl+Shift+< | Decreases font to the next smaller size in the Size drop-down list |
Applying Bold, Italic, and Underline Attributes
In addition to selecting fonts and resizing text, you can apply formatting attributes. The Formatting toolbar includes buttons for the three most commonly used formatting attributes—Bold, Italic, and Underline. To apply boldface, italic, and underlining to your text, simply click the appropriate toolbar button or press the keyboard shortcut, as listed in Table 5-2.
Table 5-2. Toolbar Buttons and Keyboard Shortcuts for Applying Boldface, Italic, and Underlining
| Format | Toolbar Button | Keyboard Shortcut |
|---|---|---|
Bold | | Ctrl+B |
Italic | | Ctrl+I |
Underline | | Ctrl+U |
Underline Words Only | None | Ctrl+Shift+W |
Double Underline | None | Ctrl+Shift+D |


The Underline button and keyboard shortcuts allow you to quickly apply standard underlining, but you can access a greater variety of underline styles using the Font dialog box. To choose an underline style in the Font dialog box, click the Underline Style down arrow in the Font dialog box (see Figure 5-3) and select an underline style from the list. Figure 5-4 shows some of the Underline Style options in action.
Tip - Remove or change a custom underline
To quickly remove a custom underline or to change the underline to a standard underline, select the underlined text (or click within the word you want to remove the underline from), and press Ctrl+U or click the Underline button on the Formatting toolbar once to remove the custom underline and twice to remove the underline altogether. The first time you execute the Underline toggle command, the custom line changes to a standard (straight-line) underline, and the second time you execute the command, the standard underline is removed.
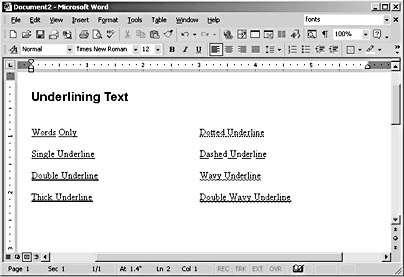
Figure 5-4. Word provides a variety of underline styles, including the styles shown here, which you can apply to text by using the Font dialog box.
Troubleshooting
Word Won't Let Me Underline a Blank Line
In Word, you can't underline a blank line. Instead, you must create the appearance of an underline by using any of the following procedures:
- Use the Border feature to add a border to the bottom of the line (by clicking the Border down arrow on the Formatting toolbar and choosing Bottom Border on the drop-down menu). (See Chapter 7, "Aligning Information and Styling Paragraphs," for more information about adding borders.)
- Press Shift+hyphen (creates an underscore; usually located to the right of the 9 key) repeatedly.
- Create nonbreaking spaces by pressing Ctrl+Shift+Spacebar (you can hold down the keys to quickly create a series of nonbreaking spaces), select the nonbreaking spaces, and then apply underlining using the technique described above.
Changing Text Color
Applying color to text and underlining provides another avenue by which you can customize text attributes. By default, Word displays and prints black text on a white background. (You can configure your view in Word to display white text on a blue background by choosing Tools, Options, clicking the General tab, and selecting the Blue Background, White Text check box, but keep in mind that this setting changes your view, not the printed text color.) In many cases, you might want to color your text to add pizzazz to your documents. For example, you might color text when you're creating a brochure, a Web page, an e-mail message, or any other document in which the text will be displayed on a colored background.
The most straightforward way to apply color to text is to follow these steps:
- Select the text you want to color.
- Click the Font Color down arrow on the Formatting toolbar.
- Select a color from the color palette, shown in Figure 5-5.
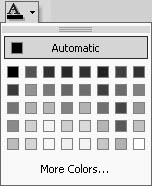
Figure 5-5. You use the color palette to specify the color you want to apply to selected text.
After you've colored some text, the Font Color button retains that color setting throughout your current session (or until you select another color in the color palette). The underline below the A on the Font Color button reflects the most recently selected color. You can select other text and simply click the Font Color button to color the text using the same color (instead of having to repeatedly select the same color in the color palette each time you want to apply the color). By default, the Font Color button is set to Automatic (which generally equates to black).
If you're going to be coloring text frequently within a document, you can drag the top bar of the color palette to display it as a floating toolbar that remains available as you work, as shown in Figure 5-6. To close the Font Color toolbar after you've detached it from the Formatting toolbar, simply click the Close button—the color palette will be available to you again via the Font Color down arrow on the Formatting toolbar whenever you need it.
In addition to these methods of changing font color, you can also color text using the Font dialog box, shown in Figure 5-3. Notice that you can specify a font color as well as an underline color. Clicking either color down arrow in the Font dialog box opens the color palette, which you can use to apply an appropriate color to your text.
For more information about creating custom colors, see Chapter 16, "Enlivening Documents with Drawings and AutoShapes."
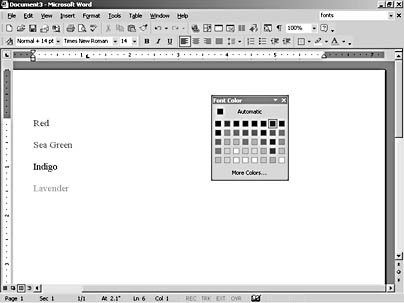
Figure 5-6. You can drag the color palette by its top bar to display it as a floating toolbar.
Copying Styles Using the Format Painter
After you've formatted your text, you might want to apply similar attributes to other text. For example, suppose you've used the following settings to style a book title that's embedded in body text: bold, italic, 12 points, Arial, red. When you type the next book title in your document, you could either manually apply all the formatting settings or use the Format Painter tool to copy and paste the settings from the last book title to the current book title. Usually, the quick-and-convenient route of copying formatting specifications will be preferable to manually reapplying attributes.
Using the Format Painter tool is a breeze. By default, the Format Painter tool is available on the Standard toolbar. To use the Format Painter, follow these steps:
- Select the text containing the formatting you want to apply to other text.
- Click the Format Painter button.
- Select the text you want to format.
To format multiple instances of text using the Format Painter, select the text you want to emulate and double-click the Format Painter, which keeps the Format Painter turned on until you turn it off. All text you select while the Format Painter is activated will be reformatted. To turn off the Format Painter, click the Format Painter button on the Standard toolbar.
You can also use keyboard commands to access the Format Painter tool. To do so, follow these steps:
- Select the formatted text you want to emulate, and press Ctrl+Shift+C.
- Select the text you want to format, and press Ctrl+Shift+V to apply the formatting attributes.
The advantage of using keyboard shortcuts in this case is that you can repeat the Ctrl+Shift+V command as many times as necessary on various instances of selected text—the formatting settings are retained during the current session until you execute another Ctrl+Shift+C command. Sometimes, having a group of formatting commands available with a single keyboard shortcut can prove to be a real time-saver.
Adding Text Effects and Animation
In addition to basic formatting, Word provides a number of other text effects that you can access from the Font dialog box (see Figure 5-3). Figure 5-7 illustrates these text effects. The following options are available in the Effects section of the Font tab:
- Strikethrough
- Double Strikethrough
- Superscript (Ctrl+Shift+=)
- Subscript (Ctrl+=)
- Shadow
- Outline
- Emboss
- Engrave
- Small Caps (Ctrl+Shift+K)
- All Caps (Ctrl+Shift+A)
- Hidden (Ctrl+Shift+H)
Adding an effect to text using the Font dialog box is accomplished in a predictable manner:
- Click within a word, select the text you want to format, or position the insertion point where you want an effect to begin when you start typing.
- Choose Format, Font.
- Select the appropriate check box on the Font tab, and click OK.
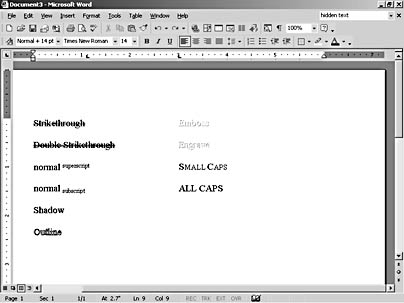
Figure 5-7. Word offers a number of font effects that you can apply to existing text.
You can also add animation effects by clicking the Text Effects tab in the Font dialog box. The animations available in Word are shown here:
- (None) applies no animation effects (the default selection).
- Blinking Background creates a blinking effect by alternating reverse text within a black rectangle with regular text.
- Las Vegas Lights surrounds selected text with a looping series of blinking colored shapes.
- Marching Black Ants borders selected text with a black dashed line that moves clockwise.
- Marching Red Ants borders selected text with a red dashed line that moves clockwise.
- Shimmer repeatedly blurs and unblurs selected text.
- Sparkle Text displays moving colored "sparkles" on top of the selected text.
Working with Hidden Text
You can't see it in Figure 5-7, but the word Hidden is inserted below ALL CAPS and formatted using the Hidden text effect. You can create hidden text by selecting text and then selecting the Hidden check box on the Font tab in the Font dialog box or by pressing Ctrl+Shift+H. Hidden text is useful for making notes to yourself. Word uses hidden text for certain components, including index fields, bookmarks, and table of contents fields.
To display hidden text on screen, click the Show/Hide button on the Standard toolbar or press Ctrl+Shift+8 to toggle your display. Hidden text is identified with a dotted underline.
Keep in mind that if you print your document while hidden text is displayed on your screen, the text will be printed by default. Likewise, if you click the Show/Hide button to hide all hidden text, the hidden text will not be printed when you print your document by default. But if you desire, you can print hidden text that's in a document even if the hidden text isn't displayed on screen. To do so, verify that the hidden text is not displayed on screen, choose Tools, Options, click the Print tab, select the Hidden Text check box on the Print tab, click OK, and then print the document.
The Text Effects tab in the Font dialog box is shown in Figure 5-8. To see each effect in action, press Ctrl+D to open the Font dialog box, click the Text Effects tab, and then click each option in the Animations list. The Preview section at the bottom of the Text Effects tab shows a small animated display as you select each option.
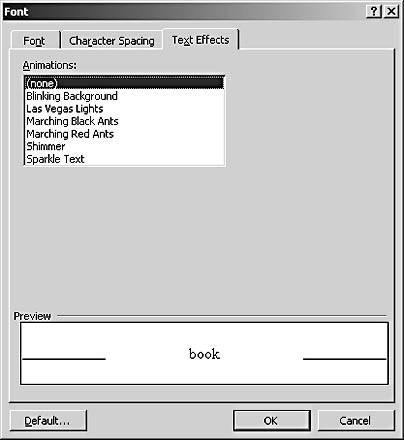
Figure 5-8. Word provides a number of animated text effects that you can use within your documents.
Tip - Animate with care
Animated text should be used sparingly. Animation can serve a purpose in a few select cases, but the effects are frequently distracting and can be downright annoying when overused. In addition, you need to consider software limitations when you use animated text. For example, earlier versions of Word such as Word 95 and Word 6, don't recognize animations, and of course animated text can't be printed (which could be a concern).
Inside Out
Although using the text animation feature seems like a natural fit for creating Web pages, the feature doesn't work in Word documents saved as Web pages. When you save a document containing animated text, Word displays a message box stating that the animated text will be displayed as italicized text. If you truly need to show animated text in a document on line, the only workaround at this time is to create a link on your Web page that points to the Word document containing the animation.
Changing Case
Occasionally, you might want to change lowercase text to all caps, all caps to lowercase, or mixed-cased text to all caps or all lowercase. Fortunately, you can perform these potentially tedious maneuvers without opening the Font dialog box or retyping text. In fact, all you need to do is to select the text you want to change and press Ctrl+Shift+A to alternate between all lowercase and all uppercase or press Shift+F3 to cycle through all lowercase, initial capped, and all uppercase.
In addition, Word offers more advanced capitalization schemes in the Change Case dialog box. To open the Change Case dialog box, shown in Figure 5-9, choose Format, Change Case. Notice that you can format selected text using the following options: Sentence Case, Lowercase, Uppercase, Title Case, or Toggle Case.
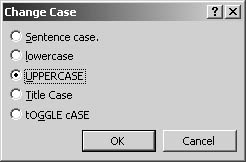
Figure 5-9. The Change Case dialog box enables you to quickly revise uppercase and lowercase letters.
Controlling Character Spacing
Another key font formatting issue is character spacing. Word provides space-tweaking features that were once available only to professional typesetters. You can (and should) use character spacing features to improve the look and readability of your documents. To view the primary character spacing options, choose Format, Font, and click the Character Spacing tab, as shown in Figure 5-10.
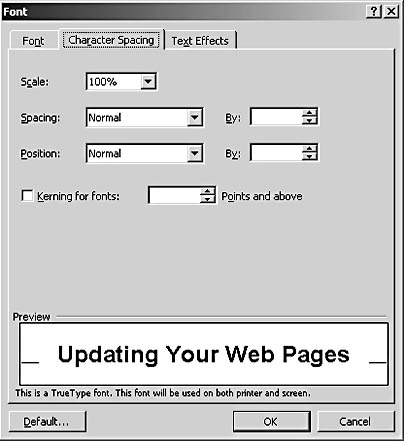
Figure 5-10. The Character Spacing tab in the Font dialog box enables you to rescale selected text, adjust spacing between characters, and reposition text.
You can control the following spacing parameters:
- Scale lets you stretch or compress selected text characters horizontally as a percentage of the text's current size for design purposes. You can choose a scaling option from the drop-down list, or you can manually enter a scaling value from 1% to 600%. The Scale option is set to 100% for normal text.
- Spacing enables you to expand or condense the spacing between text characters by the amount you enter in the By box. If you decide you don't like the expanded or condensed spacing settings, you can choose Normal in the Spacing drop-down list to revert to standard letter spacing.
Note
To reiterate, the Scale option narrows and widens the actual text characters, whereas the Spacing option adjusts the space between letters.
- Position allows you to raise or lower selected text relative to the text's baseline by the amount you enter in the By box. To reset the text on the baseline, choose Normal in the drop-down list.
- Kerning For Fonts enables Word to automatically adjust the amount of space between specific character combinations so that words and letters look evenly spaced. You can specify the minimum font size that should be automatically kerned in the Points And Above box. Generally, kerning is used for headings and larger fonts sizes (12 to 14 points and larger). In Word, kerning works only with TrueType or Adobe Type Manager fonts. Be aware that turning on the Kerning For Fonts feature can slow processing. If you want to manually kern characters, select the characters and use the Spacing option to tighten or loosen the characters' positions.
The Character Spacing tab also includes a Default button. This Default button enables you to store all the current settings for the Font, Character Spacing, and Text Effects tabs in the Font dialog box as the default settings for the active document as well as for all new documents based on the current template. If your current document uses the Normal template, clicking the Default button will change the defaults for all new blank documents you create, so be careful.
Clearing Formatting Attributes
Up to now, we've been looking at how to add font formatting attributes, but at times, you might want to remove all formatting attributes from within a paragraph. Word provides a quick way to clear all formatting attributes from text at one time. To clear all formatting from a single word or selected text, follow these steps:
- Select the word or text you want to convert to plain text.
- Press Ctrl+Spacebar.
Tip
You can remove formatting from an entire document by pressing Ctrl+A to select the entire document and then pressing Ctrl+Spacebar.
newfeature! Similarly, you can remove formatting by using the new Styles And Formatting task pane. To do so, follow these steps:
- Select the word or text you want to clear.
- Click the Styles And Formatting button on the Formatting toolbar (or select Styles And Formatting in the Task Pane drop-down list if the task pane is already open).
- In the Pick Formatting To Apply section, choose Clear Formatting in the list.
Troubleshooting
I Want to Remove a Single Character Formatting Attribute (Such as Boldfacing) That's Scattered Throughout a Paragraph
Word offers a couple of handy ways to clear all formatting from selected text, but you're still left to your own devices if you want to clear multiple instances of a single formatting attribute from text. Fortunately, there's an easy workaround. To quickly remove all instances of a single formatting attribute from an entire paragraph (or other selected text), follow these steps:
- Select the paragraph (triple-click within the paragraph) from which you want to clear a formatting attribute.
- Execute the formatting attribute's command as follows:
- Choose the command once if the attribute is applied to the first letter in the paragraph. (Word toggles a format property based on the formatting of the first letter in the selected text.)
- Choose the command twice if the text at the beginning of the paragraph doesn't contain the formatting attribute you are removing.
For example, let's say you want to remove all the boldface formatting within a paragraph that begins with a non-boldface word but contains a few words formatted as boldface scattered throughout the remainder of the paragraph. To remove the boldfacing, you'd select the paragraph and press Ctrl+B, Ctrl+B. The first Ctrl+B would apply boldfacing to the entire paragraph, and the second Ctrl+B would remove the boldfacing throughout. Similarly, if you want to remove all the boldface formatting from a paragraph that begins with a boldface word, you press Ctrl+B only once.
EAN: 2147483647
Pages: 337
- Enterprise Application Integration: New Solutions for a Solved Problem or a Challenging Research Field?
- The Effects of an Enterprise Resource Planning System (ERP) Implementation on Job Characteristics – A Study using the Hackman and Oldham Job Characteristics Model
- Distributed Data Warehouse for Geo-spatial Services
- Data Mining for Business Process Reengineering
- Relevance and Micro-Relevance for the Professional as Determinants of IT-Diffusion and IT-Use in Healthcare