Creating Macros Using the Macro Recorder
3 4
As mentioned, you can create macros by using the Macro Recorder, by entering VBA code in the VBE, or by using both tools in combination (for example, you could record the bulk of your macro's code using the Macro Recorder and then tweak the code in the VBE). In this section, we'll look at creating macros by using the Macro Recorder.
Planning a Macro
Regardless of how you create a macro, you need to gather your thoughts before you start. This is especially true when you're creating macros using the Macro Recorder. When you run the Macro Recorder, it tracks all your movements—including any corrections you make along the way. As you can imagine, because Word records every action, the more movements and commands you perform (including any commands you undo), the larger your macro becomes. Therefore, you'll want to make sure that you've outlined the most streamlined approach to creating your macro before you start to record the procedure. If necessary, you might even jot down some notes before you start the recorder. You should consider the following items before creating your macro:
- Carefully plan the steps and commands you want the macro to perform.
- Make sure that you know the keyboard shortcuts you need to use, especially for moving within the document text. (You can't use the mouse in the body of the document when you use the Macro Recorder.) Also keep in mind that using keyboard shortcuts to move around your document is generally more accurate than using the arrow keys. (For example, pressing Ctrl+End to move to the end of your document is more efficient than pressing the Down Arrow key 10 times.)
For more information about using keyboard shortcuts, see Chapter 2, "Creating Documents from Start to Finish."
- Take at least one practice run through the procedure, and take notes, if necessary.
- Anticipate any messages that Word might display that might halt your macro or seem confusing when the macro is run. (For example, if your macro includes using the Find or Replace command on the Edit menu, click More on the Find or Replace tab, and then click All in the Search box. Otherwise, if the macro searches only up or down in the document, it will stop when it reaches the beginning or end of the document and display a message box.)
- Make sure that your macro doesn't depend on the current document's content.
Tip - Create a macro that formats text
If you want to create a macro that formats text, select the text before you start the Macro Recorder, and then run the Macro Recorder and format the selected text as desired, preferably by using keyboard shortcuts or clicking toolbar buttons instead of opening the Font formatting dialog box.
After you've carefully planned the purpose and process of your macro, you're ready to run the recorder. Remember, running the recorder creates Visual Basic code, so you'll be able to view your macro and edit its code after you record it.
Initiating a Recording Procedure
To begin recording a macro, you must first open the Record Macro dialog box, shown in Figure 40-3, by choosing Tools, Macro, Record New Macro. The Record Macro dialog box enables you to set a number of macro parameters before you actually record your macro.
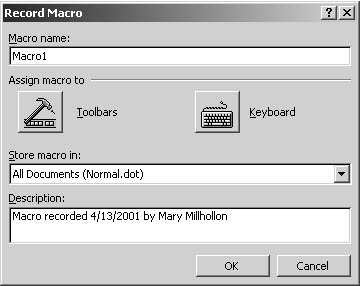
Figure 40-3. The Record Macro dialog box is a one-stop shop for configuring many macro settings.
Using the Record Macro dialog box, you can name your macro, specify how you'll access the macro after it's created, indicate where to store your macro, and add a description, if desired. Although you can configure and change these settings after you create the macro, your best bet is to address these issues up front, while the Record Macro dialog box is open and waiting for your input. If you postpone these tasks, you might overlook them later.
Initiating a Macro in the VBE
This chapter focuses on using the Macro Recorder to create macros, but you can hand-code your macros from the get-go if you want. To begin creating a macro in the VBE, follow these steps:
- Choose Tools, Macro, Macros.
- In the Macros dialog box, type a name for your macro in the Macro Name box. (For information about naming macros, see the section "Naming a Macro.")
- If necessary, ensure that the Macros In drop-down list displays the template or document in which you want to create the macro.
- Click Create.
The VBE opens (as shown later in this chapter, in Figure 40-9), in which you can enter VBA code to create your macro.
Naming a Macro
As you can see in Figure 40-3, the Record Macro dialog box contains a Macro Name box. By default, Word provides a name for your macro, such as Macro1, Macro2, and so forth. This default naming scheme is very vague. Most likely, you'll want to associate a more descriptive name with your macro (and this practice is highly recommended). Fortunately, you can supply any name for your macro as long as you abide by the following guidelines:
- The macro name must begin with a letter.
- The macro name can contain numbers.
- The macro name can contain up to 80 letters and numbers.
- The macro name can't contain spaces or symbols.
If you type a macro name that's invalid, an error message will appear after you click OK, as shown in Figure 40-4. If you see this error message, click OK, and then choose Tools, Macro, Record New Macro to restart the macro creation process.
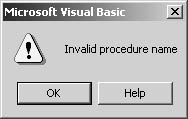
Figure 40-4. Word displays an error message if you type an invalid name in the Macro Name box in the Record Macro dialog box.
Caution
If you give a new macro the same name as an existing macro or Word command, the new macro's actions will replace the existing actions. You should be especially careful not to inadvertently replace existing Word commands. If you attempt to create a macro with the same name as an existing macro, Word will display a warning message box asking whether you would like to replace the existing macro. At that point, you can click Yes to replace the existing macro or click No to return to the Record Macro dialog box (in which case, you can enter a new name for your macro or click Cancel to halt the creation process).
Storing a Macro
In the Record Macro dialog box, you can also specify the location in which you'll store the macro. You can store macros in templates or in individual documents. Your macro is available only when the document or template in which it is stored is open. Most commonly, macros are stored in the Normal template, which means that the macros can be run at any time (because the Normal template is a global template, as described in Chapter 22, "Formatting Documents Using Templates, Wizards, and Add-Ins"). You can store macros in the following locations:
- Active document. If you plan to use a macro in a single document, you can store the macro directly in the document. When you choose this option, the macro will run only when the document is the active document.
- All documents (Normal.dot). You can store a macro in the Normal template, thereby making the macro available to all open files. By default, Word stores macros you create in the Normal template.
- Template. You can store a macro in a template other than the Normal template if a template is attached to the current document or open when you create the macro. When you do this, the macro is available only when the template is opened or attached to the active document.
To specify where you want to store a macro, open the Record Macro dialog box (by choosing Tools, Macro, Record New Macro), click the Store Macro In down arrow, and then select the location where you'd like to store the macro in the drop-down list.
Associating a Description with a Macro
The Record Macro dialog box also enables you to provide a brief description of macros you create. This description is helpful for future use, especially if you're planning to share the macro with others or if you modify or update an existing macro. By default, Word provides the date and author of a macro in the Description box. You can edit or delete this information and add custom information by typing in the Description box. Keep in mind that you can't edit text in the Description box for Word commands and other read-only macros.
Assigning a Macro to a Toolbar, a Menu, or a Keyboard Shortcut
When you create a macro, you can assign the macro to a keyboard shortcut, a toolbar button, or a menu command (or you can choose not to create an association). If you choose to create a toolbar, menu, or keyboard shortcut association, the recording process will begin directly after you make the assignment. If you opt not to associate the macro with a toolbar, menu, or keyboard shortcut, you're ready to begin recording, as described in the section "Recording a Macro." In this section, you'll learn how to create associations for your macros.
Note
If you don't assign some sort of shortcut to your macro, you'll need to open the Macros dialog box, select the macro name, and then click Run each time you want to run your macro.
Assigning a Macro to a Toolbar or Menu
As mentioned, you can associate a macro with a toolbar button or menu command to make the macro easily accessible. As you'll see, customizing your toolbars or menus with macro commands is similar to customizing toolbars and menus in general. To create a toolbar button or menu command association for your macro, follow these steps:
- In the Record Macro dialog box (choose Tools, Macro, Record New Macro), click the Toolbars button.
- In the Customize dialog box, click the Commands tab, shown in Figure 40-5.
- In the Commands list, click the name of the macro you're recording, and drag the macro to the appropriate toolbar or menu.
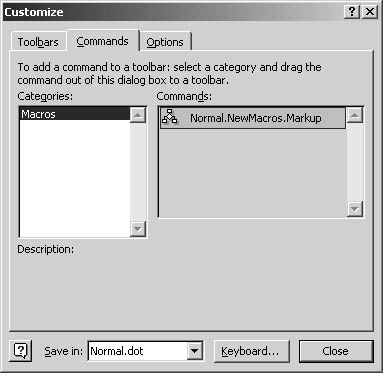
Figure 40-5. You can add a macro toolbar button or menu command by dragging the macro from the Customize dialog box onto a toolbar or menu.
- After you add a macro to a toolbar or menu, you can customize the appearance of the macro by right-clicking it and choosing options on the shortcut menu. Figure 40-6 shows the shortcut menu you can use to customize a toolbar button. Notice that you can assign a button image to your newly created macro toolbar button.
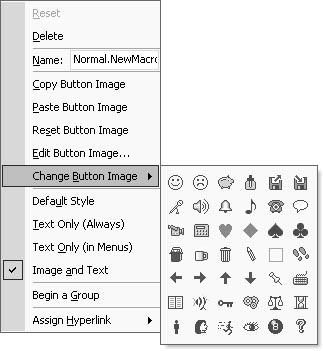
Figure 40-6. After you drag your macro to a toolbar or menu, you can customize its appearance by right-clicking it and choosing options on the shortcut menu.
The Customize dialog box also contains a Keyboard button (as shown in Figure 40-5). You can use this button to assign a keyboard shortcut to your macro in addition to creating a toolbar button or menu command, as described in the next section.
For more information about customizing menus and adding toolbar buttons, see Chapter 38, "Customizing Word and Maximizing Accessibility."
Assigning a Macro to a Keyboard Shortcut
In addition to creating toolbar buttons and menu commands, you can associate your macros with keyboard shortcuts. You might want to do this if a menu command already exists but you prefer to use a keyboard command instead of continually opening the menu. Perhaps you'd like to create a macro that turns the markup feature on and off and assign a keyboard shortcut to the macro. That way, instead of choosing View, Markup each time you want to view the markup in the current document, you could simply press a keyboard shortcut that toggles the changes on and off.
To assign a macro to a keyboard shortcut, follow these steps:
- In the Record Macro dialog box (choose Tools, Macro, Record New Macro) or in the Customize dialog box (discussed in the preceding section), click the Keyboard button. The Customize Keyboard dialog box opens.
- By default, the insertion point is in the Press New Shortcut Key box. Press the key combination you want to assign to your macro, as shown in Figure 40-7, and then click Assign and click Close.
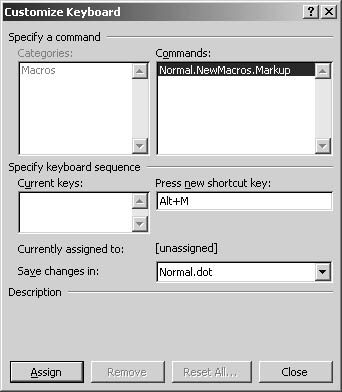
Figure 40-7. You can use the Customize Keyboard dialog box to assign keyboard shortcuts to your macros.
When you create keyboard shortcuts, make sure you don't overwrite an existing keyboard shortcut. In the example in Figure 40-7, the keyboard shortcut Alt+M is being assigned. The Currently Assigned To field indicates that the combination isn't assigned to another command in Word. If the command were already being used by another command, the dialog box would indicate that the combination is already in use and display the command that's using it. For example, if you attempt to assign Ctrl+P to a macro, Word would indicate that the FilePrint command already uses that keyboard shortcut. To assign another keyboard shortcut, delete the entry in the Press New Shortcut Key box, and try another combination.
Tip
When you create keyboard shortcuts, consider using Alt+letter instead of Ctrl+letter. Many Ctrl+letter keyboard combinations already exist in Word, so you might find it a bit tricky to find an available combination.
Recording a Macro
After you configure the settings in the Record Macro dialog box, you're ready to record your macro. To begin recording, click OK in the Record Macro dialog box. (If you assigned your macro to a toolbar button, menu command, or keyboard shortcut, the Macro Recorder will begin automatically after you complete the assignment procedure.) When the Macro Recorder begins, the Record Macro dialog box closes, and the Stop Recording toolbar, shown in Figure 40-8, is displayed. You're officially in record mode. The actions you take from this point on will be recorded in your macro.

Figure 40-8. The Stop Recording toolbar is small, but it contains the buttons you need to stop and pause your recording session.
Tip - Avoid mixing macros and mice movements
As mentioned in the section "Planning Your Macro," when you use the Macro Recorder, you can use your mouse to click commands, toolbar buttons, and menu commands, but the recorder won't record mouse movements in your document window. You'll need to use keyboard commands to record those movements. For example, if you're adding column headings in a table, you'll need to press Tab to indicate a movement from one cell to another instead of clicking in each cell.
If you need to, you can pause the recorder while recording a macro. You might want to do this to avoid adding extra (unnecessary) steps to your macro's VBA code. To pause the recorder while recording a macro, you use the Pause button on the Stop Recording toolbar, as follows:
- On the Stop Recording toolbar, click the Pause Recording button.
- Perform any actions you don't want to record.
- To resume recording, click the Resume Recorder button on the Stop Recording toolbar.
Tip
You should avoid adding extra steps to your macros whenever possible because extra steps mean extra VBA coding, which in turn results in bigger macros and larger file sizes.
After you finish recording your macro, click the Stop button on the Stop Recording toolbar, or choose Tools, Macro, Stop Recording. Your macro is now ready to run.
Saving Macros
When you create macros, they aren't automatically saved. In fact, macros aren't saved until you save the documents in which the macros are stored. Therefore, after you create a macro, you should immediately save your documents. You can easily save all open documents and templates by using Word's Save All command. To do so, press Shift, and then choose File, Save All. After you save the documents containing your macros, you should run your macros to verify that they work as planned.
EAN: 2147483647
Pages: 337