Previewing the Merge
3 4
The next step in the merge process involves reviewing the data merged into your document. The first document is displayed by default with your first recipient's data in the Word window (shown in Figure 35-13). You can page through the recipients by clicking the previous (<<) or next (>>) button in the wizard task pane.
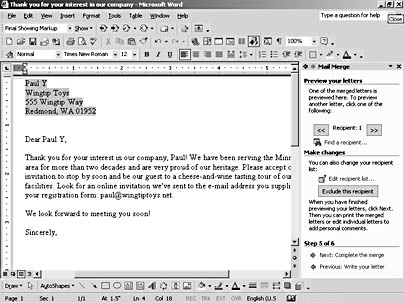
Figure 35-13. The merge data is shown automatically in your main document during Preview.
Finding a Specific Entry
If you want to locate a particular recipient in your list, click the Find A Recipient link in step 5 of the Mail Merge Wizard or click the Find Entry button on the Mail Merge toolbar. The Find Entry dialog box appears so that you can type in the Find box the data you'd like to locate. Specify the field you want to search, if necessary, and then click Find Next. Word locates the text you indicated in the merge document.
Excluding a Recipient
If you want to remove a recipient from the current merge operation, you can click Exclude This Recipient in the Make Changes section of the task pane. The entry is removed and the next recipient in the list is displayed.
If you change your mind and want to include the recipient after all, click the Edit Recipient List link to display the Mail Merge Recipients dialog box. Scroll to the recipient record you want to display, and select the check box in the left column. Click OK to close the dialog box. The recipient will be included in the merge.
Tip - Test before you print
Before you go too far in designing your letter, print a sample to make sure it fits on your company stationery. Particularly if you have a specialty logo or an unusual address line at the bottom of the page, test your printout to make sure everything fits before you start the merge operation.
Checking for Errors
If you're preparing a merge operation with hundred, or thousands, of records, it's an especially good idea to run a test before you do the actual merge. Word gives you an easy way to do a quick check for errors. Simply click the Error Check Merge button on the Mail Merge toolbar to display the Checking And Reporting Errors dialog box (shown in Figure 35-14). You have three choices for the way in which you test your merge: You can simulate the merge and save the errors in a new document; you can go ahead and run the merge operations, but have Word stop and alert you when an error is found; or you can complete the merge without pausing for errors and have Word report the errors in a new document.
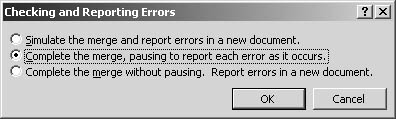
Figure 35-14. Select an error-checking method in the Checking And Reporting Errors dialog box.
The difference between these options is that one runs a "practice test" that reports on errors it finds but does not make changes in the document. The second option, the default, does the merge but alerts you immediately whenever an error is found. If this is the first time you've used Word's mail merge utility, it's a good idea to test it out using the simulation until you feel comfortable proceeding with the real thing.
EAN: 2147483647
Pages: 337