Adding Merge Fields
3 4
So now you've selected the document you want to use and you've identified the people to whom you want to send it. The next step involves adding the placeholders in the document where the data will be inserted for the individual recipients. When you click Next and the wizard displays the page on which you create the letter for your merge operation, you see the following merge fields you can insert in your document:
- Address Block displays the Insert Address Block dialog box so that you can add the name, address, and city, state, and ZIP code at the insertion point.
- Greeting Line displays the Greeting Line dialog box, allowing you to select the salutation you want to use as well as the format for the recipient name.
- Electronic Postage enables you to work with electronic postage if you've installed that feature.
- Postal Bar Code displays the Insert Postal Bar Code dialog box so that you can choose the field after which you'd like to display the postal bar code.
- More Items displays the Insert Merge Field dialog box, giving you the option of adding additional fields to your main document.
Inserting an Address Block
The Address Block includes the collection of data you're likely to use most often. The block includes the recipient name, address, city, state, and ZIP Code. You can also include the company name and the country and region in the address if you choose. To add the Address Block to your main document, follow these steps:
- Place the insertion point where you want to insert the Address Block.
- In step 4 of the Mail Merge Wizard, click the Address Block link, or click the Insert Address Block button on the Mail Merge toolbar. The Insert Address Block dialog box appears. (See Figure 35-8.)
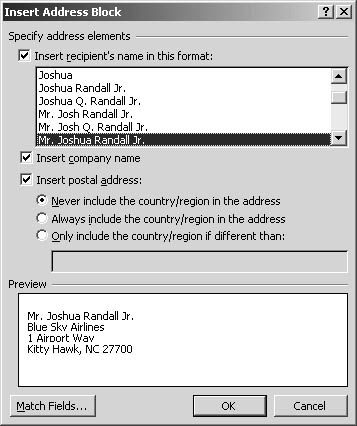
Figure 35-8. Specify the address format you want to use in the Insert Address Block dialog box.
- Scroll through the Insert Recipient's Name In This Format list to choose the format you want to use for the recipient name; select the style you want to use.
- If you want to omit the company name from the Address Block, clear the Insert Company Name check box.
- To hide the postal information in the Address Block, clear the Insert Postal Address check box. The Preview section shows your current selections.
- Click OK to close the dialog box. Word inserts the following code at the insertion point:
««AddressBlock»»
Note
You'll get a chance to preview your document with the data included before you do the actual merge. You can also use the Error Check Merge button on the Mail Merge toolbar to do a test run before you execute the merge operation.
Choosing a Greeting Line
The Greeting Line merge field enables you to say hello in the language and format you want. To add a Greeting Line, follow these steps:
- Place the insertion point in the document where you want to add a Greeting Line.
- Click the Greeting Line link in the Write Your Letter section of step 4 in the Mail Merge Wizard, or click the Insert Greeting Line button on the Mail Merge toolbar. The Greeting Line dialog box appears. (See Figure 35-9.)
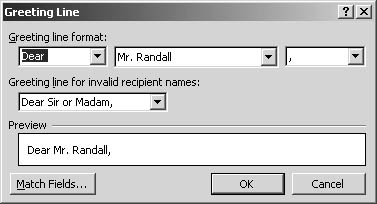
Figure 35-9. Choose the salutation and name format for your greeting in the Greeting Line dialog box.
- For those recipients that show an empty or invalid name entry, you have the option of adding a generic phrase. Choose either Dear Sir Or Madam or To Whom It May Concern.
- Click OK to close the dialog box and insert the Greeting Line. Word inserts the following code at the insertion point:
««GreetingLine»»
Tip - Add a postal bar code
If you're printing envelopes or labels on which you want a postal bar code to appear, click the Postal Bar Code link in step 4 of the Mail Merge Wizard. When the Insert Postal Bar Code dialog box appears, click the Merge Field With ZIP Code down arrow and choose the field to which the postal code should refer.
Next, click the Merge Field With Street Address down arrow to display the list of choices for the delivery address you want the postal code to reflect. Click your choice, and click OK.
Inserting Merge Fields
Word offers a number of preset merge fields you can insert by pointing and clicking. You can further personalize your main document by adding address or database fields. To display the additional merge fields you can use in your document, click the More Items link in step 4 of the Mail Merge Wizard. The Insert Merge Field dialog box appears, as Figure 35-10 shows.
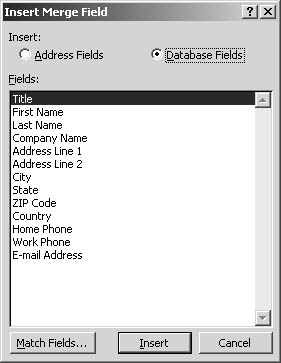
Figure 35-10. The Insert Merge Field dialog box enables you to choose either Address Fields or Database Fields.
If you want to use fields available in your Address Book, click the Address Fields option. You'll see quite a list of offerings, from basic contact info to spouse's name to nickname. When you click the Database Fields option, you see traditional database fields, including Title, First Name, Last Name, Company Name, Address Line 1, Address Line 2, City, State, ZIP Code, Country, Home Phone, Work Phone, and E-mail Address.
To insert one of Word's additional merge fields, follow these steps:
- Place the insertion point where you want to add the field.
- Click the More Items link in step 4 of the Mail Merge Wizard to display the Insert Merge Field dialog box, or click Insert Merge Fields on the Mail Merge toolbar.
- Click Address Fields or Database Fields.
- Click the field you want to add, and click Insert.
- When you're finished, click Close to return to your main document.
Figure 35-11 shows a form letter after two database fields, <<First_Name>> and <<Email_Address>>, have been added. When you're ready to preview your document with the merge data intact, click Next to proceed to the next wizard step.
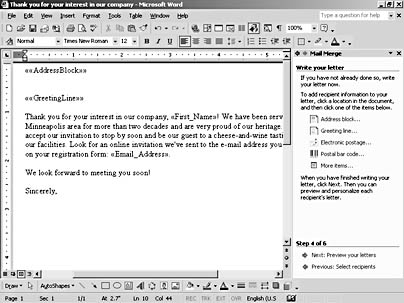
Figure 35-11. You can add database and address fields in the body of your document as needed.
Tip - Display paragraph marks for accurate spacing
When you're adding merge fields to your document, turn on paragraph marks by clicking Show All on the Standard toolbar. Displaying paragraphs shows all paragraph marks, spaces, and tab characters so that you can better control the placement of merge fields in your document.
Matching Fields with Your Database
Word enables you to use data you've entered and organized in other programs—such as Microsoft Access, Microsoft Excel, other database programs, or compatible e-mail utilities—to serve as the source for your mail merge. If the fields you've created in your database don't match the fields in the address list, don't worry—you can use Word's Match Fields tool to equate the fields so data flows into the right place automatically.
You can display the Match Fields dialog box in several different ways:
- Click the Match Fields button on the Mail Merge toolbar.
- Click the Match Fields button in the Insert Address Block dialog box.
- Click the Match Fields button in the Greeting Line dialog box.
Tell Word how to match fields by clicking the down arrow of the field you want to match. For example, if in your database file you have all addresses listed as Address Line 2, but in your Address List in the merge procedure you want it to be shown as Address Line 1, you can click the Address Line 1 down arrow (shown in Figure 35-12) and select Address Line 2. When you select Address Line 2, Word places in Address Line 1 any data it finds tagged for Address Line 2. After you make your matches, click OK to close the dialog box and return to the document.
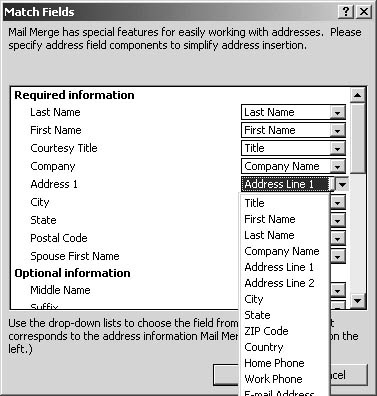
Figure 35-12. Use the Match Fields dialog box to tell Word how to correctly import the data you've created in other programs.
Adding Word Fields
Along with the merge fields you are given in the Mail Merge Wizard, you have another set of fields at your disposal. Word fields enable you to personalize your document, message, or form even further. You might want to add a Word field, for example, that skips a record based on the data in a particular field.
To add a Word field to your main document, follow these steps:
- Place the insertion point in your document where you want to add the field.
- Click the Insert Word Field button on the Mail Merge toolbar. A drop-down menu appears, listing the Word field choices. Click your choice, and Word prompts you to add additional information. Table 35-3 gives you an overview of the Word fields available in mail merge operations.
Table 35-3. Word Fields for Mail Merge
| Field | Description | Options |
|---|---|---|
Ask | Adds a customized dialog box that asks for more information during a merge | You can use a predefined bookmark or add a new one to mark the placement of the Ask field. |
Fill-In | Prompts user for additional information | You can choose to have Word ask for information with each merged record or only once, at the beginning of the process. |
If...Then...Else | Creates conditional text segments that insert one phrase in one situation and another phrase in another | You can control the fields you want to compare as well as the qualifier(Equal To, Not Equal To, Less Than, Greater Than, Less Than Or Equal, Greater Than Or Equal, Is Blank, Is Not Blank). |
Merge Record # | Adds the number of the current record to the merged document | Place the insertion point where you want the number to appear; no dialog box is displayed. |
Merge Sequence # | Inserts numbering for all documents in the merge | Place the insertion point where you want the number to appear; no dialog box is displayed |
Next Record | Includes data from the next record in the current record | You can include several records at once; however, to list many records create a directory. |
Next RecordIf | Includes data from the next record if a certain condition is met | You can include record data if a field contains a value you seek. |
Set Bookmark | Adds a bookmark and attached text in every merged document | You can use existing bookmarks or add new ones to accommodate the merge. |
Skip Record If | Omits records depending on a specific condition | You can choose the fields to compare and the qualifier (Equal To, Not Equal To, Less Than, Greater Than, Less Than Or Equal, Greater Than Or Equal, Is Blank, Is Not Blank). |
EAN: 2147483647
Pages: 337