Generating the Index
3 4
Once you've marked all the entries you want to include in your index, you're ready for Word to compile the document and place it in your document. When Word compiles the index, it gathers all the entries you've marked, assigns page numbers as you've specified, and alphabetizes the entries. Finally, after you click OK, Word places the index at the insertion point.
Tip - Review your document
Although you can update an index easily by pressing F9 (which means you can go back and edit your index entries if you choose), you'll lose any additional formatting choices you make after the index is compiled. So it's worth your time, before Word compiles the index, to go back through the document and review your index entries to make sure you haven't missed anything important. To display the index entry codes, click the Show All button on the Standard toolbar. Then page through the document to review important headings, sections, and captions for inclusion in your index.
Start the process of creating the index by placing the insertion point where you want to create the index and clicking Insert, Reference, Index And Tables. The Index And Tables dialog box appears, with the Index tab selected. In this dialog box you'll choose the format for both the text entries and page numbers. (See Figure 27-3.)
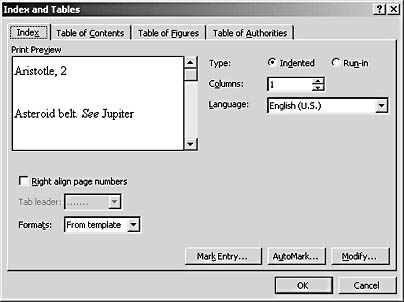
Figure 27-3. The Index tab includes the options and commands you need to create the index.
Note
Notice the Mark Entry button on the Index tab in the Index And Tables dialog box. If you begin making your formatting choices for the index and suddenly remember a topic you want to include in the index, you can click Mark Entry to open the Mark Index Entry dialog box.
Choosing the Index Format
One of the most important choices you'll make on the Index tab in the Index And Tables dialog box involves the format you select for the compiled index. How do you want the index to look? When you click the Formats down arrow, Word gives you the following choices:
- From Template, which is selected by default, leaves out headings.
- Classic centers the alphabetic headings over the index column.
- Fancy encloses the heading in a shadowed box.
- Modern italicizes the heading and places a rule above it.
- Bulleted formats the heading as a block letter and centers it over the index column.
- Formal right-aligns page numbers, adds dot leaders, italicizes the heading, and indents the heading from the left margin.
- Simple removes all alphabetic headings and special formats.
Choosing each of these different options produces a different index format, which is displayed in the preview window. To make your choice, click the Formats down arrow and click the selection you want.
If you later decide to change the default alignment of the numbering or choose a different leader character, those changes will override the settings belonging to the different formats.
Tip - Choose your format
Experiment with the different formats before selecting the one you want by clicking your different choices in the Formats drop-down list on the Index tab in the Index And Tables dialog box. When you choose a format style, the Print Preview box shows your selection so you can see the formatting effect of each style.
Choosing Alignment
After you create your index, you might want to make changes to the alignment and leaders the format applied. You can change these settings so that page numbers are aligned along the right edge of the index column, and dot leaders are added to help lead the reader to the related page number. To change the alignment of page numbers in your index, follow these steps:
- Display the Index And Tables dialog box by choosing Insert, References, Index And Tables.
- On the Index tab, click the Indented option if necessary and then select the Right Align Page Numbers check box.
- Click the Tab Leader down arrow, and select the type of leader you want.
- Click OK to create the index, and the page numbers are formatted as you selected.
Changing the Way Entries Are Displayed
Another choice in the Index And Tables dialog box allows you to choose whether you want index subentries to be run in with the index main entries or indented below them. Simply click your choice and Word will format the index accordingly.
When you choose Indented, your index subentries are indented beneath the main entries, like this:
 Stress,
  controlling, 3
  managing, 5
  reducing, 7
When you choose Run-In, the subentries are placed on the same line with the main entries, such as
Stress: controlling, 3; managing, 5; reducing, 7
Tip - Save space in cramped documents
If you're getting to the end of your document and you're running out of space, you can use the Run-In setting to pick up extra space your index might otherwise use. To do this, choose Insert, Reference, Index And Tables, click Run-In, and then click OK.
Troubleshooing
Error Messages Appear in My Index
You've gone through the process of marking your index entries and created the index by choosing Insert, Reference, Index And Tables. But after Word places the index in your document, you notice that error messages appear instead of the page numbers. The most likely cause of this is that you created the index in a subdocument rather than in the master document of your publication.
To resolve the problem, close the current document by choosing File, Close, and open the master document. (For more information on working with master documents, see Chapter 25, "Creating and Controlling Master Documents.") Expand all subdocuments by clicking the Expand Subdocuments button in the Master Document tools on the Outlining toolbar; then press F9 to update your index. The page numbers should be displayed correctly.
Changing Index Columns
Depending on the length of your document and the index you're creating, you might want to format your index in multiple columns. By default, Word compiles your index in two columns, but you might want to change this setting if you have a short outline that will occupy only a partial column, or you want to run text in the column beside the index you create.
You can create up to four columns for the index. To make a change, display the Index And Tables dialog box and on the Index tab, click the Columns up or down arrow to increase or decrease the number of columns you want.
Troubleshooting
My Index Columns Don't Line Up
You've finally finished marking all the entries in your long document. You choose Insert, Reference, Index And Tables, click the Index tab, and select the format you want. You elect to create an indented index that's displayed in three columns. With a second look over your choices, you click OK to have Word compile the index. But when you see the index on the screen, you notice that the middle column seems out of alignment with the other two. What's going on?
Although Word automatically creates a section break both before and after your index, it's possible that an extra line space is preceding the first line in the second column. Click the Show All button on the Standard toolbar to display hidden paragraph marks in your document and review the top and bottom entries in each column. If you see an unwanted paragraph mark, select it and press Delete to remove it. Then press F9 to have Word update your index and balance the columns.
EAN: 2147483647
Pages: 337