Creating Index Entries
3 4
Word makes it easy for you to enter index entries as you go along—and once you display the Mark Index Entries dialog box, you can mark additional entries, add subentries, and add cross-references and page ranges.
Marking Index Entries
You can create an index entry in two different ways:
- If you want to begin with text that is already in the document, select and use existing text.
- If you want to add an entry that does not key off an existing word or phrase in your document, click to place the insertion point in the paragraph where you want to add the index entry.
To add index entries, follow these steps:
- Select the text or place the insertion point, and then press Alt+Shift+X. The Mark Index Entry dialog box appears, as Figure 27-2 shows.
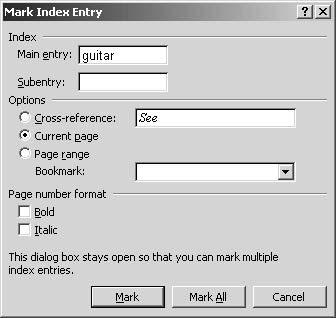
Figure 27-2. You use the Mark Index Entry dialog box to enter index entries and subentries.
- If you selected text before opening the Mark Index Entry dialog box, the text appears in the Main Entry box. If necessary, edit the text that appears. If you placed the insertion point rather than selecting text, type the entry you want in the Main Entry box.
- Click Mark to mark the entry and close the dialog box.
Tip - Create clear index entries
Edit the entry in the Mark Index Entry dialog box to make it as clear as possible. For example, instead of a phrase that appears in your document, such as "served in the state legislature," you might enter the phrase "legislature," or "government service."
Creating Subentries
A subentry is a secondary topic you use to narrow the search on a specific topic. For example, if your report is about a new HR training program your company offers, one main index entry and the related subentries might look like this:
 Life Essentials / Work Skills program, 5
  Overview, 6
  Program timeline, 7
  Reporting procedures, 7
  Retreat sessions, 8
  Training opportunities, 8
A subentry provides readers with additional references they can look up. It also adds depth and functionality to your index as a whole, and it makes reading the index easier on the eye.
Here's a quick way to enter subentries if you want to avoid repeat clicks in the dialog box: Just type the main entry and the subentry in the Mark Index Entries dialog box, separating the entries with a colon. You can use this technique to create up to seven levels of subentries, although creating an index that complex would no doubt baffle your readers! For best results, stick to one or perhaps two subentry levels. Examples of subentries entered in this way include the following:
 Life Essentials / Work Skills program: Overview
  Life Essentials / Work Skills program: Program timeline
  Life Essentials / Work Skills program: Reporting procedures
  Life Essentials / Work Skills program: Retreat sessions
  Life Essentials / Work Skills program: Training opportunities
Tip - Divide long subentry lists
If you find yourself entering too many subentries for a particular topic, you might want to think of a way to create another main entry to divide up the list. If your index lists a whole column of subentries, your readers might get lost in the list and not remember the main entry heading above.
Selecting Repeated Entries
When you're putting together a quick index and want to reference all occurrences of a particular word or phrase, you can do that easily using the Mark Index Entry dialog box. Start by selecting the text you want to index, and then pressing Alt+Shift+X to display the Mark Index Entry dialog box. Change the Main Entry text to show the entry you want, and then enter a subentry, if you want to include one. Finally, click Mark All. Word searches for the word or phrase and applies an index entry to every occurrence.
Note
One of the limitations of Mark All is that the program marks every occurrence as it appears. This means that not only will you have the same index entry for each item (which doesn't give you the flexibility of creating multiple references to the same topic), but Word will find only the words or phrases that match exactly the text you've entered. Words like composers will be found, but not composing or composition.
Formatting Entries
As you add index entries, you can specify formatting for the characters and page numbers, thus cutting down on the editing and formatting time you'll spend after you create the index. Here are the steps to apply formatting to your index entries:
- Select the text for the index entry.
- Press Alt+Shift+X to display the Mark Index Entry dialog box.
- Edit the text in the Main Entry box as needed.
- Select the text in the Main Entry box you want to format.
- Press Ctrl+B to apply bold, Ctrl+I for italic, or Ctrl+U for underline styles.
- Complete the entry as desired, and click Mark to create the entry.
Note
Word won't allow you to add any specialized formatting to entries at this stage. If you add color, change the font, or make any other changes beyond a change to bold, italic or underline style, the change will be applied to the selected text in the document and not to the index entry.
You can also control the format of the page numbers Word adds to the index by selecting or clearing the check boxes in the Page Number Format section. You might want to use bold or italic to highlight certain entries. For example,
- A bold page number might indicate the most in-depth coverage of an item.
- An italic page number might include biographical information or reference another work.
Adding Cross-References
Not all your entries will provide page number references for your readers. Some might point them instead to other topics in your index. A cross-reference gives readers a pointer to an entry (or group of entries) for related information. To create a cross-reference in your index, follow these steps:
- Select the text for the index entry, or position the insertion point in the document.
- Press Alt+Shift+X to display the Mark Index Entry dialog box.
- Enter the Main Entry text, if needed.
- Click the Cross-Reference option.
- After the word See, type the index entry you want to refer readers to. For example, you might create cross-references that look like this:
Training sessions. See Retreat sessions.
Specifying Page Ranges
By default, Word assigns the index entry the number of the current page. If you select and create an entry on page 3, for example, Word shows that page number along with the index entry. If you want to indicate a span of pages so that you can provide for your readers the full range of pages on which a specific topic is covered, you can do so by using bookmarks you've already created.
If you haven't created bookmarks to mark places in your document and want to find out how, see Chapter 12, "Honing Document Navigation Skills."
To use a bookmark to indicate a page range in your index, follow these steps:
- Press Alt+Shift+X to display the Mark Index Entry dialog box.
- Enter the text you want in the Main Entry and Subentry boxes, if needed.
- Click the Page Range option.
- Click the Bookmark down arrow to display the list of bookmarks in the current document; click the bookmark you want to use.
- Click Mark to add the entry.
When you create the index later, Word will insert an en dash (a long dash) between the page numbers in the range. A page range entry looks like this:
Physical response to stress, 1–2
EAN: 2147483647
Pages: 337