Adding Frames When Designing Online Documents
3 4
If you're creating documents that will be viewed on line, you can take advantage of frames to organize your documents. Frames enable you to create areas for text on screen that allow you to divide a window into multiple areas so that you can show several documents at one time. Frames are most frequently used in Web page design. In fact, you've probably used frames while surfing the Web.
Web designers commonly use frames to create a number of window regions that show specific types of information. For example, frames are sometimes used to create a menu bar that contains links to main pages in a Web site. Users click links on the menu bar in one frame to display selected information in another "target" frame that serves as the main content area. Figure 23-3 shows a Web page that uses three frames—one title area frame, a navigation bar frame, and a body frame.
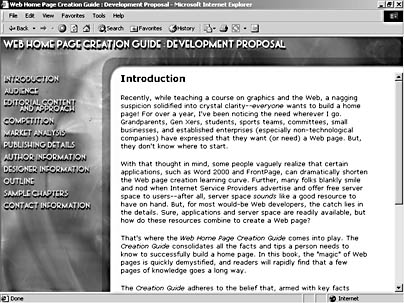
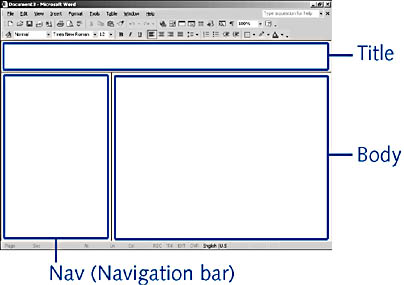
Figure 23-3. The Web page design on the left is based on a framework of three frame areas, as shown on the right.
The basic philosophy behind a frames page is that you create a page that defines how the window will be divided and then you specify the documents that should be displayed in each frame. When you upload a page that uses frames to a server, you must copy the frames page as well as the files that contain the frames' content to your server. When you save a document that uses frames in Word—whether you save the document as a Word document or a Web page—Word creates a separate file for the content in each area as well as a frames page that defines the view. Thus, the Web page shown in Figure 23-3 would consist of four files at a minimum—the title bar file, the navigation bar file, the main body text file, and the frames page file (which defines how the content files are displayed in the window). To reopen a document that uses frames in Word, you simply open the frames page document.
Note
Using frames to create Web pages can take some finagling. If you're new to frames and you're creating a Web page, you should do some research about frames on line or consult some of the many Web page design books.
Adding Frames to Documents
You can add frames to a document using any of the following techniques:
- Choose Format, Frames, New Frames Page to open a new document and display the Frames toolbar, which you can use to add frames to the new document.
- Choose View, Toolbars, Frames to open the Frames toolbar, which you can use to create frames in the current document.
- Choose Format, Frames, Table Of Contents In Frame to create a left-side frame that contains links to the headings in the current document. (The document must be formatted with built-in Word headings for this option to work properly.)
- Choose File, New to open the New Document task pane. Click the General Templates link, click the Web Pages tab in the Templates dialog box, and then double-click the Web Page Wizard icon to create a frames-based Web site.
For more information about creating Web pages, see Chapter 31, "Creating Professional Web Sites."
The tools you need to create and manage frames can be found on the Frames toolbar, shown in Figure 23-4. (You can also access frames options when you're working in a frames page by choosing Format, Frames.)

Figure 23-4. You can click buttons on the Frames toolbar to add and delete frames in a frames page.
Using the Frames toolbar, you can add a frame to the current document by clicking one of the position buttons: New Frame Left, New Frame Right, New Frame Above, or New Frame Below. After you add a frame, you can resize it by dragging the frame's border.
In addition to creating standard frames, you can have Word automatically generate a frame that contains links to the headings in your document. If your document uses built-in Word heading styles, you can click the Table Of Contents In Frame button (or choose Format, Frames, Table Of Contents In Frame) to create a linked table of contents in a left frame, as shown in Figure 23-5. You can format an automatically generated table of contents frame in the same manner you format other frames and documents.
Tip
To use the links in a table of contents frame in Word, press Ctrl as you click the link. If you want to be able to click links normally, choose Tools, Options, click the Edit tab, and then clear the Use CTRL+Click To Follow Hyperlink check box.
Tip
If you're going to include top or bottom frames in your document along with a left or right frame, you should create the top or bottom frames first. That way, the top or bottom frame will span the entire width of the page.
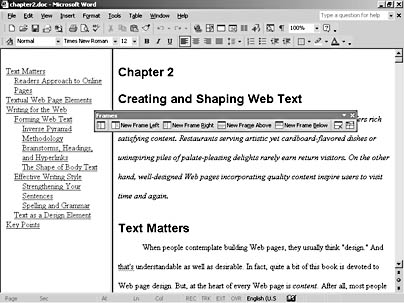
Figure 23-5. The Tables Of Contents In Frame option enables you to quickly create a left frame that contains links to each heading in your document.
Controlling Frame Properties
As with most constructs created in Word, you can control a frame's properties by configuring settings in a Properties dialog box. The two main areas of concern when you're working with frames are the content and the appearance of the frame itself. You can access content and appearance settings for frames by opening the Frame Properties dialog box. To do so, click the frame you want to format, and then click the Frame Properties button on the Frames toolbar or choose Format, Frames, Frame Properties. The Frame Properties dialog box is described in more detail in the following sections.
Assigning Documents and Names to Frames
When you create a frames page, Word displays a different document in each frame. You might have to tell Word which document to display in which frame. (If you create a frames page from scratch, Word will automatically generate file names and documents for you.) You can specify documents to associate with a frame by configuring settings on the Frame tab in the Frame Properties dialog box, shown in Figure 23-6.
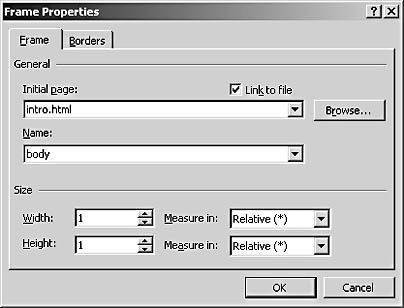
Figure 23-6. Using the Frame tab, you can perform a number of frame configuration tasks, including naming a frame and assigning a document to display in the frame when the frames page opens.
On the Frame tab, you can indicate which page to display in a frame by inserting the file's path and name in the Initial Page box. The file specified in the Initial Page box is the file that is displayed each time the frames page is opened. You can also select the Link To File check box to ensure that the document used in your frames page is updated each time the Initial Page file is changed.
In addition to specifying which file is initially displayed in a frame, you can assign a name to each frame. When you use frames, the frames must be named so that you can refer to specific frames when you create hyperlinks. For example, the Frame tab shown in Figure 23-6 specifies that the intro.html file is displayed in a frame named body. The Introduction hyperlink in the navigation frame in Figure 23-3 is configured to open the intro.html file in the frame named body when the hyperlink is clicked. The frames page shown in Figure 23-3 contains frames named title, body, and nav (short for navigation bar).
To learn more about creating hyperlinks and specifying frame targets, see Chapter 31, "Creating Professional Web Sites."
Note
Frame names are case-sensitive and can include numbers and letters. Also, because each frame must have a name, Word automatically provides default frame names for frames that aren't named manually.
Troubleshooting
Some of My Frame Pages Are Missing
If you find that a frame doesn't display an initial page when you open your frames page, you need to check the Initial Page setting in the frame's Frame Properties dialog box.
To display the Frame Properties dialog box, choose Format, Frames, Frame Properties and click the Frame tab. After you display the Frames tab, ensure that the path and file name in the Initial Page box is accurate and points to a valid file. Keep in mind that whenever you rename a file that's referred to in a frames page, you must modify the frames page's Frame Properties settings as well.
The remaining frame parameters you can configure on the Frame tab are the frame's height and width. You can assign height and width measurements in the Height and Width boxes and use the Measure In drop-down lists to specify whether the measurements are a percentage of the screen size, a fixed size in inches, or relative to the other frames, as follows:
- Percent specifies that a frame's height or width should be sized as a percentage of the window. For example, if a frame's width is set to 50 percent, the frame will consume half the width of a user's window, regardless of the window size.
- Inches specifies a fixed width or height in inches. The frame will always be displayed at the specified height, regardless of the window size.
- Relative (*) indicates that the frame's height or width should fill the remaining area of the window after the other frame settings are applied. For example, if a top frame is set to 1 inch and a bottom frame is set to 1 inch, the body frame could be set to Relative so that the frame fills the area between the top and bottom frames, regardless of the window size.
Frequently, you'll find that your document uses a combination of Percent, Inches, and Relative settings. Fortunately, if you arrange your document by dragging frame borders, Word will automatically configure your frame size settings for you.
Controlling Frame Borders, Resizing Capabilities, and Scroll Bars
In addition to controlling which documents are displayed in frames and assigning sizes and names to frames, you can control frame borders. To access frame border properties, follow these steps:
- Click the frame you want to format.
- Click the Frame Properties button on the Frames toolbar, or choose Format, Frames, Frame Properties.
- Click the Borders tab, shown in Figure 23-7.
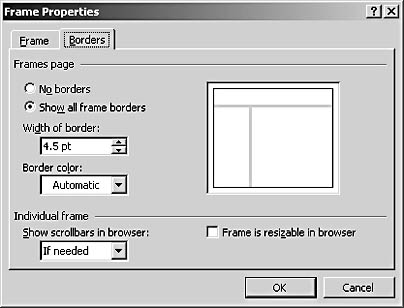
Figure 23-7. The Borders tab in the Frame Properties dialog box provides settings you can use to specify how frame borders appear in the current document.
The settings available on the Borders tab are listed here:
- No Borders. Choose this option if you want your frames to be displayed seamlessly, without borders.
- Show All Frame Borders. Choose this option if you want borders to be displayed.
- Width Of Border. If you choose to show frame borders, you can type a value in this box or click the up or down arrow to specify the size of the border that is displayed between frames.
- Border Color. Click the Border Color down arrow to access the standard color palette, which enables you to specify the color of frame borders displayed in your document.
- Show Scrollbars In Browser. Click the down arrow and choose an option on the drop-down menu to specify whether you want scroll bars to be displayed for the selected frame always, never, or only when needed.
- Frame Is Resizable In Browser. Select this check box if you want users to be able to resize the selected frame. If you want the frame to always appear according to your frame size settings, clear the check box. Keep in mind that if you want the current frame to be resizable, adjacent frames must also be formatted as resizable.
As you configure border settings, notice that the preview box shows how your borders will appear. When you finish configuring border settings, click OK to apply the settings to the current document.
Deleting Frames
If you decide to modify a frames page, you can easily delete a frame. Remember, when you delete a frame, you delete only the frame in the frames page—you don't delete the file that contains the content that is displayed in the frame. To delete a frame, click the frame, and then click the Delete Frame button on the Frames toolbar or choose Format, Frames, Delete Frame.
Caution
When you delete a frame, you can't click Undo to revert to the previous frame setup. If you want to restore a deleted frame, you'll have to re-create the frame by using the Frames toolbar. Then you'll need to configure the frame's Initial Page setting so that the frame can display the document that was displayed in the frame before you deleted it.
EAN: 2147483647
Pages: 337