Controlling Text Placement and Formatting with Text Boxes
3 4
When you use Word, you might occasionally find that you need control over your text layout beyond setting margins, formatting paragraphs, and creating columns. At those times, you might benefit from entering your information into shapes that can contain text, such as AutoShapes that can serve as text containers or text boxes. Text boxes are free-floating objects, independent of your regular document, that you can use to enclose information. You can then format these objects in the same ways you format drawings (by using the Drawing toolbar).
For more information about working with AutoShapes and the Drawing toolbar, see Chapter 16, "Enlivening Documents with Drawings and AutoShapes."
In Word, you can use two main types of text boxes: standard text boxes and AutoShapes formatted to serve as text containers. Generally, you'll want to use text boxes and AutoShapes when you want to position several blocks of text on a page or flow a continuing story from one area in your document to another. For example, you might be creating a newsletter in which a story starts on the cover page but concludes on another page, later in the newsletter.
Note
In Word, text and graphics contained within a single text box or a chain of linked text boxes is referred to as a story.
In addition to creating interesting page layouts and continuing a story from one text block to another, you might also want to use text boxes to accomplish the following tasks:
- Format text blocks using Drawing toolbar buttons
- Rotate or flip text
- Change text orientation
- Group text blocks and change the alignment or distribution of them as a group
This section describes how you can manipulate and control text using text boxes—both standard rectangular text boxes and AutoShapes formatted as text containers. Keep in mind that when you're working with text boxes and AutoShapes, you must work in Print Layout view. In Print Layout view, the text boxes and AutoShapes are displayed on screen as you work. Figure 23-1 shows a Print Layout view of a text box and an AutoShape formatted to contain text.
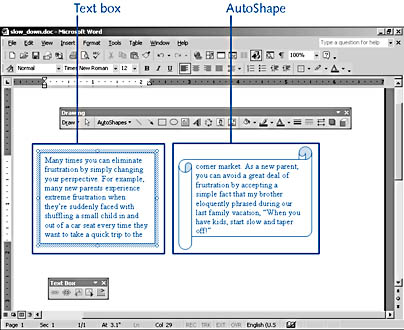
Figure 23-1. You can control text placement and generate unique page designs using text boxes and AutoShapes.
As you can see, the active text box is displayed surrounded by a frame-like border. This border appears whenever you click a text box, and it serves a number of purposes, including enabling you to move and resize the text box as well as access text box properties.
Creating Text Boxes
Creating a text box is as easy as drawing a box or shape on the drawing canvas. You can create a text box by performing any of the following actions:
- Choose Insert, Text Box, and then drag the mouse pointer in your document to draw a text box.
- Click the Text Box button on the Drawing toolbar, and then drag the mouse pointer in your document to draw a text box.
- Create an AutoShape, right-click the AutoShape, and choose Add Text on the shortcut menu.
For more information about creating AutoShapes, see Chapter 16, "Enlivening Documents with Drawings and AutoShapes."
By default, when you draw a text box or an AutoShape, a drawing canvas appears. You can work with a text box on the drawing canvas, or you can drag the text box off the drawing canvas and then delete the canvas. (To delete the drawing canvas, select it, and press Delete.) If you prefer to avoid placing text boxes and AutoShapes on the drawing canvas in the first place, you can turn off the drawing canvas's default action by configuring the Options dialog box, as follows:
- Choose Tools, Options, and click the General tab.
- Clear the Automatically Create Drawing Canvas When Inserting AutoShapes check box.
- Click OK.
After you close the Options dialog box, the drawing canvas will not appear when you create text boxes and drawings.
Regardless of whether you work on or off the drawing canvas, you'll notice that the Text Box toolbar opens automatically after you create a text box. (See Figure 23-1.) This toolbar is displayed whenever a text box is selected. When no text boxes are selected, the Text Box toolbar is hidden. To redisplay the toolbar, simply click a text box in your document.
Tip - Redisplay the Text Box toolbar
By default, the Text Box toolbar appears when you select a text box and disappears when the text box is no longer selected. If you manually close the Text Box toolbar while you're working by clicking its Close button, the toolbar won't appear automatically when you click text boxes. To redisplay the Text Box toolbar after you close it, you need to click a text box and then choose View, Toolbars, Text Box. The Text Box option appears on the Toolbars menu only when you've selected a text box within your document.
As you create text boxes in your document, you can move and resize the text boxes in the same manner you move and resize drawing objects—by dragging them by their borders. To move a text box, click anywhere on its border other than a sizing handle, and then drag the text box. To resize a text box, you can drag the sizing handles (which appear as circles in text box frames) to change the text box's width and height. (Figure 23-1 shows a selected text box along with its border and sizing handles.)
Inserting Text into Text Containers
After you create text boxes, you are ready to add text and formatting. You can insert text into text boxes in a few predictable ways, including the following:
- Type text directly into the text box.
- Paste copied information into the text box.
- Drag information into the text box.
- Click a text box, and choose Insert, File to insert a file's contents into the text box.
If you're planning to insert a longer story into a text box, you should consider typing and editing the story in a plain Word document before importing the information into a text box. That way, you can conduct most of your editing, formatting, and fine-tuning tasks in a standard document, which generally provides a larger viewing area.
Tip - Format text in text boxes
You can format text in text boxes in the same manner you format document text. First click in the text box, and then format the text using keyboard shortcuts, Formatting toolbar buttons, Font and Paragraph dialog boxes, and the Styles And Formatting task pane.
In addition to inserting text, you can insert graphics, tables, and some fields into text boxes. Among the items that you can't include in text boxes are the following:
- Columns
- Comments
- Drop caps
- Endnotes
- Footnotes
- Indexes
- Page and column breaks
- Tables of contents
To be able to include these elements in a text container, you'll have to convert your text box to a floating frame, as described in the next section, or you'll need to use a framed document, as discussed in the section "Adding Frames When Designing Online Documents".
Note
A nice feature of text containers is that when you run the spelling checker and grammar checker, Word also checks the information in text containers.
Using Comments, Footnotes, Tables, and Fields in Floating Frames
Generally, your best bet when it comes to placing text in text containers is to use text boxes and AutoShapes, because they are highly customizable. But if you need to insert text that contains comments, footnotes, endnotes, tables, or certain fields (such as table of contents and index fields) in a text container, you'll have to use a floating frame instead of a text box, because text boxes can't properly support these types of elements. A floating frame looks like a text box, but you can't format it as extensively as a text box and it supports Word fields.
You can easily convert an existing text box to a floating frame whenever necessary by following these steps:
- If the text box you want to convert is on the drawing canvas, drag the text box off the canvas.
- Click the text box you want to convert, and then right-click the text box's frame.
- Choose Format Text Box on the shortcut menu, and then click the Text Box tab in the Format Text Box dialog box.
- Click the Convert To Frame button. A message box appears, warning you that you are about to change the text box to a frame and that some drawing formatting might be lost. Click OK.
After you convert a text box to a frame, the Text Box toolbar and some Drawing toolbar buttons, such as the Fill Color and Line Color buttons, will be unavailable.
Formatting Text Boxes and AutoShapes
By default, when you create a text box, it appears as a white (not transparent) box surrounded by thin (0.75 point) black lines. Fortunately, text boxes don't have to be limited to plain white rectangles strategically placed around your document. You can format text boxes and AutoShape text containers in the same manner you format other drawing objects. For example, you can apply fill and line colors by using the Fill Color and Line Color buttons on the Drawing toolbar, or you can add a shadow to a text box by using the Shadow Style button. To format text boxes and AutoShapes using the Drawing toolbar, select the text box or AutoShape, and then click the appropriate Drawing toolbar button.
In addition to the standard formatting buttons available on the Drawing toolbar, you can format text boxes using the Format Text Box dialog box. Namely, you can control the position of text within text boxes and AutoShapes, you can change a text box's shape, and you can instruct Word to automatically resize a text box or an AutoShape to accommodate a story's complete text. For more information about using the Drawing toolbar buttons to format drawing objects, see Chapter 16, "Enlivening Documents with Drawings and AutoShapes."
Controlling Text in Text Boxes and AutoShapes
You can control how close or far away text is placed relative to a text box or an AutoShape's edges. You do this by changing the text box's internal margin settings, as described here:
- Click a text box or an AutoShape, and then double-click the container's frame (or right-click the frame, and choose Format Text Box or Format AutoShape on the shortcut menu; or click a text container, and then choose Format AutoShape or Format Text Box). The Format Text Box or Format AutoShape dialog box opens, depending on the type of text container you're formatting.
- Click the Text Box tab, shown in Figure 23-2. The Text Box tab appears the same in both the Format Text Box and Format AutoShape dialog boxes.
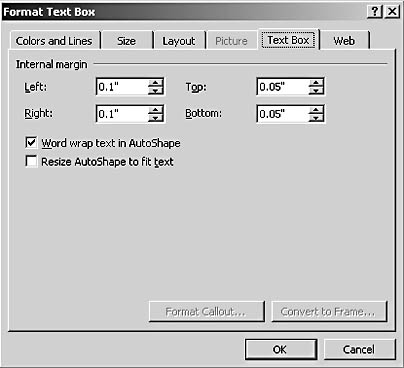
Figure 23-2. You can control the spacing around text placed in text boxes and AutoShapes by configuring the internal margin settings on the Text Box tab.
- In the Internal Margin section, increase or decrease the left, right, top, and bottom margin measurements to control the distance between the text and the selected object's edges. Click OK to apply the settings.
In addition to controlling internal margins, you can change the direction of text within text boxes. To do so, click in a text box, and click the Change Text Direction button on the Text Box toolbar. You can continue to click the button to cycle through the available text direction options: down, up, and standard.
Caution
When you change the text direction in a linked text box, you change the text direction in all linked text boxes included in the story. In other words, you can't change the text direction in a single text box if it's part of a linked series of text boxes. For more information about linked text boxes, see the section "Linking Text Boxes to Flow Text from One Text Box to Another," below.
Changing Text Box Shapes
The beauty of using AutoShapes is that you can change your mind regarding which AutoShape you want to use at any time, even if the AutoShape is formatted as a text box. Changing the shape of a text box or an AutoShape is similar to changing shapes that don't contain text. To do so, ensure that you're working in Print Layout view, and then follow these basic steps:
- Click the text box whose shape you want to modify. To select multiple text boxes, press and hold Shift while clicking each of the text boxes.
- On the Drawing toolbar, click Draw, and choose Change AutoShape on the drop-down menu.
- On the Change AutoShape submenu, choose a category, and then click the shape you want to apply to the selected text boxes.
All selected shapes take on the new shape but retain all other format settings, such as color, internal margins, and so forth.
Resizing Text Boxes or AutoShapes Automatically to Show All Text
You can automatically resize a text box or an AutoShape that contains text so that it is as long or as short as necessary to display all the text inserted in it. You can use this option only with nonlinked (stand-alone) text boxes because linked text boxes are designed to flow text to the next linked text box if text is longer than the current text box's boundaries. To automatically size a nonlinked text container to accommodate inserted text, follow these steps:
- Double-click a text container's frame, and then click the Text Box tab in the Format Text Box or Format AutoShape dialog box.
- Select the Resize AutoShape To Fit Text check box, and click OK.
The text container will automatically stretch or shrink to accommodate the text.
Linking Text Boxes to Flow Text from One Text Box to Another
If you've ever created a newsletter or a brochure, you know how tricky it can be to properly fill text areas and manage jumps from one page to another. In Word, you can simplify these types of tasks by linking text boxes. When you link text boxes, you indicate that any text you insert into one text box will automatically flow into the next text box when the first text box cannot fit all of the inserted text. After you insert text into linked text boxes, you can edit the text to make your story longer or shorter, and Word will automatically reflow the text throughout the series of linked text boxes.
Note
The maximum number of links you can have in one document is 31, which means that you can have up to 32 linked text containers in one document.
When you want to link text boxes or AutoShapes, you need to keep the following limitations in mind:
- Linked text boxes and AutoShapes must be contained in a single document.
- Each text box or AutoShape must be empty.
- Each text box or AutoShape must not already be linked to another series or story.
Before you flow text into a series of linked text boxes, you should be sure that you've made most of your changes to your text. Then draw the text boxes you want to link and import your story into. When your text is ready and your text boxes are drawn, follow these steps to link the text boxes and insert the text:
- In Print Layout view, click the first text box you want to insert text into, and then click the Create Text Box Link on the Text Box toolbar. The mouse pointer changes to an upright pitcher.

- Move the mouse pointer to the text box you want link to the first text box. When you move the upright pitcher pointer over a text box that can receive the link, the pitcher tilts and turns into a pouring pitcher. Click the second text box to link it to the first text box.

- To link a third text box, click the text box you just linked to the first text box, click the Create Text Box Link button, and then click the third text box. You can create a chain of linked text boxes using this method.
Tip
If you click the Create Text Box Link button and then decide that you don't want to link to another box, press Esc to cancel the linking process. - After you link your text boxes, click in the first text box, and insert text by typing, pasting, or choosing Insert, File. The latter approach is recommended because it enables you to insert prepared and edited text into your linked text boxes.
Inside Out
Word excludes all text in text boxes from both the word and line count statistics when you use the Word Count command on the Tools menu to perform counts on your entire document. If you need to obtain word count statistics for text in text boxes, you can work around this limitation with a little effort. Basically, you can count the text in each text box and then add the numbers together to get a total count for the story. To do this, click a text box, press Ctrl+A to select all the text in the text box, and then choose Tools, Word Count. You'll need to repeat the process in each text box, even if the text boxes are linked, and then add the numbers to produce a grand total.
Moving Among Linked Text Boxes
After you link text boxes, you can easily jump from one text box to another by using the Text Box toolbar. To do so, select a text box that's part of a linked series of text boxes. Then, on the Text Box toolbar, click the Next Text Box button to move to the next linked text box, or click the Previous Text Box button to jump to the previous text box. You can also move to the next text box by positioning your insertion point at the end of text in a text box and pressing the Right Arrow key, or you can jump to the preceding text box by positioning your insertion point at the beginning of the text in a text box and pressing the Left Arrow key.
Copying or Moving Linked Text Boxes
You can copy or move a story (including text boxes and their contents) to another document or location in the same document. To accomplish this, you must select all the linked text boxes in a story if the story consists of multiple linked text boxes. If you copy just some of the text boxes in a story, you'll copy the text boxes but not the text inside the text boxes. If your story is contained in a single text box, Word automatically includes the content when you copy the text box.
To copy or move an entire story that's contained in a single text box or a series of linked text boxes, follow these steps:
- In Print Layout view, select the first text box in the story by clicking the text box's frame.
- Press Shift and select all other text boxes you want to copy or move, and then click the Copy or Cut button on the Standard toolbar (or press Ctrl+C or Ctrl+X).
- Click where you want to reposition the text boxes, and click Paste on the Standard toolbar (or press Ctrl+V).
To copy or move text that appears within a text box without copying or moving the text box, select just the text, and then copy or move it in the same manner you normally copy or move text in Word documents. Unfortunately, you can't select and copy all the text in a linked story at once—instead, you have to select and copy the text in each text box one at a time.
Inside Out
If you want to copy all the text in a story that appears in a series of linked text boxes, you might be able to avoid copying the story piece by piece if your story isn't too long. One way to streamline the copying of a story that's spread across a series of linked text boxes is to resize the first text box so that it's large enough to contain the entire story. The story will automatically reflow into the first text box, which will make it easy for you to select and copy the text as a whole. After you copy the text, click Undo on the Standard toolbar (or press Ctrl+Z) to restore the text box to its previous size and automatically reflow the story.
Breaking Text Box Links
You can break links between text boxes just as easily as you create them. When you break a link, you remove only the link between the selected text box and the text box that follows it in the series—you don't remove all the links throughout a linked series. Essentially, when you break a link, you divide a story into two series of linked text boxes. By default, the first series of linked text boxes contains the story, and the second series of linked text boxes are emptied.
To break a link between text boxes, follow these steps:
- In Print Layout view, click the border of the text box where you want the text to stop flowing from. The selected text box will become the last text box in the first linked series of text boxes.
- On the Text Box toolbar, click the Break Forward Link button.
At this point, text will stop flowing in the last text box before the broken link, and the second series of linked text boxes will be empty. If the text doesn't fit in the first series of linked text boxes after you break a link, you can create and link additional text boxes or enlarge existing text boxes to provide enough room to display the text.
Tip - Eliminate a text box in the middle of a story
You can cut a text box in the middle of a linked series of text boxes without deleting any parts of your story. To do so, simply right-click a text box's border, and choose Cut on the shortcut menu. When you cut a linked text box, the story readjusts and flows the text into the next text box.
Deleting Linked Text Boxes Without Losing Text
To delete a text box, you simply select a text box and press Delete. Performing this action on a nonlinked text box deletes both the text box and its contents. In contrast, when you delete a text box that's part of a linked series of text boxes, the text from the deleted text box automatically flows into the remaining linked text boxes. If the remaining text boxes aren't large enough to properly display the story in its entirety, you'll have to resize the remaining text boxes, create additional text boxes, or edit your story to fit in the existing text boxes. Keep in mind that Word doesn't notify you when text overflows the final text box's boundaries, so you should always be extradiligent about checking the flow of stories and making sure that no text is hidden.
Tip
To avoid deleting an entire story when you delete a stand-alone, nonlinked text box, click in the text box, press Ctrl+A to select the story, and then either drag or copy the selected story into your document before you delete the text box.
EAN: 2147483647
Pages: 337