Improving Numbered Lists
|
| < Day Day Up > |
|
Like bulleted lists, numbered lists allow you to make your own choices about the look and format of the numerals used. Many procedures you use to customize bulleted lists can also be used to fine-tune numbered lists. Most notably, in numbered lists, you can make modifications by specifying a font, selecting the number style you want, and choosing the number and text position of the items in your list.
| Note | Because the process of changing the font, number position, and text position in the Customize Numbered List dialog box is the same as for changing the bullet and text font and position (covered earlier in this chapter in the sections "Changing the Bullet Font," "Changing the Bullet Indent," and "Modifying Text Position in Lists"), those steps are not repeated here for numbered lists. Refer to the procedures for bulleted lists for information. |
Choosing a Numbering Scheme
Numbers can add character to numbered lists. You might use simple traditional characters or larger, colorful characters, depending on the nature of your publication. Begin by selecting the numbered list you want to change, or position your cursor in an empty paragraph in which you want to start your list, and then follow these steps:
-
Choose Format, Bullets And Numbering, and then click the Numbered tab. Figure 8-23 shows the Numbered tab with the first gallery position selected.

Figure 8-23: The Numbered tab in the Bullets And Numbering dialog box displays preset numbering styles that you can use when you create numbered lists. -
Click one of the numbering styles shown in the gallery.
-
Click OK. Word updates the numbering style in your list if you selected an existing list or it implements the numbering style when you begin typing.
Modifying the Numbering Style
If you aren't particularly happy with the default numbering styles in the Numbered tab's gallery, you can customize the numbering style you use in much the same way you can customize bulleted list options. Basically, you display the Numbered tab in the Bullets And Numbering dialog box, select a number style in the gallery that you'd like to replace with a custom style, and then click Customize. The Customize Numbered List dialog box appears, which provides formatting options for numbered lists (as shown in Figure 8-24).
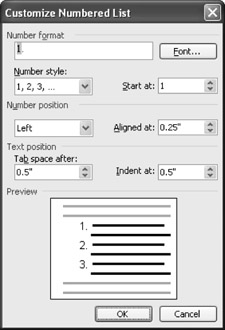
Figure 8-24: The Customize Numbered List dialog box gives you the means to change the number style you use in your list. You can also change number spacing and text position here.
Choose the Font you want to use by clicking Font, and then using the Font dialog box. To choose a number style, from the Customize Numbered List dialog box, click the Number Style arrow to see the available style choices. You can determine at which number you want the list to start by clicking in the Start At box, and then typing the number for the starting point. If you prefer, you can use the up or down arrows on the Start At box to increase or decrease the number by one. Further, you can customize the text position by configuring the Number Position and Text Position options (for additional alignment information, see the sections "Changing the Bullet Indent,", and "Modifying Text Position in Lists,").
| Note | To configure multilevel lists, see the section "Creating a Multilevel List with Picture Bullets". Also, see Chapter 10, "Outlining Documents for Clarity and Structure," for more information about working with complex lists and outlines. |
Continuing Numbering
Some of your numbered list items might be separated by elements such as charts, explanatory paragraphs, or sidebars. But instead of starting over again with number 1, as Word does by default when you click the Numbering button on the Formatting toolbar, you might want to pick back up with the next numbered step in your process. You can continue numbers in an existing numbered list in a couple of ways:
-
Right-click the first incorrect number in a numbered list, and choose Continue Numbering.
-
Click the numbered item that you want to renumber; choose Format, Bullets And Numbering; and click Continue Previous List. The numbering scheme in use is selected in the gallery and changes to show the continuation numbers (as shown in Figure 8-25). Click OK.
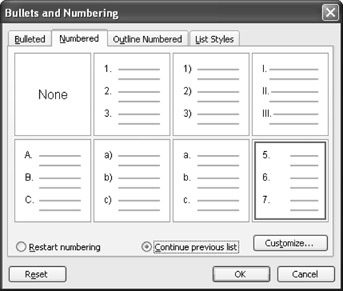
Figure 8-25: When you click Continue Previous List, the styles update to show the extended numbering sequence. -
Click a numbered item in the accurately numbered part of your list, click Format Painter in the Standard toolbar, and then click the incorrectly numbered item.
To continue a numbered list while you type, use any of the following procedures:
-
Type the next number in the series, press Tab, and then type your text. The AutoFormat feature will kick in and automatically continue your previous numbered list.
-
Click the smart tag when you start the continued numbered series, and then choose Continue Numbering in the smart tag list.
-
Click a numbered item in the accurately numbered part of your list, click Format Painter in the Standard toolbar, and then click in the paragraph where you want to add the next numbered step.
A word of caution: you should carefully evaluate the length of your numbered lists. In some cases, your information might be clearer if you create a series of shorter numbered lists (separated by headings, if possible), instead of creating a long numbered list.
Restarting Numbering
Restarting numbered lists is similar to continuing numbered lists, as described in "Continuing Numbering". The main difference is that you'll want to choose the Restart Numbering option instead of the Continue Previous List option. To restart a numbered list with the number 1, take any of the following actions:
-
In a numbered list, right-click the number that you want to change to the number 1, and choose Restart Numbering.
-
If you're currently creating the list, type 1, press Tab, and then type text to begin the new numbered list.
-
Click the numbered item that you want to renumber; choose Format, Bullets And Numbering; click Restart Numbering, and then click OK.
Tip Restart a list with a number other than 1 If you want to restart a list with a number other than 1 (but you don't want to continue the preceding list), select Restart Numbering in the Bullets And Numbering dialog box, click Customize, enter a number in the Start At box, and then click OK.
Insert a Numbered Step into an Existing List
If you find that you've forgotten a step, you can easily insert the step into an existing list. To do so, place your cursor at the end of the step that will precede the newly inserted step, and press Enter. Word will automatically insert the next number and renumber the following existing steps.
| Tip | You can combine lists by cutting and pasting existing lists together. Further, you can easily rearrange list items by selecting an item you want to move, and dragging it to another location in the list. |
Converting a Bulleted List to a Numbered List (or Vice Versa)
You can easily convert bulleted lists to numbered lists and vice versa. To do so, simply select the list, and then click either the Bullets button or the Numbering button on the Formatting toolbar. After you convert a list, you can tweak the list's appearance and settings while the list is selected by choosing Formatting, Bullets And Numbering (or right-clicking the selected list and choosing Bullets And Numbering), and then configuring the settings in the Bullets And Numbering dialog box.
|
| < Day Day Up > |
|
EAN: 2147483647
Pages: 373