Using the Highlight Tool
|
| < Day Day Up > |
|
As in earlier versions of Word, the Highlight tool is available for use in Word 2003, and its functionality remains the same. One minor difference regarding the Highlight tool in Word 2003 compared to Word 2002 is that you can access the tool from the Reviewing toolbar. Highlighting calls attention to important or questionable text in documents, as illustrated in Figure 27-2. Highlighting parts of a document works best when the document is viewed online, although you can use highlighting in printed documents if necessary. When you use the Highlight tool, the main tasks you'll perform are adding, removing, finding, and replacing highlighting. The next few sections briefly describe these procedures.
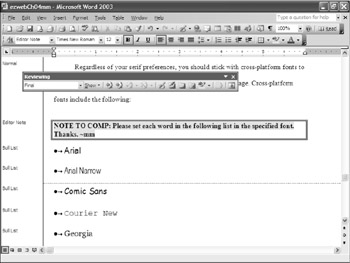
Figure 27-2: You can use the Highlight tool to draw attention to particular information in your Word document when you're collaborating with others.
Highlighting Information
![]() You can apply highlighting to a single block of selected text or graphics, or you can apply highlighting to a series of text areas or graphics. To apply a single instance of highlighting to information, select the information and then click the Highlight button on the Reviewing toolbar or the Formatting toolbar. To apply highlighting to multiple blocks of information, click the Highlight button, select the text or graphic you want to highlight, and then select the next item in the document you want to highlight. The Highlight tool continues to highlight information as you select it. To turn off highlighting, click the Highlight button again, or press Esc.
You can apply highlighting to a single block of selected text or graphics, or you can apply highlighting to a series of text areas or graphics. To apply a single instance of highlighting to information, select the information and then click the Highlight button on the Reviewing toolbar or the Formatting toolbar. To apply highlighting to multiple blocks of information, click the Highlight button, select the text or graphic you want to highlight, and then select the next item in the document you want to highlight. The Highlight tool continues to highlight information as you select it. To turn off highlighting, click the Highlight button again, or press Esc.
You can change the highlight color by clicking the Highlight button arrow and choosing a color on the menu. The color you choose becomes the default highlight color until you select another color on the menu.
| Tip | Choose highlight colors wisely Be sure to choose a light highlight color if you're going to print your document with highlighted text, especially if the document will be printed in monochrome (including grayscale) or on a dot-matrix printer. If more than one person is going to be adding highlighting to a document, consider assigning highlight colors to each person or standardize highlight colors to indicate a particular issue (for example, reviewers could use turquoise highlighting to specify that a page reference needs to be completed, bright green highlighting to draw attention to repeated information, and so forth). |
Inside Out: Considering browsers when highlighting
If you save highlighted text as part of a Web page, Word stores the highlighting information as part of the Web page's cascading style sheet (CSS). This information will be understood and displayed properly in Internet Explorer 3 and Netscape Navigator 4 browsers and later versions, but earlier versions of those browsers (and other less widely used browsers) might not display the highlighting properly. If you're not sure which browsers viewers will be using to display your Web page, you should consider using another method to draw attention to the text in place of highlighting. For example, you could color the text itself, create a graphic of the highlighted text, or build a table and color the text's table cell to simulate a highlighted paragraph.
Removing Highlighting from Documents
You can remove the highlighting in a document when you no longer need to draw attention to the highlighted text or graphics. To remove highlighting, follow these steps:
-
Select the information you want to remove highlighting from, or press Ctrl+A to select the entire document.
-
Click the Highlight button arrow, and then choose None on the menu.
After you choose None, all instances of highlighting are removed from the selected text.
| Tip | Display and hide highlighting You can display or hide highlighting (but not the text itself) on screen and in the printed document without permanently removing the highlighting. To do so, choose Tools, Options, click the View tab, clear or select the Highlight check box in the Show section, and click OK. |
Finding Highlighted Items
If you want to jump from highlighted item to highlighted item, you can do so by using the Find And Replace dialog box. To find instances of highlighted text, follow these steps:
-
Choose Edit, Find, or press Ctrl+F.
-
Click More to expand the Find tab.
-
Click Format, and choose Highlight.
-
Click Find Next to jump to the next occurrence of highlighted text, and click Cancel when you've finished reviewing all other instances of highlighted text.
You can also select all instances of highlighted text at one time by following steps 1 through 3 above and then selecting the Highlight All Items Found In check box in the Find And Replace dialog box. Verify that Main Document is selected in the list below the check box and click Find All.
| Tip | Clear the highlight format from the Find tab To stop the Highlight specification from being associated with the Find What text box on the Find tab, click No Formatting in the Find And Replace dialog box. For more information about the Find And Replace dialog box, see Chapter 4, "Honing Document Navigation Skills." |
Reformatting Highlighted Items with Another Highlight Color
You can change a highlight color in a document, as well as change all instances of highlighting in a document to the same color. To change a single instance of a highlight color, choose another highlight color on the Highlight button menu, and then select the highlighted text. The existing highlight color changes to the newly selected color.
To change the color of multiple instances of highlighting, you can use the Find And Replace dialog box. Using this technique, you replace all existing highlighting (regardless of original highlight color) with a newly selected color, as follows:
-
Click the Highlight arrow, and select the color you want to assign to all highlighting.
-
Choose Edit, Replace, or press Ctrl+H. The Find And Replace dialog box appears.
-
If necessary, click More to expand the Replace tab.
-
Make sure that no text appears in the Find What and Replace With boxes, position your insertion point in the Find What box, and then click Format and choose Highlight.
-
Click in the Replace With box, and choose Format, Highlight.
-
Click Replace All, and then click OK in the message box that tells you how many replacements were made.
-
Click Close to close the Find And Replace dialog box.
In addition to replacing all highlighted text with a newly selected color, you can use the above procedure to replace selected instances of highlighting with a new color. To do so, click Find Next instead of Replace All in step 6. You can then specify which instances of highlighting are replaced with a new color on a case-by-case basis.
| Note | You can also change all instances of highlighting to the same color by selecting all instances of highlighting using the Find tab, as described in "Finding Highlighted Items", and then choosing a new color on the Highlight button menu. |
|
| < Day Day Up > |
|
EAN: 2147483647
Pages: 373