Working in the Shared Workspace Task Pane
|
| < Day Day Up > |
|
Now that you know how to create a shared workspace and understand the site you've created online, you're ready to return to Word and use the features in the Shared Workspace task pane. This is where the benefits of these collaboration features really shine—you can manage, review, access, edit, and update your team documents, all right from within Word! This process is really no more difficult than working with any other document. This section of the chapter takes you through the major tasks you'll want to perform on shared documents.
Adding Team Members
One of the first things you'll want to do is add team members for your shared project. Open the Shared Workspace task pane (press Ctrl+F1 when your shared document is open on the screen), and then click the Members tab. This tab of the Shared Workspace task pane lists all active members, shows you whether they are online or not, gives you a link to add new members, and offers the option of sending e-mail to all members at once, as shown in Figure 25-9.
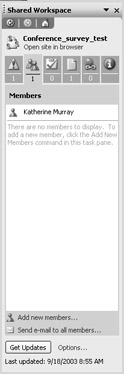
Figure 25-9: The Members tab enables you to add, organize, and contact members.
To add a new member, click the Add New Member link at the bottom of the task pane. In the Add New Members dialog box, type the names or e-mail addresses of others on your team, as shown in Figure 25-10.
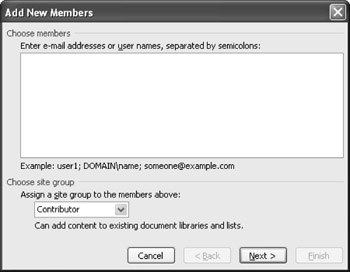
Figure 25-10: Enter the e-mail addresses of team members and assign them to a site group to control site access.
In the Choose Site Group section, you make selections that determine what kind of permissions you grant to the users you are adding. The four site groups and their permission levels are as follows:
-
Reader Gives members read-only privileges
-
Contributor Enables members to read and add postings on the site
-
Web Designer Lets members read, post, and modify items on the site
-
Administrator Includes full access; members of this group can read, post, modify, and add or delete users and pages
Note The site group you select will be applied to all users you list in the Choose Members box in the Add New Members dialog box. This means that if you want to assign different users to different site groups, you'll need to add the members in batches.
Click Next. The member names and e-mail addresses appear in the next display. Enter a display name for each member, if you like, verify the addresses, and then click Finish. A message tells you that the members have been added and asks whether you'd like to send an e-mail message to the new participants, as shown here:

When you click OK, Word displays the e-mail message that will be sent to new team members. You can add your own message as needed and then click Send to deliver the message.
Adding Tasks
Delegation is a major part of getting any collaborative project done. Who does what is important, because everyone's work depends on everyone else. You can assign and review task assignments in the Shared Workspace task pane. Here's how:
-
With your document open, display the Shared Workspace task pane.
-
Click the Tasks tab, and then click Add New Task at the bottom of the task pane.
-
In the Task dialog box, shown in Figure 25-11, enter a title for the task. Then complete the Status, Priority, and Assigned To fields.
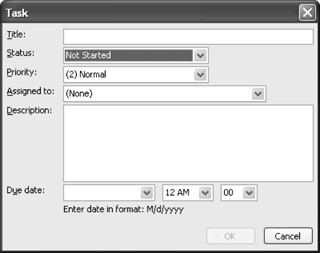
Figure 25-11: The Task dialog box collects information about the who, what, and when of any task that needs to be done. -
If necessary, add a description to provide instructions about the task, and then enter a due date by selecting it from the calendar (click the arrow) or by typing it in the form m/d/yyyy.
-
Click OK to add the task.
After the task is added, you can view it at any time by clicking the Task tab. When you click the arrow to the left of the task, a list of task options appears. You'll use these options to update the status of your tasks or to remove tasks from the list.
Inside Out: Setting alerts
One of the great features of SharePoint Team Services and the Shared Workspace task pane is that they can automatically keep you in touch with any changes made on the team site or in your shared documents. Click Alert Me About Tasks in the bottom of the Tasks tab in the Shared Workspace task pane to go to the New Alert page of the team Web site. Here you can set up a notification system so that you receive e-mail messages whenever tasks are completed or items are added, updated, or removed. This keeps you up to date with the most recent happenings on the site and in your project, which helps everybody stay on the same page.
In addition, you can display information about a task (including any text that was entered in the Description field) by simply hovering the mouse pointer over it, as shown in Figure 25-12.
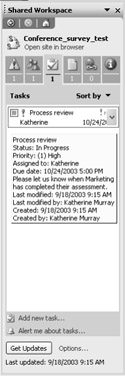
Figure 25-12: Get full information about a task by positioning the mouse pointer over it.
Working with Documents
Once you have enrolled the members and assigned the tasks, you can get down to the real business of working with your collaborative document. The Documents tab in the Shared Workspace task pane gives you everything you need to view, update, and work with the shared document. To see your options for working with a document, click the Documents tab and then click the arrow to the left of the document. A menu of document choices appears, as shown in Figure 25-13.

Figure 25-13: You can get information about the current document and update changes using the Documents tab.
| Note | Some of the options shown in Figure 25-13 are disabled because the shared document is currently open on the screen. For example, you don't need the Open In Microsoft Office Word option when you're already working on the document. Similarly, after you make changes to the current document, the option Publish Back To Source Location becomes available. |
Each time you open a shared document, a prompt will ask you whether you want to check for updates on the shared workspace site. If you click Get Updates, Word will compare the open document with the most recent version on the site. If the uploaded document is more current than the one you're opening, Word will display the Document Updates task pane so that you can compare and merge any necessary changes, as shown in Figure 25-14.
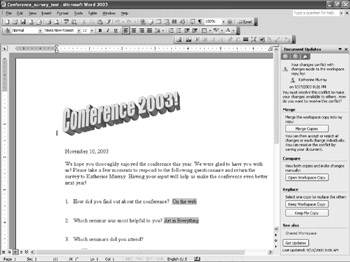
Figure 25-14: When you open a shared document, Word checks to see whether it is the most current version and gives you the option of comparing and merging changes.
When you select Merge Copies, Word adds the changes to the current document but turns on tracking so that you can easily see the changes. You can then accept or delete changes as usual.
When you select Open Workspace Copy, Word displays both the copy of the document in the shared workspace and a task pane that gives you the option of keeping the workspace copy.
|
| < Day Day Up > |
|
EAN: 2147483647
Pages: 373