Editing Master and Subdocuments
|
| < Day Day Up > |
|
Because master documents and subdocuments are two different kinds of files, each storing different things, you'll make different editing changes in each of them. Table 20-2 lists the editing tasks you'll want to perform and shows where you'll make those changes in master and subdocuments.
| Editing Task | Master Document | Subdocument |
|---|---|---|
| Text editing and correction | √ | √ |
| Applying heading levels | √ | |
| Changing topic order | √ | |
| Checking spelling | √ | |
| Global formatting | √ | |
| Local formatting of individual elements | √ | √ |
| Changing margins and page setup | √ | |
| Adding headers and footers | √ | |
| Adding borders and shading to specific objects | √ |
Making Master Changes
The types of changes you'll make to your master document include those that will affect the entire publication. For example, you'll add styles to a template in the master document so that all the styles can be consistent among the various pieces of the publication. You'll also change margins, specify column settings, and do things like run the spelling checker and print while you have everything together in your master document.
You'll also add headers and footers to your master document so that you can ensure consistent treatment throughout all your subdocuments.
Entering Subdocument Changes
The most basic changes will have to happen in the subdocuments, especially if you are assigning subdocuments to different team members to write, edit, proofread, and ultimately return to the master. The line-by-line editing, word choice, and object work (such as the addition of tables, graphics, and text boxes) all need to happen in the subdocument file.
Each person working on a subdocument can make changes as needed, and then save the file in the designated folder. When the master document is opened and the document is expanded, all changes made in the various subdocuments will be reflected in the master. The person working with the master can then change global formatting options, check spelling, add headers and footers, and print the document as needed.
Troubleshooting: Different styles appear in the master document and subdocuments
If you notice that the headings in your master document and subdocuments look different, check the template you've applied by choosing Tools, Templates And Add-Ins. In the Document Template section, check each file to make sure that both the master and the subdocument have the same template selected and that the Automatically Update Document Styles check box is selected. If necessary, attach a different template by clicking Attach and, in the Attach Template dialog box, navigating to the template file you want. Make your selection and click Open, and then click OK to close the Templates And Add-Ins dialog box and return to the document.
Locking Subdocuments
Word provides a subdocument locking feature that enables you to protect documents so that no further changes can be made to them. This is particularly helpful if you're working as part of a team and want to make sure another team member doesn't modify a file after it's been finalized.
 To lock a subdocument, simply click the subdocument icon and click Lock Document on the Outlining toolbar. A small lock symbol appears beneath the subdocument icon to the left of the subdocument text, as shown in Figure 20-8.
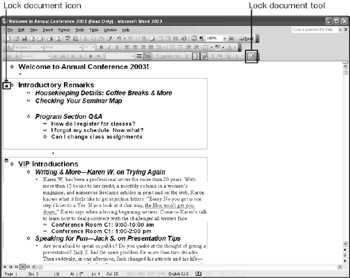
Figure 20-8: Once you finish editing a subdocument, you can lock it against further changes by clicking Lock Document on the Outlining toolbar.
|
| < Day Day Up > |
|
EAN: 2147483647
Pages: 373