Applying Shading Behind Content
|
| < Day Day Up > |
|
Sometimes you need more than a border-you need something to help the text, heading, or image really stand out as different from the rest of the publication. For those times, you might consider adding a background shade to provide color, contrast, and visual appeal for your document.
Applying Shades to Tables and Paragraphs
Word includes a number of predesigned table formats that include many shading possibilities. You can use one of the preset shading schemes by selecting the table, and then choosing Table, Table AutoFormat. You can then click each format choice to see the shading that's been used in the AutoFormats.
 When you want to apply custom shading to text, paragraphs, table cells, tables, or headings, you can use the Shading Color button on the Tables And Borders toolbar or the Shading tab in the Borders And Shading dialog box. To apply shading effects using the Shading tab in the Borders And Shading dialog box, follow these steps:
-
Select the item you want to shade.
-
Choose Format, Borders And Shading.
-
Click the Shading tab. The Shading tab contains various options you can use to add and modify shades, as shown in Figure 18-11.
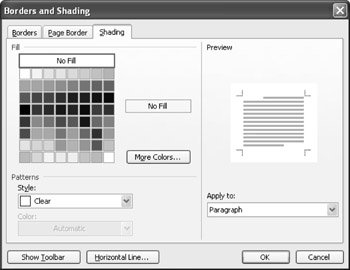
Figure 18-11: Adding shading can be as simple as selecting the information you want to appear on a shaded background, and then choosing a shade color in the Shading tab or from the Shading Color button's menu.Note The borders and shading features of Word work independently, which means that if you add shading without adding a border, the item will appear with only the shade behind it-no outer border will be added automatically. To add a border to a shaded item, select it, and then choose Format, Borders And Shading; configure border settings in the Borders tab; and then click OK to apply the border to the shaded selection.
-
In the Fill section, click the color you want to apply. If you don't see the color you want, you can click More Colors to open the Colors dialog box and choose from another selection. Alternatively, you can click the Custom tab in the Colors dialog box to enter the RGB or HSL values for a custom color.
-
In the Patterns section, click the Style arrow to display your choices for the density or pattern of the color you select. Choose a lower percentage for a lighter shade. The Preview area shows the effect of each selection.
-
Click OK to apply the shading settings.
To remove shading, select the shaded content, and then perform either of the following actions:
-
On the Tables And Borders toolbar, click the arrow on Shading Color, and then choose No Fill.
-
Choose Format, Borders And Shading, click the Shading tab, choose No Fill, and then click OK.
Note Shading applied to fields and forms is different from the shading you create by using the Shading tab in the Borders And Shading dialog box. To control whether fields and forms appear with shading, you need to configure the Options dialog box. To do so, choose Tools, Options. In the View tab, configure the Field Shading option, in the Show section, by making a selection in the list. For more information about fields and forms, see Chapter 31, "Working with Field Codes and Custom Forms."
Shading Considerations
As with the caveat given earlier about art borders, remember that a little shading goes a long way. Done thoughtfully and with readers' needs in mind, shading can be very effective in calling attention to certain elements and helping special design objects stand out on the page (especially in Web page design). But overusing shading or using the wrong mix of colors and patterns can make your document or Web page harder for people to read, which means they'll turn the page or click away from your site-and you'll lose your audience.
To use shading effectively, adhere to the following guidelines:
-
Use shading on a need-to-use basis. Don't sprinkle shades all the way through your document at random. Give a shade a reason, such as, "Every time we mention a new board member we'll provide a brief biography in a shaded sidebar."
-
Choose intensities carefully. A shade that looks light on the screen might be much darker in print. Always look at information online and in print form whenever possible, even for online content. You never know when a reader will decide to print an online page for later reference.
-
Test your contrasts. When you add a colored shade behind text, be sure to increase the contrast between the color of the shade and the color of the text. If you choose a dark blue background, black text won't show up clearly. If you choose a dark background, select a light (white or yellow) text.
-
Do test prints on a printer that produces comparable output. If you're printing colored shades, be sure to print a test page on a color printer.
-
If you're creating a Web page, use Web-safe colors for your shades. Most Web browsers today can support the standard colors used in the Windows palette. If you choose customized colors, however, some browsers might not display the color accurately. Test the display of the page with different browsers to check the colors you've selected. To see a listing of Web-safe colors and their RGB values, visit http://www.creationguide.com/colorchart.html.
|
| < Day Day Up > |
|
EAN: 2147483647
Pages: 373