Step 4 The Art of Illusion
Step 3 — Writing a Custom Renderer
Because this application will eventually support dragging, mouse clicks in the JList will be used for two purposes:
-
Selecting a Garment item to toggle whether it is worn or not
-
Selecting a Garment item to drag it to another location in the list
As you have already seen, the JList in the final version of this program is customized to display a checkbox next to each list item in order to distinguish these two use cases. A click in a checkbox toggles a Garment’s worn property, while a click outside the checkbox is handled in the default manner for the JList. In this step we will learn how to customize the way that a JList displays its items.
Using a Renderer
JList in the gui1 package uses a JLabel to draw each item. How many JLabels do you think it has? One for each item? Ten? Actually, it has only one. A JList is an example of what I will call a faux-composite component. Other examples are JTables, JTrees and JComboBoxes. Faux-composite components can create the illusion of having thousands or more children components without incurring the overhead necessary to maintain that many components. Just like a painting of a door in a wall that looks real but isn’t, what looks like a child component is only the image of a component. Faux-composite components use an object called a renderer to paint the component images or cells. A renderer implements a method that accepts several parameters detailing which cell is about to be painted (the Object it represents, whether it’s selected, etc.) and returns a Component configured to represent that cell. When the faux-composite component needs to paint itself, it paints each visible cell one at a time by getting this Component from the renderer and painting its image at the cell’s location. All the faux-composite components have default renderers but they also accept customized plug-in renderers.
JList, JComboBox and JTree use a single renderer. They each offer one method for getting this renderer and another for setting it. These methods are listed in table 14-7. The JTable class is more complex because it allows a different renderer to be set for each one of its columns and even for each column’s header. Additionally it allows a different default renderer to be associated with each distinct column data class. The methods for getting and setting JTable’s and TableColumn’s renderers are listed in table 14-8.
| Defining Class | Method |
|---|---|
| JList | public void setCellRenderer(ListCellRenderer renderer) |
| JList | public ListCellRenderer getCellRenderer() |
| JTree | public void setCellRenderer(TreeCellRenderer renderer) |
| JTree | public TreeCellRenderer getCellRenderer() |
| JCombobox | public void setRenderer(ListCellRenderer renderer) |
| JCombobox | public ListCellRenderer getRenderer() |
| Defining Class | Method |
|---|---|
| JTable | public void setDefaultCellRenderer(Class columnClass, TableCellRenderer renderer) |
| JTable | public TableCellRenderer getDefaultCellRenderer(Class columnClass) |
| JTable | public TableCellRenderer getCellRenderer(int row, int column) |
| TableColumn | public void setCellRenderer (TableCellRenderer renderer) |
| TableColumn | public TableCellRenderer getCellRenderer() |
| TableColumn | public void setHeaderRenderer(TableCellRenderer renderer) |
| TableColumn | public TableCellRenderer getHeaderRenderer() |
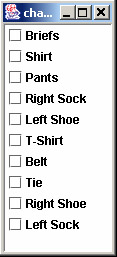
Figure 14-3 shows an example of a JList with a customized renderer. JList and JComboBox use ListCellRenderers. The ListCellRenderer interface defines the one method:
public Component getListCellRendererComponent(JList list, Object value, int index, boolean isSelected, boolean cellHasFocus)

Figure 14-3: A JFrame Containing a JList with a Custom ListCellRenderer
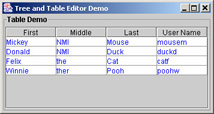
Figure 14-4 shows an example of a JTable using a customized renderer. JTables, TableColumns and JTableHeaders use TableCellRenderers. The TableCellRenderer interface defines the one method:
public Component getTableCellRendererComponent(JTable table, Object value, boolean isSelected, boolean hasFocus, int row, int column)

Figure 14-4: A JFrame Containing a JTable
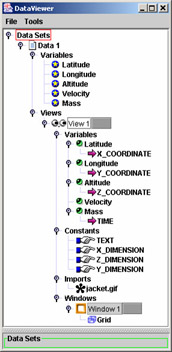
Figure 14-5 shows a JTree with a highly customized renderer. JTrees use TreeCellRenderers. The TreeCellRenderer interface defines the one method:
public Component getTreeCellRendererComponent(JTree tree, Object value, boolean selected, boolean expanded, boolean leaf, int row, boolean hasFocus)

Figure 14-5: A JFrame Containing a Highly Customized JTree
In each case, the first parameter is a reference to the faux-composite component itself. The second is the object (obtained from the data model) that is represented by the implicated cell. The remaining parameters identify the state and location of the implicated cell.
The CheckboxListCell Class
CheckboxListCell (example 14.6) will be the custom renderer for this application’s JList. Because having a checkbox for a list cell might be a good idea in other contexts, we’ll attempt to keep CheckboxListCell reusable by avoiding any dependency on application-specific classes or data. If we’re successful, we might be able to use it without modification in another program in the future.
Example 14.6: chap14.gui2CheckboxListCell.java
1 package chap14.gui2; 2 3 import java.awt.BorderLayout; 4 import java.awt.Color; 5 import java.awt.Component; 6 7 import javax.swing.JCheckBox; 8 import javax.swing.JLabel; 9 import javax.swing.JList; 10 import javax.swing.JPanel; 11 import javax.swing.ListCellRenderer; 12 13 public abstract class CheckboxListCell implements ListCellRenderer { 14 15 private JLabel label; 16 private JCheckBox checkBox; 17 private JPanel panel; 18 19 public CheckboxListCell() { 20 panel = new JPanel(new BorderLayout()); 21 label = new JLabel(); 22 checkBox = new JCheckBox(); 23 checkBox.setOpaque(false); 24 panel.add("Center", label); 25 panel.add("West", checkBox); 26 } 27 28 public Component getListCellRendererComponent( 29 JList list, 30 Object value, 31 int index, 32 boolean isSelected, 33 boolean cellHasFocus) { 34 35 panel.setBackground(isSelected ? Color.yellow : list.getBackground()); 36 label.setText(String.valueOf(value)); 37 checkBox.setSelected(getCheckedValue(value)); 38 return panel; 39 } 40 protected abstract boolean getCheckedValue(Object value); 41 } Because CheckboxListCell implements ListCellRenderer, its getListCellRendererComponent() method is obligated to return a Component that will represent the list item the list is currently attempting to paint. CheckboxListCell.getListCellRenererComponent() returns a panel (created once at the time of construction) containing a JCheckbox and a JLabel.
The getListCellRendererComponent() method takes advantage of its parameters to do just-in-time configuration of the renderer component. These parameters are a JList which is a reference to the JList itself, an Object which returns the same as invoking getElementAt(index) on its ListModel (in our case the Object will be an instance of Garment), an int which is the index of the object in the List, a boolean representing whether this list item is currently selected, and a boolean representing whether this list item currently has the focus (for example, was it just clicked?). We set the background of the renderer component to be yellow if it is selected, or the same as the JList’s background if it isn’t selected. We set the JLabel’s text by calling toString() on the value parameter just as JList’s default renderer would.
We need to check or uncheck the checkbox depending on whether or not the garment is worn, but that presents a small dilemma. If we cast the value parameter to a Garment and call Garment.isWorn(), that would build in a dependency on the object being a Garment. We would like CheckoxListCell to be able to handle any object type that can be associated with the checked state of a checkbox. So, we need to figure out a way for it to determine the checked state without knowing the value parameter’s type. There are different ways to approach this. The way we will employ here is probably the easiest to code. We make CheckboxListCell abstract, give it the abstract method getCheckedValue() thereby forcing subclasses to define the relationship by implementing this method.
By the way, did you notice that we needed to set the checkbox’s opaque property to false? Some Swing components such as the JLabel have transparent backgrounds by default. These components only paint their foreground (not their background), thereby allowing any components behind them to show through the unpainted surface area. Other components have opaque backgrounds by default. These components take responsibility for painting their entire surface area. JCheckbox is one of these. If we were to let its opaque property default to true, the JCheckbox would paint its own background and might appear a different color than its container (the JPanel). I think it looks better with a transparent background.
The MainFrame Class
The only change to MainFrame is that we plug in an instance of CheckboxListCell as the JList’s renderer (lines 40 - 45 of example 14.7).
Example 14.7: chap14.gui2.MainFrame.java
1 package chap14.gui2; 2 3 import java.awt.BorderLayout; 4 import java.awt.Container; 5 import java.awt.Image; 6 import java.awt.Point; 7 import java.util.Collections; 8 import java.util.Vector; 9 10 import javax.swing.BorderFactory; 11 import javax.swing.JFrame; 12 import javax.swing.JList; 13 import javax.swing.ListModel; 14 import javax.swing.border.BevelBorder; 15 import javax.swing.event.ListSelectionEvent; 16 import javax.swing.event.ListSelectionListener; 17 18 import utils.ResourceUtils; 19 import chap14.gui0.DressingBoard; 20 import chap14.gui0.Garment; 21 22 public class MainFrame extends JFrame implements ListSelectionListener { 23 24 private DressingBoard dressingBoard; 25 private JList garmentList; 26 27 public MainFrame() { 28 setTitle(getClass().getName()); 29 setSize(600, 400); 30 setDefaultCloseOperation(JFrame.EXIT_ON_CLOSE); 31 32 Container contentPane = getContentPane(); 33 contentPane.setLayout(new BorderLayout()); 34 dressingBoard = new DressingBoard(); 35 contentPane.add("Center", dressingBoard); 36 37 garmentList = new JList(); 38 garmentList.setBorder(BorderFactory.createBevelBorder(BevelBorder.LOWERED)); 39 garmentList.addListSelectionListener(this); 40 CheckboxListCell cellHandler = new CheckboxListCell() { 41 protected boolean getCheckedValue(Object value) { 42 return ((Garment)value).isWorn(); 43 } 44 }; 45 garmentList.setCellRenderer(cellHandler); 46 contentPane.add("West", garmentList); 47 48 initList(); 49 } 50 private void initList() { 51 String[] names = 52 { 53 "T-Shirt", 54 "Briefs", 55 "Left Sock", 56 "Right Sock", 57 "Shirt", 58 "Pants", 59 "Belt", 60 "Tie", 61 "Left Shoe", 62 "Right Shoe" }; 63 Point[] points = 64 { 65 new Point(75, 125), 66 new Point(86, 197), 67 new Point(127, 256), 68 new Point(45, 260), 69 new Point(69, 118), 70 new Point(82, 199), 71 new Point(88, 203), 72 new Point(84, 124), 73 new Point(129, 258), 74 new Point(40, 268)}; 75 76 Vector garments = new Vector(names.length); 77 for (int i = 0; i < names.length; ++i) { 78 Image image = 79 ResourceUtils.loadImage("chap14/images/" + names[i] + ".gif", this); 80 Garment garment = new Garment(image, points[i].x, points[i].y, names[i]); 81 garments.add(garment); 82 } 83 Collections.shuffle(garments); 84 garmentList.setListData(garments); 85 } 86 private void redrawBoy() { 87 ListModel lm = garmentList.getModel(); 88 int stop = lm.getSize(); 89 Vector order = new Vector(); 90 for (int i = 0; i < stop; ++i) { 91 Garment garment = (Garment)lm.getElementAt(i); 92 if (garment.isWorn()) { 93 order.add(garment); 94 } 95 } 96 dressingBoard.setOrder((Garment[])order.toArray(new Garment[0])); 97 } 98 public static void main(String[] arg) { 99 new MainFrame().setVisible(true); 100 } 101 public void valueChanged(ListSelectionEvent e) { 102 ListModel lm = garmentList.getModel(); 103 for (int i = lm.getSize() - 1; i >= 0; --i) { 104 Garment garment = (Garment)lm.getElementAt(i); 105 garment.setWorn(false); 106 } 107 108 Object[] selectedGarments = garmentList.getSelectedValues(); 109 for (int i = 0; i < selectedGarments.length; ++i) { 110 Garment selectedGarment = (Garment)selectedGarments[i]; 111 selectedGarment.setWorn(true); 112 } 113 redrawBoy(); 114 } 115 } Use the following commands to compile and execute the example. From the directory containing the src folder:
javac –d classes -sourcepath src src/chap14/gui2/MainFrame.java java –cp classes chap14.gui2.MainFrame
Run this step’s program and notice the JList’s new looks! Notice also that the checkbox is not truly functional. Try selecting an unselected list item, for instance. Did your checkbox get checked? Hmmm… Try to unselect that list item by selecting another. Did it become unchecked? Hmmm… Try to uncheck a checked checkbox by clicking inside it. A checkbox should toggle state when it’s clicked, but this one doesn’t. Well, what did you expect? Remember that it’s actually only the image of a checkbox that our renderer painted there. But wait! If the checkbox is not functional (it isn’t) then how did it manage to display a check mark when its list item was selected and get unchecked when its list item was unselected? What’s really happening here? It is important that we be able to answer these questions so that we don’t lose control over a “maverick” program.
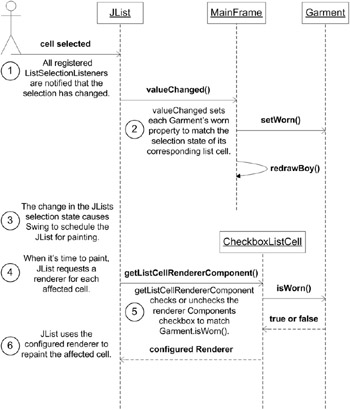
In words, here’s what happens when an unselected list cell is clicked: The click causes the cell to become selected. This causes the JList to call MainFrame.valueChanged() because MainFrame is the list’s registered ListSelectionListener. MainFrame.valueChanged() updates every Garment’s worn property to match the selection state and then calls redrawBoy(). Meanwhile, JList knows that it needs to repaint all cells whose selection state changed. When it is time to repaint, it calls CheckboxListCell.getListCellRendererComponent() for each cell that needs to be updated. CheckboxListCell.getListCellRendererComponent() sets the checkbox’s checked state to reflect whether or not the Garment is worn. Fortunately, the Garment’s worn state was just set by MainFrame’s valueChanged() method. Finally, the JList paints the affected cell with the correctly updated checkbox. Figure 14-6 details this process with a sequence diagram.

Figure 14-6: Sequence Diagram for a JList Using CheckboxListCell – First Version
So, the reason unchecking a checked checkbox by clicking inside it doesn’t work, is that it doesn’t cause a change in the JList’s selection state. As far as the JList is concerned, there’s no need to repaint itself. Clearly, we’re going to need something more than a ListSelectionListener to get things functioning.
Quick Review
JList, JComboBox, JTree and JTable are examples of faux-composite components. They use renderers to create the illusion of having many children components without incurring the overhead of maintaining that many components. JList and JComboBox use ListCellRenderers; JTables use TableCellRenderers; and JTrees use TreeCellRenderers. By implementing the correct renderer interface, a custom renderer can affect a faux-composite component’s appearance, tailoring it to the data it represents.
EAN: 2147483647
Pages: 452
- Chapter VI Web Site Quality and Usability in E-Commerce
- Chapter X Converting Browsers to Buyers: Key Considerations in Designing Business-to-Consumer Web Sites
- Chapter XII Web Design and E-Commerce
- Chapter XIV Product Catalog and Shopping Cart Effective Design
- Chapter XVII Internet Markets and E-Loyalty