Designing the User Interface
| Now you need to implement a basic user interface for the few features that you'll be adding to the game (and some that you will add yourself when you finish the game, I hope). Earlier in this chapter, you removed two Dialog variables that were used to make the user interface for the empty project sample. Now you add back a new Dialog variable to create your own user interface: // User interface for the game private Dialog gameUI = null; Of course, you need to instantiate this object somewhere, so find the constructor of the KartRacers class and add the creation code there: gameUI = new Dialog(sampleFramework); Regardless of what controls you end up having within this dialog, you need to have it rendered at some point. Find the OnFrameRender method of the class and add this code after the call to End on the sprite object: gameUI.OnRender(elapsedTime); Make sure that call is within the if statement dealing with the current state of the game. You wouldn't want the interface being rendered while the game is being played. Now, you also need to ensure that the dialog has a way to react to any changes going on, such as the mouse moving over them and so on. Find the OnMsgProc method and add this code to the beginning of that method: if (currentState == GameState.MainMenu) { // Give the dialog a chance to handle the message first noFurtherProcessing = gameUI.MessageProc(hWnd, msg, wParam, lParam); if (noFurtherProcessing) return IntPtr.Zero; } Notice that this code also checks the current state of the game. There is no need for the dialog to respond to user input if it isn't being shown. What you need now is a place to add the user controls to this dialog. Remember from earlier, you removed the code from the InitializeApplication method but not the method itself. That is where you add the code to create your controls. Replace the method with the one in Listing 19.3. Listing 19.3. Creating Controls public void InitializeApplication() { int y = 10; // Game title text gameUI.AddStatic(StaticControlNonChanging, "Kart Racers - The Game", 30, y, 600, 30); // User name information gameUI.AddStatic(StaticControlNonChanging, "User Name:", 30, y += 34, 80, 30); gameUI.AddEditBox(UserNameBoxControl, System.Environment.UserName, 30, y += 34, 500, 30); // Buttons Button single = gameUI.AddButton(NewButtonControl, "New Game", 30, y += 34, 120, 24); Button multi = gameUI.AddButton(MultiButtonControl, "AI Game", 200, y, 120, 24); Button network = gameUI.AddButton(NetworkButtonControl, "Network Game", 370, y, 120, 24); // All the buttons should have the same handler for now single.Click += new EventHandler(OnNewGame); multi.Click += new EventHandler(OnNewGame); network.Click += new EventHandler(OnNewGame); // Slider for AI opponents (unused in this code) gameUI.AddStatic(ChangingStaticControl, "Number of AI Opponents: 1", 30, y += 34, 200, 20); Slider opponents = gameUI.AddSlider(AISliderControl, 30, y += 24, 200, 20, 1, 7, 1, false); opponents.ValueChanged += new EventHandler(OnSliderChanged); // Combo box for picking correct kart gameUI.AddStatic(StaticControlNonChanging, "Pick your kart style:", 30, y += 24, 150, 20); ComboBox kart = gameUI.AddComboBox(PickKartControl, 30, y += 24, 200, 24); if (kart != null) { kart.SetDropHeight(100); kart.AddItem("Kart #1", "KartAndDriver_YYYB.jpg"); kart.AddItem("Kart #2", "KartAndDriver_BBRY.jpg"); kart.AddItem("Kart #3", "KartAndDriver_RRBR.jpg"); kart.AddItem("Kart #4", "KartAndDriver_RRYY.jpg"); } // Combo box for picking the level gameUI.AddStatic(StaticControlNonChanging, "Pick your level:", 250, y -= 24, 100, 20); ComboBox level = gameUI.AddComboBox(PickLevelControl, 250, y += 24, 200, 24); if (level != null) { level.SetDropHeight(100); level.AddItem("Level #1", "track.x"); } // Exit Game Button exitGame = gameUI.AddButton(ExitGameControl, "Exit Game", 50, y += 30, 120, 30); exitGame.Click += new EventHandler(OnExitGame); } You add a few types of controls in this method. The Static control is basically just a control to render some text, much like the Label control in WinForms. The EditBox control, which works much like a TextBox in WinForms, is where you can input data directly. Button controls, as the name implies, are simple buttons. There is a Slider control, which works much like the TRackbar control from WinForms. Finally, the ComboBox controls work just like the WinForms controls of the same name. You'll notice first that each control is created with an integer identifier; in the preceding code, constants are used to describe each of them, but they haven't been declared yet. Add these constants to your class: // UI Control constants private const int StaticControlNonChanging = 1; private const int UserNameBoxControl = 2; private const int NewButtonControl = 3; private const int MultiButtonControl = 4; private const int NetworkButtonControl = 5; private const int ChangingStaticControl = 6; private const int AISliderControl = 7; private const int PickKartControl = 8; private const int PickLevelControl = 9; private const int ExitGameControl = 10; As the controls are created and sized, some of the events that can be fired by these controls are hooked. (You can find the event handlers in Listing 19.4.) Most of the controls need a simple piece of text to describe them (such as the text on the button), but two of the controls (the combo boxes) require more information. Notice that the AddItem method takes two parameters. The first parameter is the data that will be rendered on the control (the description), and the second parameter is the actual data of the control. For example, in the kart picking combo box, the data represents the texture file that is loaded for that go-kart. Listing 19.4. Event Handlers for Controls /// <summary> /// Fired when the exit game button is clicked /// </summary> private void OnExitGame(object sender, EventArgs e) { // We should exit the game sampleFramework.CloseWindow(); } /// <summary> /// Fired when one of the new game buttons is clicked /// </summary> private void OnNewGame(object sender, EventArgs e) { currentState = GameState.Gameplay; } /// <summary> /// Fired when the slider changes /// </summary> private void OnSliderChanged(object sender, EventArgs e) { Slider slider = sender as Slider; gameUI.GetStaticText(ChangingStaticControl).SetText( string.Format("Number of AI Opponents: {0}", slider.Value)); } The event handlers are basically self-explanatory. When the exit button is clicked, the form is closed. When one of the new game buttons is clicked, the game state is changed to GamePlay because you play the game after you click those buttons. (Currently, you just go back to a blue screen, but eventually, that's what you'll be doing.) You won't use the slider code for anything unless you decide to add artificial intelligence (AI) opponents. One more thing you should do is make sure that the dialog is resized if the device is reset. Find the OnResetDevice method and add the following code to the end: if (gameUI != null) { int width = desc.Width - 10; int height = desc.Height - 30; gameUI.SetLocation(5,30); gameUI.SetSize(width, height); // Exit Game gameUI.GetButton(ExitGameControl).SetLocation((width - 120) / 2, height - 50); } This code sets the location and size of the dialog and ensures that the exit button is always located at the center of the screen toward the bottom. See Figure 19.3 for the finished user interface screens. Figure 19.3. Complete with user interface.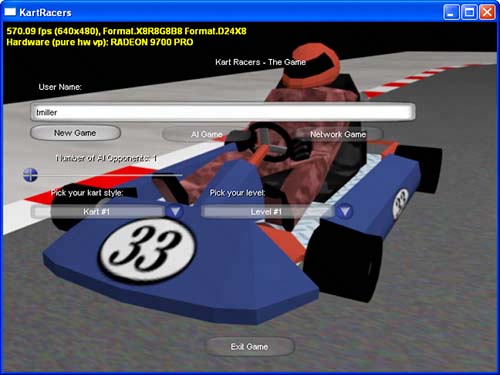 |
EAN: 2147483647
Pages: 191