Creating Your Project
| I hope that you took the time to write down your design ideas and goals and imagine a good design layout. It's time to start writing some code and get this project started. Remember back to the second chapter when you first started learning about the differences between 3D and 2D programming: you wrote a quick and simple application designed to show these differences. It created a 3D teapot rotating around your screen. You initially created the project by running the sample browser that ships as part of the DirectX software development kit (SDK). (You should be using the Summer 2004 update.) (Refer to Figure 2.2.) After that application was running, you clicked the Install Project link next to the managed Empty Project application. Do the same thing once more and call the project KartRacers. Construction Cue
As you can see in Figure 19.1, running the application as it is created results in a running application with a few user interface controls rendered off to the side. The upper section of these controls resides in all the samples, but the other controls are "sample-specific" (even though they don't actually have any purpose in this project). Figure 19.1. The default empty project running.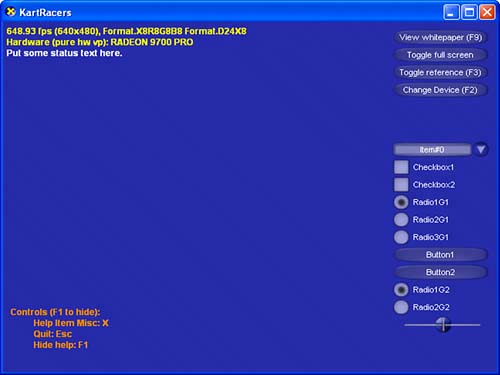 To get ready for the game, you fix up this code to remove the unnecessary items. Plus, you want to make the game run in full-screen mode when you're not debugging, as with the previous games you've written. You also don't need all this text that's all over the sample. First, you get rid of the current user interface. Find the following variable and constant declarations in the only code file in the project: private Dialog hud = null; // dialog for standard controls private Dialog sampleUi = null; // dialog for sample specific controls // HUD Ui Control constants private const int ToggleFullscreen = 1; private const int ToggleReference = 3; private const int ChangeDevice = 4; The two dialog parameters are for the two sets of user interfaces. The sample framework groups the user interface controls into dialogs much as Windows itself does. Each of the controls in a dialog should have a unique integer identifier, and these constants are used to create what the samples call the HUD. It is the set of user controls that all the samples use to toggle full-screen mode, change device settings, or toggle into a reference device. Because you won't be using any of these items, remove all the lines listed here. Trying to compile the application now means that you see quite a few compilation errors, but considering that you just removed some variables, you should expect them. First, find the constructor of the KartRacers object and remove the two lines that create the dialogs: // Create dialogs hud = new Dialog(sampleFramework); sampleUi = new Dialog(sampleFramework); Next, find the OnResetDevice method and remove the four calls to the dialogs that you've already removed: // Setup UI locations hud.SetLocation(desc.Width-170, 0); hud.SetSize(170,170); sampleUi.SetLocation(desc.Width - 170, desc.Height - 350); sampleUi.SetSize(170,300); You also need to fix the OnFrameRender method so it doesn't try to render those user interface controls, so remove these calls from that method: // Show UI hud.OnRender(elapsedTime); sampleUi.OnRender(elapsedTime); Because the controls have any messages coming from windows processed in the OnMsgProc method, you remove the Dialog variables from that method as well: // Give the dialog a chance to handle the message first noFurtherProcessing = hud.MessageProc(hWnd, msg, wParam, lParam); if (noFurtherProcessing) return IntPtr.Zero; noFurtherProcessing = sampleUi.MessageProc(hWnd, msg, wParam, lParam); if (noFurtherProcessing) return IntPtr.Zero; Finally, you remove every line of code from the InitializeApplication method (but not the method itself). With that, you should be able to compile and run again, but the only difference is that the user controls are now missing. Although it's not required to remove the event handlers for the user interface buttons you've just removed, it is probably a good idea. Remove the following handlers from the code: OnChangeDeviceClicked, OnFullscreenClicked, and OnRefClicked. You need to add the new controls later in this chapter, but for now, you should get rid of the extra text that's cluttering the running application. Find the RenderText method in the code because that is where all the text is being rendered. The frame rate text is something you want to keep while debugging, but the rest of that text is pretty much useless for this game. Replace the method with the one in Listing 19.1. Listing 19.1. Rendering Text private void RenderText() { #if (DEBUG) TextHelper txtHelper = new TextHelper(statsFont, textSprite, 15); // Output statistics txtHelper.Begin(); txtHelper.SetInsertionPoint(5,5); txtHelper.SetForegroundColor(System.Drawing.Color.Yellow); txtHelper.DrawTextLine(sampleFramework.FrameStats); txtHelper.DrawTextLine(sampleFramework.DeviceStats); txtHelper.End(); #endif } As you see here, the majority of the text rendering code was removed, and even the code that stayed is put into a #if clause that only renders the text if the game is running in debug mode. Notice that the text is rendered using the TextHelper object rather than direct calls to the DrawText method on the font class. This helper object is used to maintain the location of where the next section of text will be drawn, and it makes drawing a series of lines of text such as this much simpler. Running the application now results in a completely blank screen if you're running in release mode or a blank screen with some frame statistics if you're running in debug mode. Now you need to ensure that the game runs in full-screen mode if you're not debugging, so find the Main method and add this code directly after the InitializeApplication call: #if (!DEBUG) sampleFramework.IsOverridingFullScreen = true; #endif You also want to change the call to the Initialize method on the sample framework object so it doesn't respond to the normal keyboard commands or parse the command line as the samples do: sampleFramework.Initialize( false, false, true ); Before you start designing the new user interface by using the sample framework's controls, there are just a few things you should do first. You need some way to know what state the game is in. For now, you know that there are at least two different states that the game can be in (showing the user interface or playing the game), so add this enumeration to your code: public enum GameState { MainMenu, Gameplay } You also need to add a variable to the KartRacers class so that it knows which state the game is in, and you start in the main menu state because that's the way the game should begin: private GameState currentState = GameState.MainMenu; // State of the game The main menu screen should also have a background screen that will be rendered behind the user interface. Because this screen requires some media, you need a way to figure out the location of the media. As you did back in the first two games, click the Add New Item selection from the project menu, add an Application Configuration File to your project, and replace the automatically generated Extensible Markup Language (XML) with the XML in Listing 19.2. Listing 19.2. Configuration File for the Media<?xml version="1.0"?> <configuration> <appSettings> <add key="MediaPath" value="..\..\..\..\Media\KartRacers\"/> </appSettings> <startup> <supportedRuntime version="v1.1.4322"/> <requiredRuntime version="v1.1.4322" safemode="true"/></startup> </configuration> Obviously, you want the MediaPath value to match wherever you have copied the media on your hard drive. If you used the installation program, the value shown here will work for you. With the configuration file in your project now, you need to have a variable to actually access this key, so add this variable to your KartRacers class: public static readonly string MediaPath = ConfigurationSettings.AppSettings.Get("MediaPath"); You probably notice that this code doesn't compile. The ConfigurationSettings class resides in the System.Configuration namespace, which currently hasn't been imported, so you need to either fully qualify the ConfigurationSettings classname or add the using clause to the application. I prefer the latter: using System.Configuration; You need a few things to get the background rendering correctly now. First, you declare two new variables in your KartRacers class: // Background image variables private Sprite backgroundSprite = null; private Texture backgroundTexture = null; You also instantiate these objects. Find the OnCreateDevice method, and add the following code to the end of that method to get these objects created: backgroundSprite = new Sprite(e.Device); backgroundTexture = ResourceCache.GetGlobalInstance().CreateTextureFromFile( e.Device, MediaPath + "splash.jpg"); The sprite is pretty straightforward because the only parameter it takes is the device (which is retrieved from the event arguments that this method receives). The texture, however, is created from the sample framework's resource cache, which is similar to the texture pool you created for Tankers but instead can store more than one type of object. A benefit of using this cache is that you no longer have to worry about cleaning up the objects stored there, unlike the sprite, which you do. Construction Cue
Speaking of cleanup for the sprite, you need to do that now. You handle three scenarios for the sprite: when the device is lost, reset, and destroyed. Find the OnLostDevice method first and add this code to the end: // Clean up sprite if required if (backgroundSprite != null) { backgroundSprite.OnLostDevice(); } Similarly, find the OnResetDevice method and use this code at the end: // Reset sprite if required if (backgroundSprite != null) { backgroundSprite.OnResetDevice(); } Finally, destroy the sprite when the OnDestroyDevice method is called: // Destroy sprite if required if (backgroundSprite != null) { backgroundSprite.Dispose(); backgroundSprite = null; } With everything created and cleaned up properly now, you only need to add the rendering code. Find the OnFrameRender method, and add this code after the begin scene variable is set: if (currentState == GameState.MainMenu) { backgroundSprite.Begin(SpriteFlags.None); backgroundSprite.Draw2D(backgroundTexture, System.Drawing.Rectangle.Empty, sampleFramework.ClientRectangle, System.Drawing.Point.Empty, unchecked((int)0xffffffff)); backgroundSprite.End(); } Naturally, you only want this background image to display when the main menu is open, so you first make sure that the game state is the correct one, and then you call Begin on the sprite object. You'll notice that the next call is to a new Draw2D method that didn't exist before this release of the Managed DirectX assemblies. As its name implies, its goal is to simplify drawing a 2D image onscreen. This particular overload takes the texture to render (in this case, your splash screen texture) and the rectangle portion of that texture that will be rendered. Because you want to use the entire texture as the splash screen, you pass System.Drawing.Rectangle.Empty here. The next rectangle parameter is the area where you want this texture to be rendered. Because you want the splash screen to cover the entire area of the window, you use the client rectangle of the sample framework. Next, you need to know where you want the upper-left corner of the texture to be rendered. In this case, the upper-left corner of the window happens to be (0, 0), or Point.Empty. The final parameter is the color you want to blend the texture with; in this case, you want the full texture to be shown as is, so you use the integer value for white. Finally, you just call the End method on the sprite. You can see the result of this work in Figure 19.2. Figure 19.2. Splash screen is done.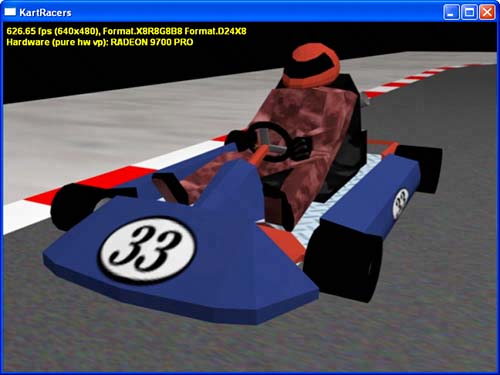 |
EAN: 2147483647
Pages: 191