Finishing Up the Player
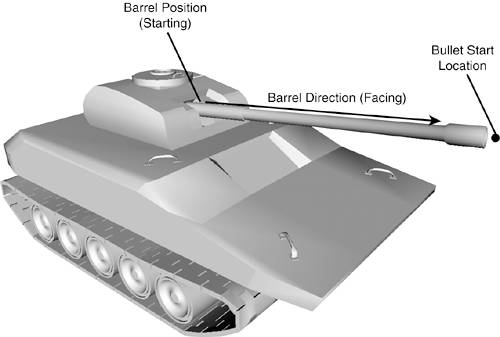
| You need to finish up just a few things in the player class before you're ready to begin using it. One of those things is to add the code that fires the bullets! You couldn't do it up to this point because the classes weren't defined, but now that you've implemented the bullet classes, this is the perfect time. What you want to do first is add a method to fire the round (Listing 15.8) to the player class. Listing 15.8. Firing a Round /// <summary> /// Will add a new bullet to the list /// </summary> public void FireRound(Device device, Bullets list) { // Get the bullet start and velocity Vector3 bulletStart; Vector3 bulletVel; GetBulletStartLocation(out bulletStart, out bulletVel); // Finally add the new bullet list.Add(new Bullet(device, bulletStart, bulletVel, this)); } This method doesn't do much other than add a bullet to the list after it calculates where the starting location of the bullet and the velocity should be. That method is defined in Listing 15.9. Listing 15.9. Calculating Initial Position and Velocity /// <summary> /// Get the starting bullet location and velocity /// </summary> public void GetBulletStartLocation(out Vector3 bulletStart, out Vector3 bulletVelocity) { // First, get the bullet start bulletStart = gameTank.BarrelPosition; // Scale the bullet in the correct direction to the end of the barrel bulletStart.Add(Vector3.Scale(gameTank.BarrelDirection, Tank.GunBarrelLength)); bulletVelocity = Vector3.Scale(gameTank.BarrelDirection, Bullet.BulletStrength); } This method calculates the initial position of the bullet by first setting it to the position of the gun's barrel. However, the gun's barrel position is at the base of the gun barrel (at the turret). You don't want your bullet to fire from way down there: you want it to be coming out of the barrel's end. So take the position you have and add to it the length of the gun barrel, in the direction the barrel is facing. See Figure 15.1. Figure 15.1. Calculating the bullet position.
After you have the starting position of the bullet, calculating the velocity is simple. Take the direction the barrel is facing (which is already normalized), and scale it by the speed you want the bullet to be initially traveling (which you defined as a constant earlier in this chapter). Construction Cue
One other thing you haven't done in the player class yet is add a method to draw the player's name above the tank. Remember, during the constructor, you stored the player's name and created a sprite and font to render it, but you haven't done anything with it yet. Add the following method (in Listing 15.10) to the player class to allow the name to be rendered. Listing 15.10. Rendering the Player Name public void DrawPlayerName(GameEngine engine) { // Calculate where to put the player's name Vector3 pos = Position; pos.Y += Radius / 1.75f; // Set the world transform to the correct location engine.SetWorldTransform(Matrix.RotationX((float)Math.PI) * gameTank.TankRotationMatrix * Matrix.Translation(pos) * Matrix.Translation(gameTank.Center)); // Now draw the text onto the sprite playerFontSprite.Begin( SpriteFlags.AlphaBlend | SpriteFlags.ObjectSpace); playerFont.DrawText(playerFontSprite, playerName, System.Drawing.Rectangle.Empty, DrawTextFormat.NoClip, System.Drawing.Color.CornflowerBlue); playerFontSprite.End(); } You first need to calculate where you'll be rendering the text, so you use the tank's position as a starting point. You want the text to appear above the tank, so you translate the y position up slightly. Then you need to set the world matrix by combining a few different transformation matrices. First, you rotate around the x axis so the text is facing the correct direction, then add in the rotation of the tank, then translate to the position of the text, and finally add one last translation to the center of the tank. With the world matrix now set, you can draw the text. Notice that in the Begin method on the sprite class, you added a new flag, SpriteFlags.ObjectSpace. Without this flag, the sprite assumes it will be rendering 2D content in screen space and will ignore the world matrix you've just set. Finally, you draw the text on the sprite and call the End method. |
EAN: 2147483647
Pages: 191