Most Popular Peripherals
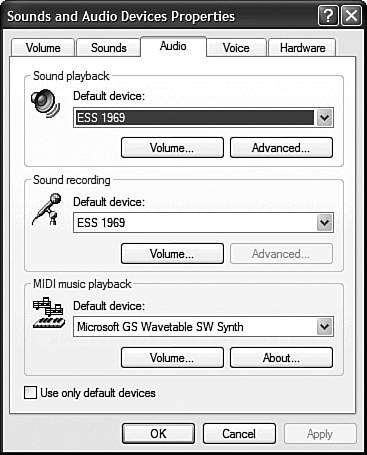
| When it comes to adding stuff to your PC, what are the most popular peripherals? Here's a list of hardware you can add to or upgrade on your system, along with some tips on how Windows XP might handle the new devices. Video CardsIf you want to display a higher-resolution picture on your computer screen, play the latest graphics-intensive PC games, or add advanced video editing capabilities to your system, you need to upgrade to a higher-performance video card. This procedure is as simple as swapping out the old card for a new one. Windows should recognize your new video card on restart, and make the necessary configuration changes automatically. You can also install additional video cards to use with multiple monitors. To learn more about the multiple-display capabilities of Windows XP, turn to the "Setting Up Windows for Two Monitors" section in Chapter 2, "Changing the Way Windows Looks and Acts." Sound CardsIf you play high-end games, listen to a lot of CDs, watch surround-sound DVD movies, or mix and record digital audio, you may want to upgrade your PC's sound card. While the replacement is a simple procedure, you may need to tweak your system's audio configuration to take advantage of all the functionality of the new card. You can configure all sorts of audio properties by clicking the Sounds and Audio Devices icon in the Control Panel. This displays the Sounds and Audio Devices Properties utility. Select the Audio tab (shown in Figure 6.4) to select and configure specific devices for sound playback, sound recording, and MIDI music playback. Select the Voice tab to select and configure devices for voice playback and recording. Select the Hardware tab to configure the properties for specific multimedia drivers. Figure 6.4. Use the Sounds and Audio Devices Properties utility to configure your new sound card.
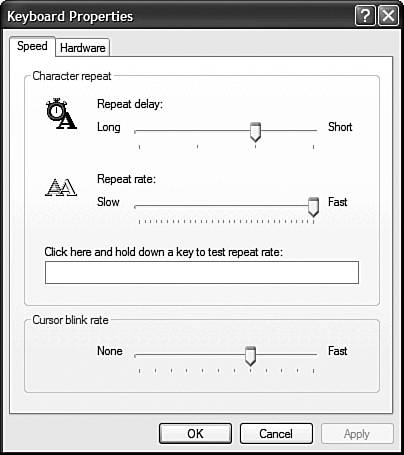
KeyboardsInstalling a new keyboard is as simple as unplugging the old one and plugging in the new one. You may want to replace your PC's standard keyboard with a more ergonomic model, or with a wireless keyboard or both. After you install a new keyboard, you can set various properties that affect the way it works. In particular, you can set the character repeat rate, cursor blink rate, the language, and the keyboard type. You can also select multiple languages for your keyboard and switch between them. You change keyboard properties by opening the Control Panel and clicking the Keyboard icon. This opens the Keyboard Properties utility, as shown in Figure 6.5. Most of what you want to adjust can be found on the Speed tab. Figure 6.5. Use the Keyboard Properties utility to change various keyboard options, such as repeat rate and delay.
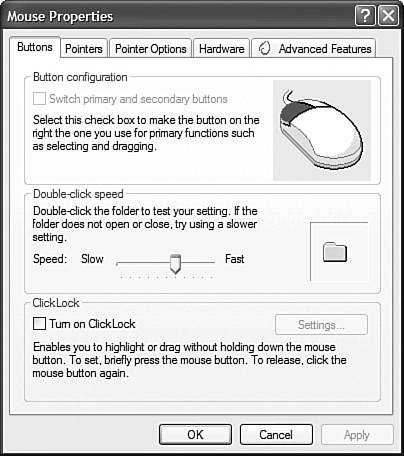
MiceReplacing your mouse is as easy as replacing your keyboard. If you're still using the generic mouse that came with your PC, you should definitely take a look at the newer models available today. You'll find optical mice, wireless mice, and alternative mice (trackballs, and so on). I guarantee that you'll find some kind of input device that you like better than the one you're currently using! Because some mice have extra buttons or wheels, it's likely that the mouse will come with its own installation program. When you run this program, the proper device drivers will be installed and additional features added to Windows' Mouse Properties utility. You open the Mouse Properties utility by clicking the Mouse icon in the Control Panel. As you can see in Figure 6.6, all mice share the same basic tabs (Buttons, Pointers, Pointer Options, and Hardware). Some mouse models add their own proprietary tabs for their own specific features. It might be worthwhile to click through the tabs to see what kinds of functionality your specific mouse offers and select the desired settings, as appropriate. Figure 6.6. Configure your mouse with the Mouse Properties utility.
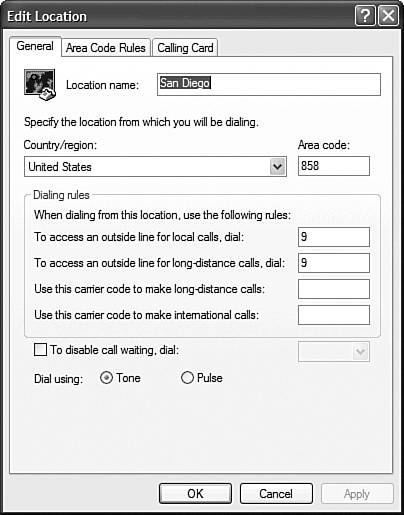
NOTE Learn more about using Windows XP with games and gaming devices in Chapter 19, "Playing Games." Joysticks and Game ControllersThere are many brands and types of joysticks and game controllers available for use with PC games. Connecting a new device is as simple as plugging it in (and running the installation program, if there is one). Go with a USB joystick and you get the immediate gratification of using it as soon as you plug it in. You can configure a new game controller by clicking the Game Controllers icon in the Control Panel. This opens the Game Controllers dialog box. Select the Settings tab to calibrate your joystick and configure additional settings. TIP If you intend to use your modem from another location, or from a hotel room, click the New button on the Dialing Rules tab to create a new location with different dialing rules. ModemsMany new PCs come with an internal 56.6Kbps modem installed. This is the fastest dial-up modem available today, so you probably won't have any need to install a new one. If you do need to install a new modem, you can choose from an internal or an external model. Internal modems are less hassle, even though you have to open up your system unit to plug them in. External modems take up valuable desk space, need to be plugged in to a power supply, and are sometimes more difficult to configure. If you have a choice, go with an internal modem. When you need to change the settings for your modem, click the Phone and Modem Options icon in the Control Panel. This opens the Phone and Modem Options utility, where you can set a number of configuration options. To set driver, performance, and other settings specific to your modem, select the Modems tab, select the modem, and click the Properties button. To configure how your modem dials, select the Dialing Rules tab, select your location, and click the Edit button. This opens the Edit Location dialog box (shown in Figure 6.7), which lets you specify which number the modem dials to get an outside line, whether to disable call waiting, and so on. Figure 6.7. Don't forget to set the dialing rules for your modem or create new rules for a new location.
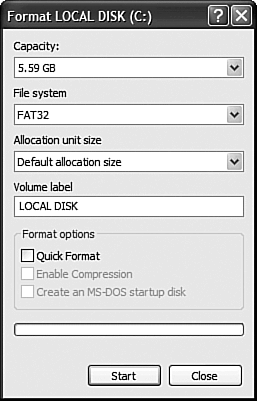
Of course, more and more users are migrating to faster Internet connections and dumping the dial-up modem completely. If you're setting up your system for use with a broadband Internet connection via DSL or a cable modem the setup is completely different. Yes, you'll still use a modem (an external model typically supplied by your Internet service provider), but the modem will either connect to a network card in your PC or through your PC's USB port. See Chapter 7, "Making the Connection," for more information on this type of hookup. NOTE Recordable CDs are designated CD-R, and rewritable CDs are designated CD-RW. Most drives can burn both recordable and rewritable CDs, and are designated as CD-R/RW drives. DVD and CD-ROM DrivesMost PCs come with either a CD-ROM or a DVD drive as standard. (A DVD drive also reads CD-ROM discs.) If you have a CD-ROM drive, you may want to upgrade to or add a DVD drive. You may also want to add a recordable/rewritable drive to burn your own CDs or DVDs. After you add a new DVD or CD drive to your PC, there's not a lot of configuring to do. It either works or it doesn't. If it works, great. If it doesn't, you need to do some troubleshooting. When a DVD or CD drive is properly installed, it should appear in My Computer as a new Device with Removable Storage, alongside any removable drives on your system. You can access the contents of the drive from My Computer as you would any other drive. If you have a CD-R/RW drive, you can copy files and folders to a blank disc by using Windows' normal copy command or by dragging and dropping files onto the CD-R/RW drive icon. CAUTION After you convert from FAT32 to NTFS, you can't go back. Also, if you're using NTFS, you can't boot your computer from DOS. In addition, you can't convert to NTFS if you're using a dual-OS box, like if you're running both Linux and Windows from the same hard disk or running an older version of Windows along with XP. Hard DrivesManaging new hard drives is easier in Windows XP than in Windows 9X/Me, because there are fewer options. In most instances you don't have to do a lot of formatting or partitioning, because XP recognizes and works with today's large hard disks. Windows XP recognizes three different hard disk file systems: NTFS, FAT, and FAT32. NTFS is Microsoft's preferred file system, because it works best with ultra-large hard disks. It's also compatible with Microsoft's Active Directory service, which is used by network administrators to manage network security. Know, however, that most current disk utilities don't work with NTFS yet, although this is bound to change over time. If you want to convert an older hard disk to NTFS, the process is surprisingly easy. If your hard disk is blank (or if you don't mind losing all the data on it), you can format the disk as NTFS. If you want to retain the disk's data, you can convert the drive from FAT or FAT32 to NTFS. TIP I recommend using an external hard drive as a backup device for all your important files. Hard disk drives have become relatively inexpensive; you can configure most external drives to automatically back up your entire hard disk at specified intervals. It's cheap insurance in case something happens to your system. To convert an existing drive, you have to open the Command Prompt utility and then run the following command: convert x: /fs:ntfs Naturally, you replace x with the letter of the drive you want to convert. Formatting a drive is a more destructive process although it's amazingly simple to do. Just follow these steps:
CAUTION Formatting a drive permanently erases all data stored on the drive. You cannot format the hard disk that contains your PC's system information (typically drive c:). Flash DrivesA flash drive (also known as a keychain drive or USB drive) is a small, keychain-sized device that uses flash memory to store computer data. Flash drives come in any number of storage sizes, from 32MB to 1GB or more, and connect to your computer via a USB port. When connected, your computer views the device just like another disk drive; you can then transfer files from your computer to the flash memory and back again. Using a flash drive is easy with Windows XP. All you have to do is plug the drive into the nearest open USB port, and Windows automatically recognizes the device as a new drive. You can then use My Computer or My Documents to navigate and manage the contents of the drive, just as you would any system storage device. Digital Media Card ReadersMany new PCs now come with digital media card readers standard, typically located in a front panel bay. If you have an older PC, you can add a low-priced external media reader via USB; it's a plug and play operation. Media card readers typically offer a variety of different slots to read the most popular types of removable media cards Compact Flash, Smart Media, Secure Digital, MultiMediaCard (MMC), xD Picture Card, and Sony Memory Stick. Insert a media card and Windows XP recognizes the contents as it would with any type of removable media drive. You can use My Computer or My Documents to navigate and manage the contents of the media card. Digital CamerasMost digital cameras store their digital photos on removable media cards, which you can insert into a media card reader attached to your PC. Alternately, you can connect most digital cameras directly to your PC, typically via a USB connection. When you first connect your digital camera, Windows XP should recognize it and begin the driver installation process. If you're lucky, Windows will have a device driver for your camera. If not, you'll have to insert the camera's installation disc to download the proper driver. If Windows doesn't recognize your camera, you can add the camera to your system via the new Scanners and Cameras utility. Just click the Scanners and Cameras icon in the Control panel, and when the utility opens, click the Add Device icon. This starts the Scanner and Camera Installation Wizard, which walks you step-by-step through the installation. NOTE To learn more about using Windows XP with scanners and cameras, see Chapter 13, "Working with Digital Cameras and Scanners." Once your digital camera is properly installed and connected, you can work with it from My Computer as you would any other device. ScannersA desktop scanner is an essential part of many users' PC systems. Scanners have come down in price so they're quite affordable, and they're relatively easy to install and use. If you have the option, go with a scanner that connects via your computer's USB or FireWire port. USB and FireWire scanners require very little setup. In fact, connecting a scanner is very similar to connecting a digital camera; the installation should be automatic, and if not, you can use the Scanner and Camera Wizard to do the job. When your scanner is installed, you can link the scanner to a particular program. For example, you can configure Windows to automatically open a specific image-editing program when you click a scanned image anywhere on your system. Follow these steps:
PC CamerasA PC camera is a small camera that sits on top of or beside your computer monitor, and transmits live video images directly to your computer. You can use PC cameras to take digital photographs or videos of yourself, which you can then send via e-mail or post on your Web site. You can also use a PC camera to create a Webcam, which is a live stream of photographs, updated every few minutes, which are transmitted over the Web for all to see. Webcams are very popular these days, partly because PC cameras are so cheap and easy to use. If you buy a USB model, installing it is as easy as plugging it in. Windows handles the PC camera as it would any other type of input device, such as a digital still camera. Your chief chores are interfacing the camera with your Webcam software, configuring your Webcam software to work with your Web site, and coding your Web site to display your Webcam pictures. |
EAN: 2147483647
Pages: 270