| In the old days, adding new devices to your system was a major-league undertaking and apt to cause any number of new problems. Fortunately, those days are long gone; Windows XP makes upgrading your system extremely easy. Installing USB or FireWire Peripherals Most external devices today connect to your PC via USB; those that don't connect via USB typically connect via FireWire. Connecting via either USB or FireWire is an extremely simple operation that goes something like this: 1. | Connect the new device. (You don't have to turn your PC off first.)
| 2. | Windows automatically recognizes the new device, and either installs the proper drivers automatically or asks you to supply the device drivers (via CD-ROM or disk).
| 3. | Windows installs the drivers and informs you that your new device is now operational.
|
That's it USB and FireWire devices are truly plug and play. Installing Non-USB/FireWire Peripherals If you're connecting via a serial or parallel connection or installing a new internal card, then the operation is a little more complicated. Here's how it typically goes: 1. | Close Windows and turn off your PC.
| 2. | Connect the new device.
| 3. | Restart your computer.
| 4. | As Windows starts, it should recognize the new device, and either install the proper drivers automatically or ask you to supply the device drivers (via CD-ROM or disk).
| 5. | Windows installs the drivers and finishes the startup procedure. Your new device should now be operational.
|
This procedure should work with both external devices and boards that you insert into your PC's internal slots. Using the Add Hardware Wizard There are still occasions, however, where Windows doesn't recognize a new peripheral. There are many causes for this. The device might be an older one that isn't PnP-compatible. Windows might not have a record of that particular device in its internal database. Or it could just be that the moon and the stars aren't aligned quite right. Whatever the cause, if Windows doesn't recognize your new device, you have to install the device manually. With Windows XP, even manual installation is automated, thanks to the Add Hardware Wizard. This wizard walks you step-by-step through the installation process. It starts by trying to recognize the new device itself. If it still doesn't recognize the device, it asks you to identify the device, and to supply the proper device driver. After the driver is supplied, the wizard completes the installation for you. To use the Add Hardware Wizard, follow these steps: 1. | From the Control Panel, click the Add Hardware icon.
| 2. | When the Add Hardware Wizard opens, click the Next button.
| 3. | The wizard now asks if the new hardware is connected. Assuming you've already installed or connected the hardware, select the Yes, I Have Already Connected the Hardware option and click the Next button.
NOTE A device driver is a small software program that enables your PC to communicate with and control a specific device. Windows XP includes built-in device drivers for many popular peripherals. If Windows doesn't include a particular driver, you can typically find the driver on the peripheral's installation disk, or on the peripheral manufacturer's Web site. | 4. | Windows now evaluates your system and displays a list of installed devices, as shown in Figure 6.2. To add a new device, scroll down the list and select Add a New Hardware Device, and then click the Next button.
Figure 6.2. The Add Hardware Wizard starts by identifying all the hardware installed on your PC. 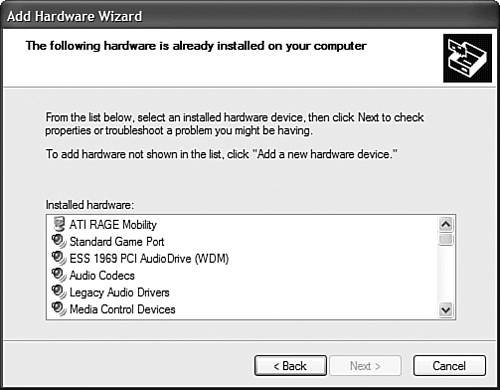
| 5. | When the next screen appears, select Search For and Install the Hardware Automatically, then click Next.
| 6. | Windows now looks for new PnP hardware. If it can identify the new hardware, the wizard will continue with the installation. If it can't find a new device, it will tell you so. If this is your situation, click Next to begin a manual installation.
| 7. | Select the type of device you want to install, then click Next.
| 8. | On the next screen, select the manufacturer and specific device. If you want to install the drivers that came with the device, click the Have Disk button. To use a built-in Windows driver, click the Next button.
| 9. | When the necessary files have been loaded, follow the onscreen instructions to complete the installation.
|
TIP If you think you need an updated device driver (of any type), go to WinDrivers.com (www.windrivers.com) or DriverGuide.com (www.driverguide.com). Both of these sites contain massive databases of drivers and related resources, all available for easy download.
|