Troubleshooting Technical Problems with Windows Diagnostic Tools
Troubleshooting Technical Problems with Windows' Diagnostic ToolsRemember all those technical tools I told you about earlier in the book? Well, now's the time to use them. Find and Fix Easy Problems with Windows TroubleshootersAs you learned back in Chapter 22, "Getting Help," Windows XP includes several Troubleshooters that can walk through various problems with your system. These Troubleshooters are like wizards, in that you're led step-by-step through a series of questions. All you have to do is answer the interactive questions in the Troubleshooter, and you'll be led to the probable solution to your problem. In most cases, Windows XP's Troubleshooters can help you diagnose and fix common system problems. It's a good idea to try the Troubleshooters before you pick up the phone and dial Microsoft's Technical Support line or start trying to track down problems manually. To run a Troubleshooter, open the Help and Support Center and click the Fixing a Problem link. When the next page appears, click the link for the type of problem you're having, and then click the link to start a specific Troubleshooter. All you have to do now is follow the interactive directions to troubleshoot your particular hardware problems. Tracking Down Startup Problems with the System Configuration UtilityThe System Configuration Utility is the tool you turn to when you know you have a startup problem but you don't know what's causing it. This utility troubleshoots your system by duplicating the procedures used by Microsoft's tech support staff when they try to diagnose system configuration problems. This utility leads you through a series of steps that, one-by-one, disable various components of your system on startup, until you're able to isolate the item that's causing your specific problem. You find the System Configuration Utility in the Tools section of the Help and Support Center. The easiest way to check your system with the System Configuration Utility is to perform a diagnostic startup. This routine enables you to interactively load specific device drivers and software when you start your system. You perform a diagnostic startup by selecting the General tab (shown in Figure 25.3) and selecting the Diagnostic Startup option. When you click OK, your computer will restart and you'll be shown the Windows Startup menu. Select Step-by-Step Confirmation, and then choose to process all files. Figure 25.3. Use the System Configuration Utility to track down startup problems.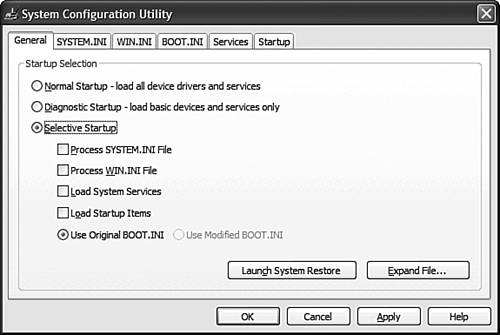 Windows will now start, but with only the most basic devices and services loaded. If you find that your problem is no longer present, you know that the problem was caused by one of the drivers or services that you didn't load. From here you need to return to the General tab and check the Selective Startup option. Then, starting with the first available option, enable each option (one at a time) and restart your system. By going through this admittedly time-consuming process, you should be able to determine which file or service is causing your problem. Your job isn't done yet, however. You now have to find the item within that file the specific driver, in most cases that is causing your problem. Click the tab that corresponds to the problematic file or service, and work through one item at a time, rebooting your computer after enabling each item. Again, working through one item at a time is very time-consuming, but this is the exact same procedure that the tech professionals use. Working meth odically, you can isolate the precise item that is causing your problem. If, after working through these steps, your computer still acts up, select the Startup tab. Here you see a list of all the programs that get launched every time you start Windows. Work through this list, line-by-line (rebooting your computer after each change, of course), to determine if one of these programs is causing your system problem. Even though this process is time-consuming, more often than not it will help you isolate your problem. Of course, once the problem is isolated, you still have to fix it normally by reinstalling a missing or corrupted driver file. Find and Fix Shared IRQs with System InformationSometimes a new piece of hardware will inadvertently try to share an IRQ with another previously-installed component, with predictably bad results. In Windows XP you can use the System Information utility to examine any and all shared IRQs on your system. To open this utility, click the Start button, then select All Programs, Accessories, System Tools, System Information. When the System Information window opens, open the Hardware Resources section of the System Summary, then select Conflicts/Sharing. This displays a list of all shared IRQs on your system. Identify the device causing your problem, and either reconfigure or reinstall the device to use a different IRQ. Find and Fix Driver Problems with the Device ManagerFor any piece of hardware to work with Windows, Windows has to install and configure a device driver file. Windows XP includes drivers for most popular hardware devices. If you have a newer or less widely used peripheral, however, the manufacturer may have to provide its own drivers for Windows to use. In most cases, Windows XP automatically recognizes your new device and installs the proper drivers. Even when that doesn't work, the Add Hardware Wizard can be used to install the proper drivers for new devices. Still, these methods can't add new and improved drivers if those drivers aren't available. Windows XP's Device Manager (select the Hardware tab in the System Properties utility and click the Device Manager button) is where you can review your various hardware settings. You also can use the Device Manager to determine which devices may have conflicts or other problems. When you open the Device Manager, any resource conflict on your system will be highlighted within the problematic Class group. Click the "+" next to the hardware device type to view all corresponding devices. If there is a problem with a specific device, it will be identified with one of the following symbols:
If you have a device conflict, right-click that device and select Properties from the pop-up menu. This displays the Properties dialog box. When you select the General tab you'll see a message indicating the basic problem and the steps Windows recommends to solve the problem. The message may also display a problem code and number that can be useful when consulting with a technical support specialist. To reconfigure a device, select the Resources tab in the Properties dialog box. (If this device doesn't have a Resources tab, either you can't change its resources or it isn't using any resource settings.) Select the resource you want to change, uncheck the Use Automatic Settings option, and then click the Change Setting button. When the Edit Resource dialog box appears, edit the system resources as necessary. Click OK when done. To update a device driver, select the Driver tab in the Properties dialog box, and then click the Update Driver button. When the Hardware Update Wizard appears, select where you want to search for an upgraded driver. If you have new driver software from your hardware's manufacturer, check the Install From a List or Specific Location option, then insert the disk or CD-ROM and follow the onscreen instructions to install the specific driver. If you'd rather have Windows search for a better driver, check the Install the Software Automatically option. Windows will now search for an updated device driver. If it finds one, follow the onscreen instructions to install it. If it doesn't find one, choose to keep your present driver. (And then go online yourself to try to find an updated version, if one exists.) Find and Fix Memory Problems with Virtual MemoryWindows XP augments your system's random access memory (RAM) with virtual memory. Virtual memory is hard disk space that Windows treats as RAM. When Windows runs low on conventional memory, it simply begins to store temporary data on your hard drive. Most of the time you don't have to worry about virtual memory, because Windows does the configuration automatically. If you're running low on hard drive space, however, you can decrease the amount of hard drive space used for virtual memory and give yourself more storage room for your permanent data. To change Windows' virtual memory settings, go to the Control Panel and click the System icon. When the System Properties dialog box appears, select the Advanced tab and click the Settings button in the Performance section. When the Performance Options dialog box appears, select the Advanced tab and then click the Change button. When the Virtual Memory dialog box appears, choose the hard disk you want to use for virtual memory, and then specify the Initial and Maximum number of megabytes you want Windows to use for virtual memory. Click the OK button when done. |
EAN: 2147483647
Pages: 270