Programming with the Google Maps API
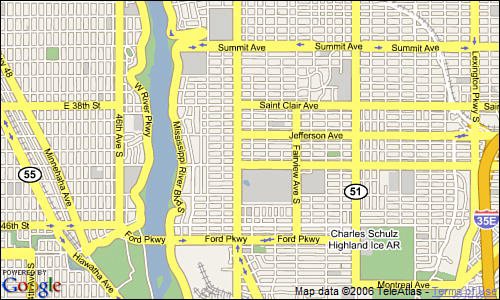
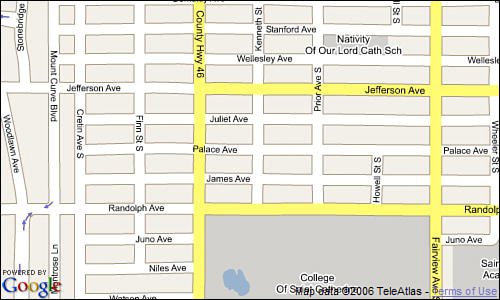
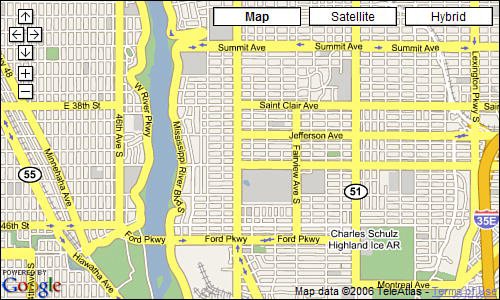
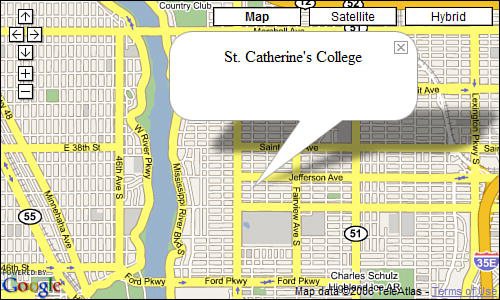
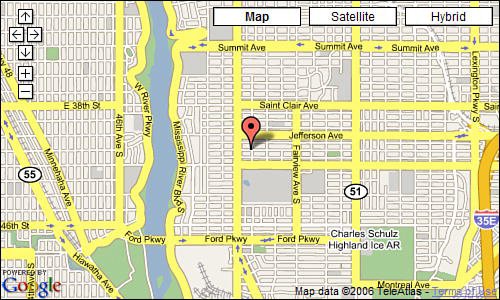
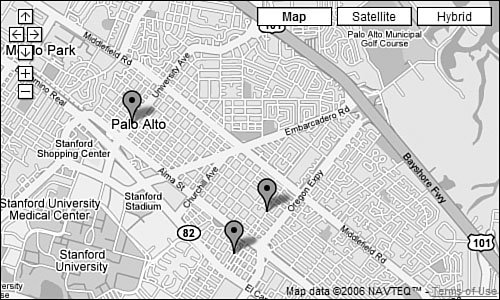
| A better way to get precisely the map you want is to use the Google Maps API. This API lets you embed custom Google Maps in your own web pages. You need to know a little HTML and JavaScript, but it's not that hard to create a basic map. To create more advanced map mashups, you just add more sophisticated code. For example, the Google maps API lets you add custom markers, info windows, and overlays to your maps. Each element is added via a distinct line of code, which then uses the Google Maps API to retrieve the appropriate map from Google. Like all of Google's other development tools, the Google Maps API is free for your noncommercial use. Using the Google Maps APITo use the Google Maps API, you have to obtain a license key. This key can be used only on the web domain you specifyso if you plan on using a practice board or another website for development, you'll want to get a key for that site in addition to your main site. You obtain your Google Maps API key at www.google.com/apis/maps. This is also where you download the API's documentation, access online help files, and link to the official Google Maps API Blog. (You can also access the blog directly at googlemapsapi.blogspot.com.) To obtain a license key, you'll need to have a Google Account, and then enter the domain of your website. Google will then email you the key, which you'll include in all your Google Maps code. Creating a Basic MapTo create a static map focused on a specific location, you need to create three blocks of JavaScript code. One block goes in the <HEAD> section of your document, the next augments the <BODY> tag, and the final block goes into the body of your document where you want the map to appear. Let's start with the opening code. Insert the following lines of code between the <HEAD> and </HEAD> lines of your document: <script src="/books/2/935/1/html/2/http://maps.google.com/maps?file=api&v=2&key=APIKEY" type="text/javascript"> </script> <script type="text/javascript"> //<![CDATA[ function load() { if (GBrowserIsCompatible()) { var map = new GMap2(document.getElementById("map")); map.setCenter(new GLatLng(LATITUDE, LONGITUDE), ZOOM); } } //]]> </script> In this code, replace APIKEY with the license key Google supplied to you. I stated this in the previous section, but it bears repeating: The key is specific to the web domain you specified when you applied for the key; if you use this code on another website, you'll need to edit the code to use a separate license key for that site. You'll also need to replace LATITUDE and LONGITUDE with the precise latitude and longitude coordinates of the location you want to map. You can obtain these coordinates by generating a map on the Google Maps site, clicking the Link to This Page link, and then copying the coordinates from the resulting URL. (Latitude and longitude are listed in the URL following the &ll parameter.) For example, I generated a map for St. Catherine College in St. Paul, Minnesota; the latitude and longitude coordinates for this location are 44.928835, -93.185177. In addition, you want to replace ZOOM with a number from 0 to 17. The smaller the number the wider the view; to zoom into street level, try a zoom of 13 or larger. Next, you need to edit the <BODY> tag to include the following parameters: <BODY onload="load()" onunload="GUnload()"> Finally, insert the following line of code into the body of your document, where you want the map to display: <div id="map" style="width: 500px; height: 300px"></div> You can play around with this last line of code a bit. For example, you can make the map larger or smaller by using different width and height parameters, or center the map on the page by surrounding it with <CENTER> and </CENTER> tags. It's your choice in terms of formatting. The resulting map, with a zoom level of 13, is shown in Figure 41.2. The same map, with the zoom level set to 15, is shown in Figure 41.3. Figure 41.2. A map created with a zoom level of 13. Figure 41.3. The same map with a zoom level of 15. Adding Map ControlsYou may have noticed that the map you created is just a mapit doesn't include any controls that let users zoom around or into or out of the default location. That's fine if you want a static map (of your company's headquarters, let's say), but if you want to make the map interactive, you have to add the appropriate map controls. You do this by adding the following lines of code between the var map and map.setCenter lines in the <HEAD> of your document: map.addControl(new GSmallMapControl()); map.addControl(new GMapTypeControl()); The resulting map, shown in Figure 41.4, now includes the expected right, left, up, down, and zoom in/zoom out controlsas well as the Map/Satellite/Hybrid display controls. Figure 41.4. Your map with map controls added. Adding an Info WindowAnother neat thing is to display an info window centered on the location you selected. The info window, like the one in Figure 41.5, can display whatever text you specify. Figure 41.5. The map with an info window added for the default location. To create an info window, enter the following lines of code directly after the map.setCenter line in the <HEAD> of your document: map.openInfoWindow(map.getCenter(), document.createTextNode("YOURTEXT")); Naturally, you replace YOURTEXT with the text you want to appear in the info window. Creating an Animated MapHere's an example of a neat effect you can add to your map. By inputting two locations into the code, you can make your map pan from one location to another. This is a good effect to add when you're showing how to get from one location to another. All you have to do is insert the following lines of code after the map.setCenter line in the <HEAD> of your document: window.setTimeout(function() { map.panTo(new GLatLng(LATITUDE2, LONGITUDE2)); }, 1000); Naturally, replace LATITUDE2 and LONGITUDE2 with the coordinates for the second location on the map. Increase the 1000 parameter if you want to slow down the speed of the pan. Adding a Marker to Your MapWhat's a map mashup without an icon to mark a specific location? Here's a quick way to add a single marker to your map, like the one in Figure 41.6. All you have to do is insert the following lines of code after the map.setCenter line in the <HEAD> of your document: Figure 41.6. The map with a location marker added. var point = new GLatLng(LATITUDE,LONGITUDE) map.addOverlay(new GMarker(point)); Replace LATITUDE and LONGITUDE with the precise latitude and longitude of the marker's location, of course. Adding Multiple Markers from Your Own DatabaseA first-class map mashup plots multiple markers on a map, based on a database of individual locations. Each location in the database has to be expressed as a latitude/longitude coordinate, of course; the database of coordinates can then be easily plotted as an overlay on the base Google map. Let's start with the database of locations. You need to create an XML file named data.xml. The contents of the file should be in the following format: <markers> <marker lat="LATITUDE1" lng="LONGITUDE1" /> <marker lat="LATITUDE2" lng="LONGITUDE2" /> <marker lat="LATITUDE3" lng="LONGITUDE3" /> <marker lat="LATITUDE4" lng="LONGITUDE4" /> </markers> Add as many <marker> lines as you like, each with its own coordinates. You then call this file into your Google Maps code, using the GDownloadUrl command. You do this by adding the following lines of code after the map.setCenter line in the <HEAD> of your document: GDownloadUrl("data.xml", function(data, responseCode) { var xml = GXml.parse(data); var markers = xml.documentElement.getElementsByTagName("marker"); for (var i = 0; i < markers.length; i++) { var point = new GLatLng(parseFloat(markers[i].getAttribute("lat")), parseFloat(markers[i].getAttribute("lng"))); map.addOverlay(new GMarker(point)); This adds a new overlay to your map, with each point from the data.xml file translated into its own marker on the map, like the one shown in Figure 41.7. Cool! Figure 41.7. A map with multiple markers created from a database of locations. And Even More...This gives you a pretty good idea of how to add a simple Google map to your web page. To create more sophisticated mashups, you need to get more familiar with the Google Maps API and the use of overlays. That's more detail than we have space for here, but you can find all the documentation you need on the Google Maps API site. It's not that hard, especially if you know your way around a little JavaScript. And the results are worth it!
|
EAN: 2147483647
Pages: 370