| Any time you run an application, move or delete a file, or accidentally turn the power off while the system is running, you run the risk of introducing errors to your hard disk. These errors can make it harder to open files, slow down your hard disk, or cause your system to freeze when you open or save a file or an application. Fortunately, you can find and fix most of these errors directly from within Windows XP. All you have to do is run the built-in ScanDisk utility. To find and fix errors on your hard drive, follow these steps: 1. | Click the Start button to display the Start menu.
| 2. | Select My Computer to open the My Computer folder.
| 3. | Right-click the icon for the drive you want to scan, and then select the Properties option from the pop-up menu; this displays the Properties dialog box.
tip  | Windows XP includes a Scheduled Tasks utility that lets you automatically run essential system maintenance tasks while you're away from your computer. To use this utility, click the Start button; then select All Programs, Accessories, System Tools, Scheduled Tasks. When the Scheduled Tasks window opens, click the icon for a specific task to display its scheduling dialog box. Click the Schedule tab, and then select how often you want to run the task. Click OK to schedule the task. |
| 4. | Select the Tools tab.
| 5. | Click the Check Now button to display the Check Disk dialog box, shown in Figure 9.3.
Figure 9.3. Use ScanDisk to check your hard disk for errors. 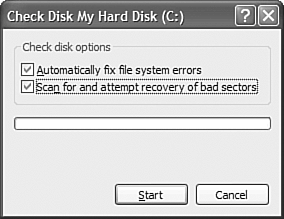
| 6. | Check both the options (Automatically Fix File System Errors and Scan for and Attempt Recovery of Bad Sectors).
| 7. | Click Start.
|
Windows now scans your hard disk and attempts to fix any errors it encounters. |