Section 7.7. Bringing a Use Case to Life with a Sequence Diagram
7.7. Bringing a Use Case to Life with a Sequence DiagramIt's time to take a closer look at a sequence. Specifically, let's look at a sequence diagram that is going to model the interactions that need to occur to make the Create a new Regular Blog Account use case happen. Figure 7-13 should look familiar; it is just a quick reminder of what the Create a new Regular Blog Account use case looks like (see Chapter 2). Figure 7-13. The Create a new Regular Blog Account use case diagram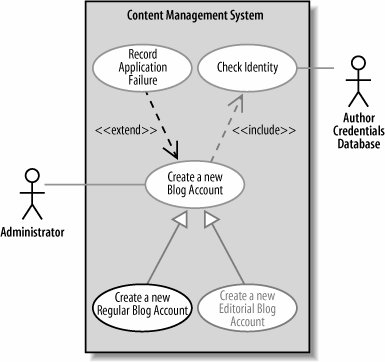 Briefly, the Create a new Regular Blog Account use case is a special case of the Create a new Blog Account use case. It also includes all of the steps provided by the Check Identity use case and may optionally execute the steps provided by the Record Application Failure use case, if the application for a new account is denied. Figure 7-13 is a pretty busy use case diagram, so feel free to jump back to Chapter 2 to remind yourself of what is going on.
7.7.1. A Top-Level Sequence DiagramBefore you can specify what types of interaction are going to occur when a use case executes, you need a more detailed description of what the use case does. If you've already completed a use case description, you already have a good reference for this detailed information. Table 7-3 shows the steps that occur in the Create a new Regular Blog Account use case according to its detailed description.
Table 7-3 actually shows all of the steps involved in the Create a new Regular Blog Account use case, including any steps that it has inherited from Create a new Blog Account or reused from Check Identity. This has been done just so you can easily see all of the Main Flow steps in one place. In practice, you would probably just look up all three use case descriptions separately without actually going to the bother of actually merging them. Table 7-3 only shows the Main Flowthat is the steps that would occur without worrying about any extensionsbut this is a good enough starting point for creating a top-level sequence diagram, as shown in Figure 7-14. Figure 7-14. This sequence diagram shows the actors that interact with your system and your system is shown simply as a single part in the sequence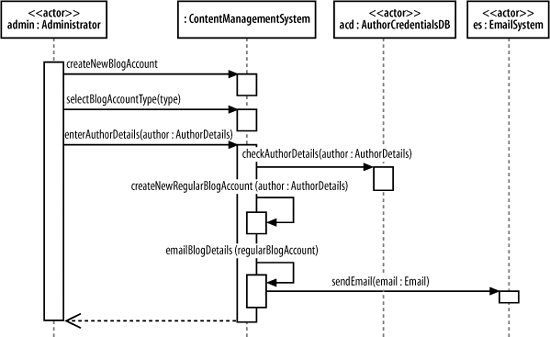
7.7.2. Breaking an Interaction into Separate ParticipantsAt this point, Figure 7-14 shows only the interactions that must happen between the external actors and your system because that is the level at which the use case description's steps were written. On the sequence diagram, your system is represented as a single participant, the ContentManagementSystem; however, unless you intend on implementing your content management system as a single monolithic piece of code (generally not a good idea!), it's time to break apart ContentManagementSystem to expose the pieces that go inside, as shown in Figure 7-15. Figure 7-15. Adding more detail about the internals of your system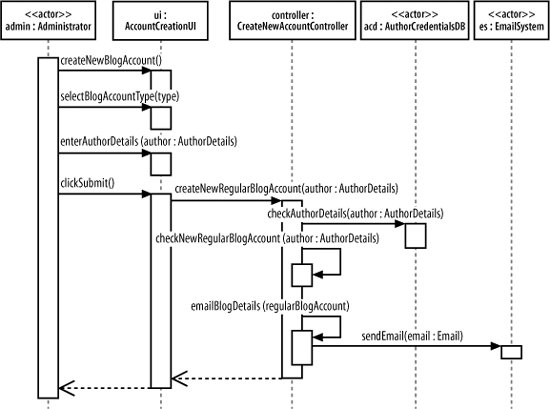 Sequence diagrams can get much more complicated by simply adding a couple of extra participants and some more detailed interactions. In Figure 7-15, the original sequence diagram has been refined so that the single ContentManagementSystem participant has been removed and in its place, more detail has been added showing the actual participants that will be involved. Work on sequence diagrams invariably goes on throughout the life of your system's model, and even getting the right participants and interactions in a detailed sequence diagram at the beginning can be hard work. Keeping your sequence diagrams up to date is also a challenge (see "Managing Complex Interactions with Sequence Fragments" later in this chapter); therefore, expect to spend some time working with your sequence diagrams until you get things right. 7.7.3. Applying Participant CreationSomething critical is missing from the sequence diagram shown in Figure 7-15. The title of the use case in which the sequence diagram is operating is Create a new Regular Blog Account, but where is the actual creation of the blog account? Figure 7-16 adds the missing pieces to the model to show the actual creation of a regular blog account. Figure 7-16. Showing the lifelines of your sequence diagram's participants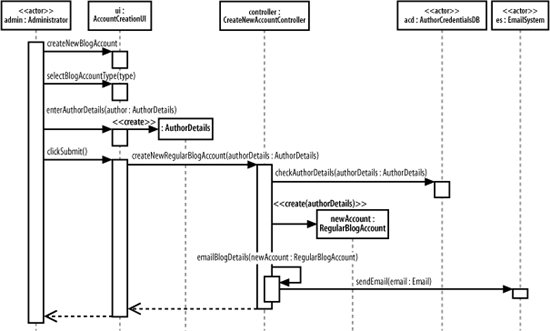 Participant lifelines are particularly useful when showing that a participant has been created. In Figure 7-16, the AuthorDetails and RegularBlogAccount participants are not in existence when the sequence diagram begins but they are created during its execution. The AuthorDetails and newAccount:RegularBlogAccount participants are created by corresponding create messages. Each create message connects directly into the title box for the participant being created, passing any information needed when creating the new participant. By dropping the participant's title box to the point where the create message is actually invoked, the diagram can clearly show the point where the participant's lifeline begins. 7.7.4. Applying Participant DeletionLet's say that the authorDetails:AuthorDetails participant is no longer required once the newAccount:RegularBlogAccount has been created. To show that the authorDetails:AuthorDetails participant is discarded at this point, you can use an explicit destroy message connected to the destruction cross, as shown in Figure 7-17. 7.7.5. Applying Asynchronous MessagesSo far, all of the messages on our example sequence diagram have been synchronous; they are executed one after the other in order, and nothing happens concurrently. However, there is at least one message in the example sequence that is a great candidate for being an asynchronous message, as shown in Figure 7-18. Figure 7-17. Showing that a participant is discarded using the destruction cross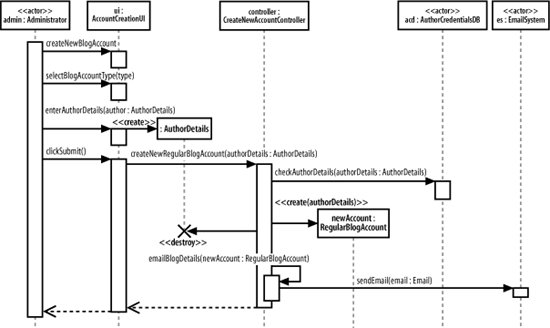 Figure 7-18. The clickSubmit( ) message will currently produce some irregular behavior when the admin creates a new account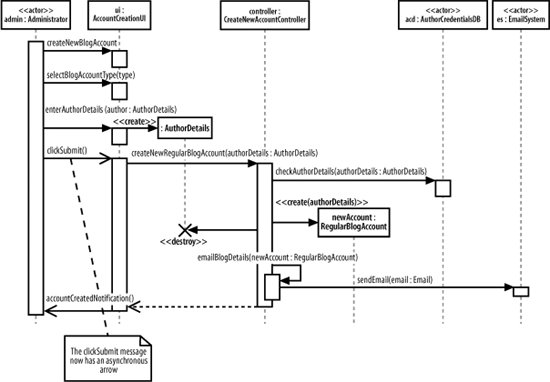 In Figure 7-18, when the Administrator clicks on the submit button the system freezes, until the new blog account has been created. It would be useful to show that the user interface allows the Administrator to carry on with other tasks while the content management system creates the new account. What we need is for the clickSubmit( ) message to be asynchronous. Converting the clickSubmit( ) from a synchronous to an asynchronous message means that the sequence diagram now shows that when the new regular blog account information is submitted, the user interface will not lock and wait for the new account to be created. Instead, the user interface allows the Administrator actor to continue working with the system. For the Administrator to receive feedback as to whether the new blog account has been created, the simple return arrow has to be replaced with a new accountCreationNotification( ) asynchronous message since asynchronous messages do not have return values. |

EAN: 2147483647
Pages: 175