NTFS is the preferred file system for all computers running Windows XP Professional. By formatting new volumes as NTFS or converting existing FAT volumes to NTFS you can take advantage of features unique to NTFS such as mounted drives, encryption, disk quotas, and file and folder permissions. This section describes many of the features available on NTFS volumes as well as issues including recoverability, performance, and compatibility.
Features Available on NTFS Volumes
This section describes the following NTFS features that are exclusive to NTFS volumes:
File and Folder Permissions
Encryption
Disk Quotas
File Compression
Mounted Drives
Distributed Link Tracking
Sparse Files
Multiple Data Streams
POSIX Compliance
NTFS Change Journal
Indexing Service
File and Folder Permissions
On NTFS volumes you can set permissions on files and folders that specify which groups and users have access, and what level of access is permitted. NTFS file and folder permissions apply to users on the local computer and to users accessing the file or folder over the network. File and folder permissions are maintained in discretionary access control lists.
Note
You can also set shared folder permissions, which operate on shared folders in combination with NTFS file and folder permissions. File attributes (read-only, hidden, and system) also limit file access. For more information about shared folder permissions, see Managing Files and Folders in this book.
File and folder permissions on NTFS volumes are inheritable by default. This feature reduces the time required to change the permissions of many files and subfolders. For example, you might want to change the permissions on a tree of folders containing several thousand files. If the files and subfolders inherit permissions, you need to set permissions for only the top-level folder. In addition, you can prevent files or folders from inheriting permissions from the parent folder, allowing you to give a file or subfolder permissions different from its parent folder.
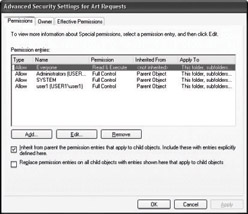
When you view the Advanced Security Settings dialog box, you can see the individual permission entries assigned to the object. Permissions acquired through inheritance are called inherited permissions. Permissions that are not inherited, but are instead defined directly on an object, are called explicit permissions. Both types of permissions are shown in the Advanced Security Settings dialog box as shown in Figure 13-1.
To open the Advanced Security Settings dialog box
Right-click a file or folder on an NTFS volume.
Click Properties, click the Security tab, and then click Advanced.
If the Security tab does not appear, the computer is not part of a domain, and simple file sharing is enabled. To view the Security tab, you must disable simple file sharing.
To disable simple file sharing
In My Computer, click the Tools menu, and then click Folder Options.
On the View tab, in Advanced settings, clear the Use simple file sharing (Recommended) check box.
Warning
You can back up and restore data on FAT and NTFS volumes. However, if you back up data from an NTFS volume and then restore it to a FAT volume, you lose security settings and other file information specific to NTFS.
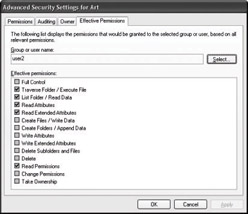
Windows XP Professional offers an easy way to view which permissions are effectively granted to any specified user or group for the current object. You can view this information in the Effective Permissions dialog box.
Effective permissions reflect the work of combining permissions, both allowed and denied, from all matching entries, whether explicit or inherited. Matching entries name either the user or group directly, or a group in which the specified user or group is a member. The effective permissions are indicated by a checkmark next to each permission that is granted to the user or group. Figure 13-2 shows the permissions assigned to the Art folder for user2.
Figure 13-2: Effective Permissions tab
Although NTFS provides access control to individual files and folders, users can perform certain actions even if permissions are set on a file or folder to prevent access. For example, you have a folder (MyFolder) containing a file (File1), and you grant Full Control to a user for the folder MyFolder. If you deny Full Control for File1, the user can still delete File1 because the Full Control permission for MyFolder consists of a set of special permissions that include Delete Subfolders and Files. This special permission allows the user to delete files within the folder, even if the special permission Delete has been denied (or not granted) to the user for File1. You can view the special permissions assigned to a file or folder by clicking the Edit button in the Advanced Security Settings dialog box.
To prevent File1 from being deleted, you must ensure that the user is not granted the Delete Subfolders and Files special permission on the parent folder (MyFolder), explicitly or through group membership. To do this, use the Effective Permissions tab to view the folder s special permissions that are granted to the user. If Delete Subfolders and Files is selected, the user can delete all files within the folder.
To give the user access to the folder and its files without the ability to delete them, clear the Full Control check box and ensure that the user is not also granted Full Control via membership in another group. Although explicit permissions override inherited permissions, you cannot deny Full Control without also denying Modify, Read & Execute, List Folder Contents, Read, and Write. To prevent a user who is granted Full Control, by way of inherited group permissions, from deleting MyFolder and its files, you can do one of the following:
Explicitly deny the Delete Subfolders and Files special permission for either the group or for the individual user.
Remove inheritance from the folder and then reset the permissions for the group.
Note
Anyone who has List Folder Contents permission for a folder can view file properties on any file in the folder, even if file permissions prevent them from seeing the contents of the file.
For more information about file and folder permissions, see Authorization and Access Control in this book.
Encryption
The Encrypting File System (EFS) uses symmetric key encryption in conjunction with public key technology to protect files and folders. Encryption ensures that only the authorized users and designated recovery agents of that file or folder can access it. Users of EFS are issued a digital certificate with a public key and a private key pair. EFS uses the key set for the user who is logged on to the local computer where the private key is stored.
Users work with encrypted files and folders just as they do with any other files and folders. Encryption is transparent to any authorized users; the system decrypts the file or folder when the user opens it. When the file is saved, encryption is reapplied. However, intruders who try to access the encrypted files or folders receive an Access denied message if they try to open, copy, move, or rename the encrypted file or folder.
To encrypt or decrypt a folder or file, set the encryption attribute for NTFS folders and files just as you set attributes such as read-only or compressed. If you encrypt a folder, all files and subfolders created in the encrypted folder are automatically encrypted.
Warning
It is recommended that you encrypt at the folder level to ensure that new files are automatically encrypted and that temporary files created during the editing process remain encrypted.
EFS is not available in Microsoft Windows XP Home Edition. For more information about EFS, see Encrypting File System in this book.
You can also encrypt or decrypt a file or folder by using the command-line tool Cipher. For more information about Cipher, see Windows XP Professional Help.
Disk Quotas
Disk quotas track and control disk space usage for NTFS volumes. By using disk quotas, you can configure Windows XP Professional to:
Log an event when a user exceeds a specified disk space warning level. The warning level specifies the point at which a user is nearing the quota limit.
Prevent further use of disk space or log an event when a user exceeds a specified disk space limit.
Disk quotas are tracked on a per-user, per-volume basis; users are charged only for the files they own. Quotas are tracked per volume, even if the hard disk contains multiple volumes. If you have multiple shared folders on the same volume, the quotas apply to all shared folders equally, and a user s use of all shared folders cannot exceed the assigned quota on that volume.
The disk space used by each file is charged to the user who owns the file. The file owner is identified by the security identifier (SID) in the security information for the file. The total disk space charged to a user is the sum of the length of all data streams; property set streams and resident user data streams affect the user s quota. Small files contained entirely within the file s master file table (MFT) record also affect the user s quota.
Because disk quotas are based on file ownership, they are independent of the location of the files on the volume. Moving files from one folder to another on the same volume does not change volume space usage. However, copying the files to a different folder on the same volume results in duplicate files in both locations. Thus, the available volume space usage against the user s quota decreases by the number of bytes copied.
Disk quotas are transparent to the user. When a user views the available disk space for the volume, the system reports only the user s available quota allowance. If the user exceeds this allowance, the system indicates that the disk is full. To obtain more disk space after exceeding the quota allowance, the user must do one of the following:
Delete files.
Reduce the size of existing files.
Have another user claim ownership of some files.
Have the administrator increase the quota allowance.
Disk quotas are based on uncompressed file sizes. Users cannot increase the amount of free space by using NTFS compression to compress the files.
For sparse files, disk quotas are based on the nominal size of the sparse file, not the actual allocated amount of disk space. For example, creating a 50-MB file with all zero bytes consumes 50 MB of that user s quota. This means the user can write data to the sparse file without exceeding the quota limit because the user has already been charged for the space. For more information about sparse files, see Sparse Files later in this chapter.
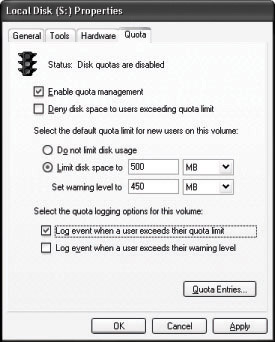
To enable quotas
Right-click a volume in Windows Explorer or My Computer.
Click Properties, and then click the Quota tab (see Figure 13-3).
Do the following:
Enable or disable disk quotas.
Deny disk space to users who have exceeded their quota limit.
Set the default warning level and quota limit assigned to new volume users.
Specify whether to log an event in the system log when a user reaches the quota or warning level.
Figure 13-3: Quota tab
If the volume is not formatted by using NTFS, or if you are not a member of the Administrators group on the computer, the Quota tab is not displayed on the volume s Properties dialog box.
Note
You can also use the command-line tool Fsutil.exe to manage quotas. For more information about Fsutil.exe, see Windows XP Professional Help.
Disk Quota States
As the administrator, you can turn quota enforcement on and off. There are three quota states, as shown in Table 13-9.
Table 13-9: Disk Quota States
State
Description
Quota disabled
Quota usage changes are not tracked, and the quota limits are not removed. In this state, performance is not affected by disk quotas. This is the default state.
Quota tracked
Quota usage changes are tracked, but quota limits are not enforced. In this state, no quota violation events are generated and no file operations fail because of disk quota violations.
Quota enforced
Quota usage changes are tracked, and quota limits are enforced.
Warning Levels and Disk Quota Limits
When you enable disk quotas, you can set both the warning level and the quota limit.
Warning level
Specifies when a user is nearing the limit. When the disk space charged to the user exceeds the warning level, the system can generate an event in the system log on the computer hosting the volume. The user is not notified when this level is surpassed.
Quota limit
Specifies the amount of disk space allocated to a user. When the disk space charged to the user exceeds the quota limit, the system generates an event in the system log or denies additional disk space to the user. When you set quota limits on a computer that many users share, make sure to set the limit to at least 2 MB, which is greater than the default 1 KB, to ensure that Windows XP Professional can create a user profile when a user logs on to the computer.
For example, you can set a user s disk quota limit to 500 MB, and the disk quota warning level to 450 MB. The user can store no more than 500 MB of data on the volume. If more than 450 MB are stored on the volume, the disk quota system can log an event in the system log.
Increasing Quotas for Individual Users
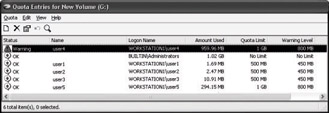
Figure 13-4 shows the Quota Entries window, which you open by clicking the Quota Entries button. In the Quota Entries window, you can view each user s quota limit, warning level, and quota usage. You can also change the quota limit and warning level for individual users who need more disk space than the default quota.
Figure 13-4: Quota Entries window
For example, on a volume that contains a shared folder named \\Workstation1\Public, you can set a quota of 500 MB per user while giving two users each a 1-GB limit because they work with large files. If both users have files stored on \\Workstation1\Public, their current usage is displayed in the Quota Entries window.
To change the quota for an individual user
Open the Properties dialog box for the appropriate volume.
Click the Quota tab, and then click Quota Entries.
Select the appropriate user, right-click, and then click Properties to set the quota.
-or-
For a new user who does not have files stored on the volume, on the Quota menu, click New Quota Entry, and then set the quota higher than the default.
Note
Disk quotas do not prevent you from allocating more space than is available on the disk. For example, on a 40-GB volume used by 50 users, each user might be allocated 1 GB.
Disk Quotas and Administrators
A new Group Policy setting allows you to specify the default owner of objects (such as files) created by members of the Administrators group. You can access the Group Policy setting System objects: Default owner for objects created by members of the administrators group in Local Computer Policy\Computer Configuration\Windows Settings\Security Settings\Local Policies\Security Options\. In Windows XP Professional, the default owner is the object creator. To change the default owner to the Administrators group, use the Group Policy snap-in. For more information about using the Group Policy snap-in, see Managing Desktops in this book.
Although members of the Administrators group do not have quotas enabled by default, you can set quotas for all members of the Administrators group except the built-in Administrator account. In Windows 2000, you cannot set quotas for any member of the Administrators group.
Exceeding Disk Quota Limits
When you select Deny disk space to users exceeding quota limit on the Quota tab of the Properties dialog box, users who exceed their limit receive an Insufficient disk space error message and cannot write additional data to the volume without deleting or moving files. Individual programs determine their own error handling for this condition. The program treats the volume as full.
By leaving the Deny disk space to users exceeding quota limit check box cleared, you can let users exceed their quota. This is useful when you want to track use of disk space without denying users access to a volume. You can also specify whether to log an event to the volume host computer s system log when users exceed either their quota or warning level.
Event Viewer keeps a chronological record of users who exceed their quota or warning level. However, it does not provide information about which users are currently over their quota warning level.
Note
You can use the fsutil behavior set quotanotify command to set the interval between quota-related events that NTFS records in the system log. For more information about this command, see Windows XP Professional Help.
Deleting Quota Entries
To delete the quota entry for a user, you must do any of the following:
Permanently delete the files.
Take ownership of the files and folders.
Move the files to a different volume.
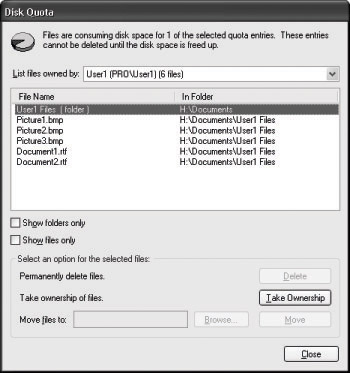
You cannot delete quota entries if a user owns files or folders on the volume. If you try to delete a quota entry for a user who still owns files or folders on the volume, a dialog box appears as shown in Figure 13-5.
Figure 13-5: The Disk Quota dialog box
If the user owns files on the volume, you can use the Disk Quota dialog box to delete the files, take ownership of them, or move them to another volume. However, if the user owns folders on the volume, you can only use the Disk Quota dialog box to take ownership of the folders, not delete or move them. To make it easier to take ownership of folders, you can click the Show folders only check box.
Local and Remote Implementations of Disk Quotas
You can enable disk quotas on local computers and remote computers. On local computers, use quotas to do the following:
Prevent users from using excessive disk space on a shared folder on your computer.
Limit the amount of space available to users who log on to the local computer.
On remote computers, quotas can ensure the following:
Disk space on public servers is not monopolized by one or a few users.
Information technology (IT) budget for mass storage is managed efficiently by making users account for the use of shared disk space by using public disk space only for necessary files.
You can manage NTFS volumes on remote computers running Windows XP Professional and Windows 2000. The volumes must be formatted by using NTFS and be shared from the root folder of the volume. You can set quotas on the remote volume by mapping to it using Windows Explorer or My Computer.
To set quotas on a mapped remote volume
Right-click the mapped remote volume.
Click Properties, and then click the Quota tab.
Note
You must be a member of the Administrators group on the remote computer to enable, disable, or manage quotas.
Auditing Disk Space Use
Enabling quotas causes a slight decrease in file system performance. By periodically enabling and disabling quotas, you can take advantage of the auditing capabilities provided by Windows XP Professional disk quotas without permanently affecting performance.
To create a record of the audit, save a copy of the system log data from Event Viewer to a comma-delimited file that can be read by programs such as Microsoft Excel. These files can be useful for analyzing the data captured.
Note
When you disable quotas, the tracking information displayed in the QuotaEntries window is no longer updated. To refresh this information (including the current disk space used by each user), enable disk quotas again.
Disk Quotas in Multiple-Boot Configurations
Disk quotas are not enforced and can be exceeded in multiple-boot configurations when an NTFS volume is mounted by using Windows NT 4.0. However, when that computer resumes running Windows XP Professional, users who exceeded their quotas must delete or move files to a different volume that is, until they are under their limit before they can store new files to the quota volume. Disk quotas are enforced on computers configured as a multiple-boot system with Windows XP Professional and Windows 2000.
Using WMI to Script Disk Quotas
Microsoft Windows Management Instrumentation (WMI) is the application programming interface (API) that allows all system components to be monitored and controlled, either locally or remotely. By using the WMI classes Win32_DiskQuota, Win32_QuotaSettings, and Win32_VolumeQuotaSetting, you can create scripts that help you to do the following:
View and modify the quota settings for users for all disks on a computer by:
Viewing the status of the quota.
Reporting or setting the warning level.
Reporting or setting the quota limit.
Reporting how much space is being used for a specified user.
View and modify the quota settings and defaults for each disk on a computer by:
Reporting or setting the operational state of quotas on a disk (disabled, tracked, or enforced).
Reporting or setting the default warning level.
Reporting or setting the default quota limit.
Enabling or disabling the logging of warning levels being exceeded.
Enabling or disabling the logging of quota limits being exceeded.
By using these classes, you can take advantage of other standard WMI features such as WMI Query Language (WQL) query support and event generation based on changes in the data in these classes. For example, a program can request that it be notified when a user is within 2 MB of the quota limit. When this criterion is met, WMI sends an event notification to the program, allowing an action such as increasing the quota or sending an e-mail message to the user.
Note
WQL is a subset of Structured Query Language (SQL).
For more information about WMI, see the Microsoft Windows Management Instrumentation (WMI) SDK link on the Web Resources page at http://www.microsoft.com/windows/reskits/webresources
File Compression
NTFS supports compression on individual files, all files within a folder, and all files within NTFS volumes. Because compression is implemented within NTFS, any Windows-based program can read and write compressed files without determining the compression state of the file. When a program opens a compressed file, NTFS decompresses only the portion of the file being read and then copies that data to memory. By leaving data in memory uncompressed, NTFS performance is not impacted when it reads or modifies data in memory. NTFS compresses the modified or new data in the file when the data is later written to disk.
The compression algorithms in NTFS support cluster sizes of up to 4 KB. When the cluster size is greater than 4 KB on an NTFS volume, none of the NTFS compression features are available.
Using Windows Explorer or My Computer to Compress Files
Using Windows Explorer or My Computer, you can set the compression state of a file on an NTFS volume. You can also set the compression state of a folder or volume without changing the compression state of existing files in that folder.
If you have Modify permission for a file or folder, you can change its compression state locally or across a network.
To set the compression state of a volume
In My Computer or Windows Explorer, right-click the volume that you want to compress or uncompress.
Click Properties to display the Properties dialog box.
On the General tab, select or clear the Compress drive to save disk space check box, and then click OK.
In the Confirm Attribute Changes dialog box, select whether to make the compression apply to the entire volume or only to the root folder.
Any change to the compression attribute is applied to the files you specified. If you compress all files in the volume, the process might take a few minutes to finish, depending on the size of the volume, the number of files to compress, and the speed of the computer. The delay occurs because Windows XP Professional must change the compression state of every folder on the volume and compress or uncompress every file on the volume. Changing the compression state of folders is relatively fast because for each folder Windows XP Professional changes only the compression attribute. However, compressing or uncompressing every file on the volume takes longer because NTFS must read data in its current form (compressed or uncompressed) from the disk, convert the data to its new form in memory, and then write the data back to disk.
To set the compression state of a folder or file
In My Computer or Windows Explorer, right-click the file or folder that you want to compress or decompress.
Click Properties to display the Properties dialog box.
On the General tab, click Advanced.
In the Advanced Attributes dialog box, select or clear the Compress contents to save disk space check box, and then click OK.
In the Properties dialog box, click OK.
If the compression state was altered for a folder, in the Confirm Attribute Changes dialog box, select whether to make the compression apply only to the selected folder, or to the selected folder and all its files and subfolders. Click OK when done.
Note
Windows XP Professional can compress closed paging files. However, when you restart Windows XP Professional, the paging files revert to an uncompressed state. For information about paging files, see the topics on virtual memory in Windows XP Professional Help.
You can set Windows Explorer to display alternate colors for compressed files and folders by using the following procedure:
To display alternate colors for compressed files and folders
In My Computer or Windows Explorer, click the Tools menu, and then click Folder Options.
On the View tab, select the Show encrypted or compressed NTFS files in color check box.
Click OK to return to Windows Explorer or My Computer.
Using Compact to Compress a Volume
Compact.exe is the command-line version of the compression feature in Windows Explorer and My Computer. Compact displays and alters the compression of folders and files on NTFS volumes. It also displays the compression state of folders.
Three reasons that you might want to use Compact instead of Windows Explorer or My Computer follow:
You can use Compact in a batch script.
If the system fails during compression or decompression, the operation might not have finished. You can use the /f parameter to force the operation to finish in the background.
You can compress or uncompress files that match certain criteria. For example, to compress all .txt files in the current folder, type:
compact /c *.txt
The following list provides examples of Compact syntax.
To compress a volume, from the root folder of the volume, type:
compact /c /i /s:\
The preceding example sets the compression state of the root folder and all folders on the volume and compresses every file on the volume. Using the /i parameter ensures that error messages do not interrupt the compression process.
To set the compression state of the current folder and its subfolders and existing files, from the current folder, type:
compact /c /s
To set the compression state of files in the current folder, subfolders in the current folder, and files within all subfolders without altering the compression state of the current folder from the current folder, type:
compact /c /s *.*
For more information about Compact, see Windows XP Professional Help.
Effects of Compression on Moving and Copying Files
Moving and copying files and folders can change their compression state. The resulting compression state depends on whether you move or copy the files and whether you move files between NTFS volumes or to FAT volumes.
Note
The default behavior for dragging and dropping files and folders in Windows Explorer and My Computer depends on the relationship between the source and the target location. If the selected item is dragged to a folder on the same volume, the item is moved. If the selected item is dragged to a folder on a different volume, the item is copied. To force a copy, press CTRL as you drag and drop the item to its new location. To move the item, press SHIFT as you drag and drop it to the new location. If you right-click and drag the selected item, a shortcut menu appears so that you can choose to copy, move, create a shortcut to the item, or cancel the task.
Moving Files or Folders within an NTFS Volume
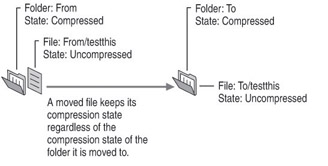
When you move an uncompressed file or folder to another folder on the same NTFS volume, the file remains uncompressed, regardless of the compression state of the folder to which it was moved. For example, if you move an uncompressed file to a compressed folder, the file remains uncompressed after the move, as shown in Figure 13-6.
Figure 13-6: Moving an uncompressed file to a compressed folder
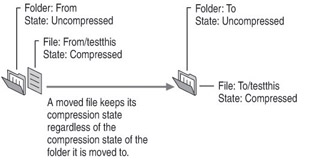
When you move a compressed file or folder to another folder, the file remains compressed after the move, regardless of the compression state of the folder, as shown in Figure 13-7.
Figure 13-7: Moving a compressed file to an uncompressed folder
Copying Files or Folders on NTFS Volumes
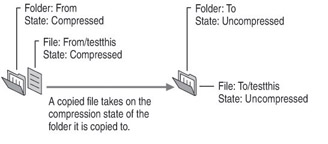
When you copy a file to a folder, the file takes on the compression attribute of the target folder. For example, if you copy a compressed file to an uncompressed folder, the file is uncompressed when it is copied to the folder, as shown in Figure 13-8.
Figure 13-8: Copying a compressed file to an uncompressed folder
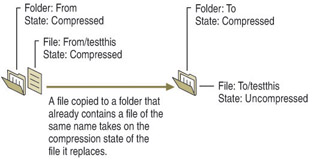
When you copy a file to a folder that already contains a file of the same name, the copied file takes on the compression attribute of the target file, regardless of the compression state of the folder, as shown in Figure 13-9.
Figure 13-9: Copying a file to a folder that contains a file of the same name
Copying Files Between FAT and NTFS Volumes
Like files copied between NTFS folders, files copied from a FAT folder to an NTFS folder take on the compression attribute of the target folder. Because Windows XP Professional supports compression only on NTFS volumes, compressed NTFS files copied to a FAT volume are uncompressed. Similarly, compressed NTFS files copied to a floppy disk are uncompressed.
Caution
If you copy a file from an NTFS volume to a FAT volume, any NTFS-specific properties associated with that file, such as permissions and data streams, are permanently lost.
Adding Files to an Almost Full NTFS Volume
As a best practice for using compression, ensure that you have at least 15 percent free space on the volume. If you copy files to a compressed NTFS folder that does not have room for the files in an uncompressed state, an error message indicates the disk lacks adequate space. A message might also appear if you attempt to read a compressed file on a volume that is almost full. These messages appear because NTFS must support the possibility that any file that is read into memory might be modified, and the modified data must eventually be written to disk. Therefore, NTFS must reserve enough space on the disk for the file based on the worse possible compression scenario: that the file must be saved, uncompressed, to disk. After the files are flushed to disk, NTFS releases any remaining reserved space.
You can regain space that NTFS has reserved for open files by dismounting and then remounting the volume or by restarting the computer. You can temporarily dismount a volume by using the fsutil volume dismount command. The volume is remounted the next time you access it.
NTFS Compression Performance
Workstations are good candidates for compression because compression and decompression are performed locally. Heavily loaded servers that have substantial input/output (I/O) traffic are poor candidates for data compression. Because the server must decompress files before sending them across the network, the decompression workload can cause performance degradation on the server. However, read-only servers, read-mostly servers, or servers that store infrequently accessed files might not get performance degradation. For example, if 50% of the files on a server are frequently accessed and are close to 100% of the server s I/O workload, do not compress those files. If the other 50% are accessed once every few days, and account for less than 1% of the server workload, you might want to compress them.
If your workload involves asynchronous I/O, do not use compression. Compression converts all I/O to synchronous.
If you have programs that use transaction logging and constantly write to a database or log, have the programs store their files on an uncompressed volume. If a program modifies data by using mapped sections in a compressed file, it can produce dirty pages faster than the mapped writer can write them. (A dirty page is a page that has been modified in the cache, but is not yet written to disk.) For example, programs such as Microsoft Message Queue cannot function on compressed NTFS volumes.
It is recommended that you avoid placing user home folders and roaming profiles on compressed NTFS volumes because of the large number of read and write operations performed in these folders.
For information about the effect of compression on NTFS performance, see Optimizing NTFS Performance later in this chapter.
Other Compression Methods
In addition to using NTFS compression, you can use the Compressed (zipped) Folders feature in Windows XP Professional and other compression tools.
Using the Compressed (zipped) Folders Feature
You can use the Compressed (zipped) Folders feature in Windows XP Professional to create, add files to, and extract files from zipped files. In Windows Explorer and My Computer, a zipper on the folder icon identifies Compressed (zipped) Folders. Unlike in NTFS compression, you can create Compressed (zipped) Folders on any FAT or NTFS volume. In addition, Compressed (zipped) Folders are compatible with other programs that create zipped files, so you can share them with users who use other compression programs that support zipped files.
To create a Compressed (zipped) Folder
In Windows Explorer or My Computer, click the File menu, point to New, and then click Compressed (zipped) Folder.
After you create a Compressed (zipped) Folder, you can compress files, programs, or other folders by dragging them to it. You can open files directly from Compressed (zipped) Folders, or you can extract files before opening them.
For more information about using the Compressed (zipped) Folders feature, see Windows XP Professional Help.
Other Compression Tools
Other compression tools are available to compress files on computers running Windows XP Professional. These tools differ from NTFS compression in the following ways:
They typically run from either the command line or as a stand-alone application.
They can be used to compress files on FAT volumes as well as NTFS volumes.
Files cannot be opened when they are in a compressed state; the file must first be decompressed. When you close the file, it is saved in an uncompressed state, and you must use a program to compress it.
NTFS compression differs from DoubleSpace, DriveSpace, and DriveSpace 3 compression in several ways. For example, NTFS provides faster compression and decompression with minimal loss of compression for a typical text file. Another difference is that these programs compress the entire volume, including the metadata associated with each file and folder. By using NTFS compression, you can compress individual files or folders instead of the entire volume, and you can compress only files you use infrequently.
Note
You can use the Disk Cleanup tool to compress files that have not been accessed for a specified number of days. For more information about Disk Cleanup, see Windows XP Professional Help.
Mounted Drives
Mounted drives, also known as volume mount points or drive paths, are volumes attached to an empty folder on an NTFS volume. Mounted drives function the same way as any other volume, but are assigned a label or name instead of a drive letter. Mounted drives are robust against system changes that occur when devices are added or removed from a computer. They are not subject to the 26-volume limit imposed by drive letters, so you can use them for access to more than 26 volumes on your computer.
The version of NTFS included with Windows XP Professional and Windows 2000 must be used on the host volume. However, the volume to be mounted can be formatted in any file system supported by Windows XP Professional, including NTFS, FAT16, FAT32, CDFS, or UDF.
One volume can host multiple mounted drives, providing a way for you to easily extend the storage capacity of any particular volume on a Windows XP Professional system. Users on the local system or users who connect to it over a network can continue to use the same drive letter for access to the volume, but multiple volumes can be in use simultaneously from that drive letter.
Note
To identify and manage mounted drives from the command line, use the Mountvol.exe tool. For more information about Mountvol.exe, see Windows XP Professional Help.
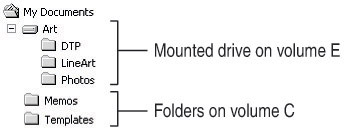
The following scenario is an example of mounted drives. A user recently installed Windows XP Professional on volume C, an NTFS volume. She is concerned about storage space on this volume because she uses her computer extensively to create and edit digital photos, graphic art, and desktop publishing (DTP) files. The user knows that the default document folder, My Documents, is on volume C, but she wants to use the E volume on her second hard disk to store her work. She creates a mounted drive on volume C under the My Documents folder labeled Art. Any subfolder of the Art folder actually resides on volume E, thus saving space on volume C.
To create a mounted drive, you must be a member of the Administrators group on the local computer.
To create a mounted drive under C:\My Documents
Log on to the computer using an account that is a member of the Administrators group.
Click Start, click Run, type diskmgmt.msc, and then click OK.
Right-click volume E, and then click Change Drive Letter and Paths.
In the Change Drive Letter and Paths dialog box, click Add, click Mount in the following empty NTFS folder, and then click Browse.
In the Browse for Drive Path dialog box, expand drive C, go to the C:\Documents and Settings\username\My Documents folder, and then click New Folder.
In the folder name placeholder in the Explorer tree, type the name Art over the default name New Folder, and then close the dialog boxes.
In My Computer or Windows Explorer, go to volume E and create new folders such as Photos, LineArt, and DTP for the graphic arts documents.
As shown in Figure 13-10, all files stored in the My Documents\Art folder are stored in the root folder of volume E, the mounted drive. Any other folder created within Windows Explorer or My Computer under the My Documents folder still resides on volume C.
Figure 13-10: A mounted drive in My Documents
Hard Links
You can use the fsutil hardlink create command to create hard links. A hard link is an NTFS-based link to a given file. When you create a hard link to a file on an NTFS volume, NTFS adds a directory entry for the hard link without duplicating the original file. By creating hard links, you can:
Create hard links that use the same file name as the original file but appear in different folders.
Create hard links that use different file names from the original file but appear in the same folder.
Create hard links that use different file names from the original file and appear in different folders.
Because a hard link is a directory entry for a file, an application can modify a file by using any of its hard links. Applications that use any other hard link can detect the changes. However, directory entries for hard links are updated only when a user accesses a file by using the hard link. For example, if a user opens and modifies a file by using its hard link, and the size of the original file changes, the hard link that is used to access the file also shows the new size.
Warning
NTFS updates the properties of a hard link only when a user accesses the original file by using the hard link, not every time a user makes a change to the original file.
Hard links do not have security descriptors; instead, the security descriptor belongs to the original file to which the hard link points. Thus, if you change the security descriptor of any hard link, you actually change the underlying file s security descriptor. All hard links that point to the file allow the newly specified access. You cannot give a file different security descriptors on a per-hard-link basis.
When creating hard links, consider the following:
You can create hard links only on NTFS volumes; not on FAT volumes.
You cannot create a hard link on one volume that refers to a file on another volume.
To delete a file that has multiple hard links, you must delete the file and all its associated hard links.
For more information about using the fsutil hardlink create command, see Windows XP Professional Help.
Distributed Link Tracking
Distributed link tracking ensures that shell shortcuts and OLE links continue to work after the target file is renamed or moved. When you create a shortcut to a file on an NTFS volume, distributed link tracking stamps a unique object identifier (ID) into the target file, known as the link source. Information about the object ID is also stored within the referring file, known as the link client. Distributed link tracking uses this object ID to locate the link source in any combination of the following events that occur on NTFS volumes within a Windows 2000-based domain:
The link source is renamed.
The link source is moved to another folder on the same volume or to a different volume on the same computer.
The link source is moved from one shared network folder to another shared network folder on other computers within the same domain.
The computer containing the link source is renamed.
The name of the shared network folder containing the link source has changed.
The volume containing the link source is moved to another computer within the same domain.
Note
Distributed link tracking works only on NTFS volumes in computers running Windows 2000 or Windows XP. The NTFS volumes cannot be on removable media.
Distributed link tracking attempts to maintain links even when they do not occur within a domain, such as cross-domain, within a workgroup, or on a single computer that is not connected to a network. Links can always be maintained in these events when a link source is moved within a computer, or when the network shared folder on the link source computer is changed. Typically, links can be maintained when the link source is moved to another computer; however, this form of tracking is less reliable over time.
Distributed link tracking uses different services for client and server:
The Distributed Link Tracking Client service runs on all Windows 2000 and Windows XP Professional computers. In computers that are not part of a network, the Client service performs all activities related to link tracking.
The Distributed Link Tracking Server service runs on Windows 2000 domain controllers. The Server service maintains information relating to the movement of link sources. Because of this service and the information it maintains, links within a domain are more reliable than those outside a domain. For computers that run in a domain, the Distributed Link Tracking Client service takes advantage of this information by communicating with the Distributed Link Tracking Server service.
The Distributed Link Tracking Client service monitors activity on NTFS volumes and stores maintenance information in a file called Tracking.log, which is located at the root of each volume in a hidden folder called System Volume Information. This folder is protected by permissions that allow only the system to have access to it. The System Volume Information folder is also used by other Windows XP Professional services such as Indexing Service.
Sparse Files
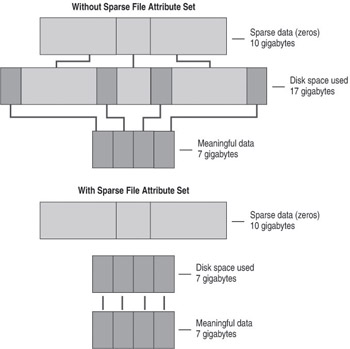
Sparse files provide a method of saving disk space for files that contain meaningful data as well as large sections of data composed of zeros. If an NTFS file is marked as sparse, then NTFS allocates disk clusters only for the data explicitly specified by the application. Non-specified ranges of the file are represented by non-allocated space on the disk. When a sparse file is read from allocated ranges, the data is returned as it was stored. Data read from non-allocated ranges is returned as zeros. An example of a program that uses sparse files is Indexing Service, which stores its catalogs as sparse files on NTFS volumes.
File system application programming interfaces (APIs) allow for the file to be copied or backed as actual bits and sparse stream ranges. File system APIs also allow for querying allocated ranges. Programs that implement these APIs then need only to read allocated ranges to recover all data in the file. The result is efficient file system storage and access. Figure 13-11 shows how data is stored with and without the sparse file attribute set.
Figure 13-11: Sparse data storage
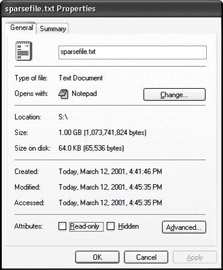
Figure 13-12 shows the properties of a 1-GB sparse file. Although the file is 1 GB, it occupies only 64 KB of disk space.
Figure 13-12: Properties of a sparse file
Warning
Only NTFS volumes mounted by Windows 2000 or Windows XP support sparse files. If you copy or move a sparse file to a FAT volume or an NTFS volume mounted by an operating system other than Windows XP or Windows 2000, the file is built to its originally specified size. If the required space is not available, the operation fails.
Multiple Data Streams
A data stream is a sequence of bytes. An application populates the stream by writing data at specific offsets within the stream. The application can then read the data by reading the same offsets in the read path. Every file has a main, unnamed stream associated with it, regardless of the file system used. However, NTFS supports additional named data streams in which each data stream is an alternate sequence of bytes as illustrated in Figure 13-13. Applications can create additional named streams and access the streams by referring to their names. This feature permits related data to be managed as a single unit. For example, a graphics program can store a thumbnail image of bitmap in a named data stream within the NTFS file containing the image.
Figure 13-13: Unnamed and named streams for Streamexample.doc
To see how data streams work, you can create a file that contains multiple data streams by adding summary information to a file on an NTFS volume.
To create a data stream for a file on an NTFS volume
Right-click a text file or Wordpad document, and then click Properties.
On the Summary tab, add information about the file, such as the title, subject, and author.
The file information is stored in separate named streams. Figure 13-14 shows the Summary tab of the file Streamexample.doc.
Figure 13-14: Creating alternate data streams by using the Summary tab
FAT volumes support only the main, unnamed stream, so if you try to copy or move Streamexample.doc to a FAT volume or floppy disk, you receive an error message as shown in Figure 13-15. If you copy the file, all named data streams and other attributes not supported by FAT are lost.
Figure 13-15: Message that confirms loss of named data streams
POSIX Compliance
NTFS provides a several features to support the Portable Operating System Interface (POSIX) standard, which is defined by the Institute of Electrical and Electronic Engineers (IEEE) standard 1003.1-1990 (also known as ISO/IEC 9945-1:1990).
NTFS includes the following POSIX-compliant features.
Case-sensitive naming
For example, POSIX interprets README.TXT, Readme.txt, and readme.txt as separate files.
Hard links
A file can have more than one name. This allows two different file names, which can be in different folders on the same volume, to point to the same data.
Additional time stamps
These show when the file was last accessed or modified.
The POSIX subsystem included with Windows NT and Windows 2000 is not included with Windows XP Professional. A new subsystem supporting the broad functionality found on most UNIX systems beyond the POSIX.1 standard is shipped as part of Interix 2.2. The Interix subsystem can be certified to the NIST FIPS 151-2 POSIX Conformance Test Suite.
For more information about Interix 2.2, see the Microsoft Interix 2.2 link on the Web Resources page http://www.microsoft.com/windows/reskits/webresources
Caution
You must use Interix-based programs to manage file names that differ only in case. You cannot use standard Windows XP Professional command-line tools (such as copy, del, and move, or their equivalents in Windows Explorer or My Computer) to manage file names that differ only in case.
NTFS Change Journal
The change journal provides a persistent log of changes made to files on a volume. NTFS uses the change journal to track information about added, deleted, and modified files for each volume.The change journal describes the nature of any changes to files on the volume. When any file or folder is created, modified, or deleted, NTFS adds a record to the change journal for that volume.
The total size of all the records currently in the journal varies, but there is a configurable maximum size. The change journal can exceed the maximum size until the size reaches an outer threshold, at which point a portion of the oldest records are deleted until the change journal is restored to its maximum size. The maximum size of the change journal is configurable but cannot be reduced, only increased.
The change journal conveys significant scalability benefits to applications that might otherwise need to scan an entire volume for changes. File system indexing, replication managers, virus scanners, and incremental backup applications can benefit from using the change journal.
The change journal is much more efficient than time stamps or file notifications for determining changes in a particular namespace. Applications that must rescan an entire volume to determine changes can now scan once and subsequently refer to the change journal. The I/O cost depends on how many files have changed, not on how many files exist on the volume.
The APIs are fully documented and can be leveraged by independent software vendors (ISVs). Microsoft uses the change journal in Windows XP Professional components such as the Indexing Service and File Replication Service. ISVs can use this feature to enhance the scalability and robustness of a range of products including backup, antivirus, and auditing tools.
For more information about the change journal, see the Platform SoftwareDevelopment Kit (SDK) link on the Web Resources page at http://www.microsoft.com/windows/reskits/webresources
Indexing Service
Indexing Service extracts information from a set of documents and organizes it for easy access through the Windows XP Professional Search function, the Indexing Service query form, or a Web browser. After the index is created, users can query the index for documents that contain key words, phrases, or properties. For example, a user can query all documents containing the word product, or query for all Microsoft Office documents written by a specific author. Indexing Service returns a list of all documents that meet the search criteria.
Although you can run Indexing Service on volumes formatted using any supported file system, Indexing Service works best on NTFS volumes because it uses several NTFS advanced features.
Change journal
After you enable Indexing Service and it completes the first scan of the NTFS volume, additional time-intensive disk scans are not required because Indexing Service uses the change journal to detect file additions, deletions, and modifications. On NTFS volumes, the disk I/O required to update the index isproportional to the number of files that have actually changed. On FAT volumes, Indexing Service must periodically scan all files to locate changes, making the disk I/O proportional to the number of files on the computer that are marked for indexing. Without using Indexing Service, Windows XP Professional must open, read, and close every file in the search, resulting in thousands of disk I/Os per search.
Sparse files
Indexing Service stores the index as a sparse file on NTFS volumes, reducing the size of the index by half when compared to the index size on FAT volumes.
Permissions
Indexing Service does not compromise information security. On NTFS volumes, if a user does not have Read permission for a file, Indexing Service does not return that file in the results list to the user. Similarly, Indexing Service does not indicate that a match was found if the file cannot be accessed.
Encryption
Indexing Service never indexes encrypted documents. If a document is encrypted after it is indexed, it is removed from the catalog.
Indexing Service is disabled by default. For more information about enabling Indexing Service, see Windows XP Professional Help.
Converting Volumes to NTFS
Windows XP Professional can convert FAT16, FAT32, and previous versions of NTFS to the new version of NTFS used in Windows XP.
Converting NTFS Volumes Formatted By Using Windows 2000
When Windows XP Professional first mounts an NTFS volume that was formatted in Windows 2000, Windows XP Professional converts the NTFS volume to NTFS 3.1. The conversion consists of changing the NTFS version from 3.0 to 3.1. No other changes are made to existing metadata or files on the volume. However, Windows XP Professional uses a different header style for new files created on NTFS 3.1 volumes. As a result of this change, some third-party imaging programs cannot create images of NTFS 3.1 volumes. Contact the manufacturer of your imaging program to find out if a version is available that supports NTFS 3.1 volumes in Windows XP Professional.
Computers running Windows NT 4.0 with Service Pack 4 or later or Windows 2000 can access NTFS 3.1 volumes without any conversion or additional service packs.
Converting NTFS Volumes Formatted by Using Windows NT 4.0 and Earlier
When you upgrade from Windows NT 4.0 to Windows XP Professional, all local volumes formatted by using the version of NTFS used in Windows NT 4.0 and earlier are upgraded to NTFS 3.1. The upgrade occurs when Windows XP Professional mounts the volume for the first time after Windows XP Professional Setup is completed. (The upgrade does not take place during Setup.) Any NTFS volumes that are removed or turned off during Setup, or added after Setup, are converted when Windows XP Professional mounts the volumes.
The Ntfs.sys driver performs the conversion by determining which version of NTFS is used on the volume and converting the volume if necessary. The conversion takes only a few seconds on any size volume and consists of the following new records in the master file table:
$Secure, which contains unique security descriptors for all files within a volume.
$Extend, which is used for extensions such as quotas, reparse point data, and object identifiers. The conversion process also adds three new files the to $Extend directory:
$Quota, used for disk quotas.
$Reparse, used for reparse points.
$ObjID, used for distributed link tracking.
Both $Secure and $Extend take the place of previously unused master file table (MFT) records, so sufficient space always exists in the volume for these two records. However, $Quota, $Reparse, and $ObjID are new additions to the MFT, and you must have enough free space in the volume to contain these files, or the conversion fails.
If the conversion fails, the volume is still available, but you can only perform NTFS-related tasks that were available in Windows NT 4.0 or earlier. To convert the volume to the version of NTFS used in Windows XP Professional, you must free disk space by deleting or moving files and then dismount the volume by using the fsutil volume dismount command. When Windows XP Professional mounts the volume and enough space exists, the conversion is completed. (You can also restart the computer to dismount the volume and complete the conversion.)
Note
Removable media that is formatted by using the previous version of NTFS is upgraded after the installation or upgrade process, or when you insert the media and Windows XP Professional mounts it.
NTFS Conversion Issues for FAT Volumes
Before you convert a FAT or FAT32 volume to NTFS, you must consider the following issues:
You cannot uninstall Windows XP Professional if you convert any volume to NTFS. For more information, see Supporting Installations in this book.
Despite a minimal chance of corruption or data loss during the conversion from FAT to NTFS, it is recommended that you perform a full backup of the data on the volume to be converted before you execute the convert command. It is also recommended that you verify the integrity of the backup before proceeding.
The conversion is a one-way process. After you convert a volume to NTFS, you cannot reconvert the volume to FAT without backing up your data, reformatting the volume as FAT, and then restoring your data.
The first step of the conversion process is running the Chkdsk tool. Because Chkdsk can increase the time required to complete the conversion, you must take this factor into account when you plan the conversion. Until the conversion is completed, the FAT volume and its data are unavailable. For more information about determining how long Chkdsk will run, see Troubleshooting Disks and File Systems in this book.
To convert the file system, the Convert tool requires a certain amount of free space on the volume and sufficient memory to update the cache. For a detailed description of the amount of free space required for a conversion, see article Q156560, Free Space Required to Convert FAT to NTFS, in the Microsoft Knowledge Base. To find this article, see the Microsoft Knowledge Base link on the Web Resources page at http://www.microsoft.com/windows/reskits/webresources
In multiple-boot configurations, NTFS volumes are accessible only by using Windows NT 4.0 with Service Pack 4 or later, Windows 2000, or Windows XP. For more information about using NTFS in multiple-boot configurations, see NTFS Compatibility with Windows NT 4.0 later in this chapter.
When you install Recovery Console onto a volume that is formatted for either the FAT16 or FAT32 file systems, and then use Convert.exe to convert the volume to NTFS, the Recovery Console no longer runs. This problem occurs because the file-system-specific boot files (in the cmdcons folder of the system volume) that are used to run Recovery Console are not valid for a volume that has been converted to NTFS. To resolve this problem, re-install Recovery Console from the Windows XP Professional operating system CD after the conversion. You can also use the Windows XP Professional operating system CD to start Recovery Console.
Because the format command in Windows XP Professional aligns FAT data clusters at the cluster size boundary, Convert.exe can preserve the cluster size for the size of the volume (up to 4 KB) instead of using the 512-byte cluster size used in Windows 2000 for converted volumes. Table 13-10 lists the cluster sizes used for volumes converted to NTFS.
Table 13-10: Cluster Sizes for Volumes Converted to NTFS
Original FAT Cluster Size
Converted NTFS Cluster Size
512 bytes
512 bytes
1 KB
1 KB
2 KB
2 KB
4 KB and larger
4 KB
Note
If the FAT volume was formatted using an operating system other than Windows XP, the cluster size of the converted volume is usually 512 bytes. However, if the FAT clusters happen to be aligned at the cluster size boundary, Windows XP Professional can use the variable cluster size for the converted volume.
Using Convert.exe to Convert FAT Volumes to NTFS
To convert FAT16 and FAT32 volumes to NTFS, use Convert.exe from the command line. The syntax of Convert follows:
Table 13-11 describes the parameters available with Convert.
Table 13-11: Convert Parameters
Parameter
Description
volume
Specifies drive letter (followed by a colon), mounted drive, or volume name that you want to convert.
/fs:ntfs
Specifies that you want to convert the volume to NTFS.
/v
Specifies verbose mode. All messages are displayed during conversion.
/x
Causes the volume to dismount, if necessary, before it is formatted. Any open handles to the volume become invalid.
/cvtarea:filename
Specifies that the MFT and other NTFS metadata files are written to an existing, contiguous placeholder file. This file must be in the root folder of the volume to be converted.
/nosecurity
Specifies that you do not want to apply default NTFS permissions to the volume. Using the convert command together with the /nosecurity parameter mimics the behavior of the convert command in Windows 2000.
/?
Displays user help.
Converting Volumes in Use
When you use the convert command, you might see the following messages:
Convert cannot run because the volume is in use by another process. Convert may run if this volume is dismounted first. ALL OPEN HANDLES TO THIS VOLUME WOULD THEN BE INVALID. Would you like to force a dismount on this volume (Y/N)?
-or-
Convert cannot gain exclusive access to the [driveletter] drive, so it cannot convert it now. Would you like to schedule it to be converted the next time the system restarts (Y/N)?
Caution
Forcefully dismounting a volume can cause data loss if files are open when the volume is dismounted. Therefore, the safest way to convert a volume that cannot be locked is to schedule the conversion to take place when the computer restarts.
These messages appear if any of the following three conditions exist.
The current folder (where you run the Convert command) is on the volume to be converted
For example, you cannot immediately convert the F volume if you type convert f: / fs:ntfs at the F:\> prompt. If you have multiple volumes, you can solve this problem by changing to a folder on another volume (by typing c: for example) and retyping the command to start the conversion. If you have only one volume, you must schedule the conversion to occur the next time you start Windows XP Professional.
A program has a file open on the volume to be converted
To solve this problem, close all programs that might be accessing the volume and ensure that remote users are not accessing files on the volume from across the network. If this does not work, run the command again and type Y to dismount the volume. If you do not want to dismount the volume, type N. Convert then prompts you to schedule the conversion to occur the next time you restart the computer.
Windows XP Professional is installed on the volume to be converted, or the volume contains the paging file
You cannot convert the Windows XP Professional boot volume while Windows XP Professional is running, nor can you force a dismount of the volume that contains the paging file. In these situations, you must schedule the conversion to occur the next time you start Windows XP Professional.
If you must restart the computer to complete the conversion, Windows XP Professional provides a 10-second delay before the conversion begins.
If necessary, you can cancel the conversion before the computer restarts by editing the registry.
Caution
Do not edit the registry unless you have no alternative. The registry editor bypasses standard safeguards, allowing settings that can damage your system, or even require you to reinstall Windows. If you must edit the registry, back it up first and see the Registry Reference in the Microsoft Windows 2000 Server Resource Kit at http://www.microsoft.com/reskit
To edit the registry and cancel an NTFS conversion before the computer restarts
Click Start, click Run, and then type:
regedit.exe
Click OK.
In the registry editor, navigate to HKEY_LOCAL_MACHINE\SYSTEM\CurrentControlSet\Control\Session Manager.
Delete the following value from the BootExecute entry, where x is the volume that is to be converted:
autocheck autoconv \??\x: /FS:NTFS
Close the registry editor.
Using the /CVTAREA Parameter
For optimal performance after the conversion, you can use the /cvtarea parameter to prevent the MFT from becoming fragmented during the conversion. Before you use the /cvtarea parameter, you must first use the fsutil file createnew command to create a large file (typically 1/8th of the total volume size) in the root folder. This file is overwritten by the MFT during the conversion. If the file is larger than the space required for the MFT, the unused space becomes available space. If the file does not reside in contiguous clusters, an error message appears and the conversion fails. Defragment the volume, and then try running the conversion again. For more information about the fsutil file createnew command, see Windows XP Professional Help.
If you do not use the /cvtarea parameter, volumes that are converted from FAT to NTFS (instead of being initially formatted by using NTFS) lack some performance benefits because the MFT becomes fragmented after the conversion. You can defragment the MFT after the conversion by using Disk Defragmenter. For more information, see Defragmenting NTFS Volumes later in this chapter.
How Convert.exe Safeguards Data During the Conversion
To guard against the possibility of corruption caused by failure during conversion, Convert.exe must build the NTFS metadata files by using only the space designated as free space by the FAT file system. Then, if the conversion does not finish, the FAT representation of the user files remains valid. A complication is that one sector of NTFS data must occupy a specific location on the disk, and a small number of other structures must occupy contiguous sectors.
During the conversion process, Convert.exe performs the following steps:
Runs Chkdsk or Autochk to verify the integrity of the file system. Chkdsk runs when the conversion takes place while Windows XP Professional is running. If Chkdsk encounters an error, the conversion stops. You must use the chkdsk /f command to fix any file system errors, and then run Convert again. Autochk runs when you schedule the conversion to take place when the computer restarts. If Autochk encounters an error, Autochk attempts to repair the error, and the conversion continues. For more information about Chkdsk and Autochk, see Troubleshooting Disks and File Systems in this book.
Relocates FAT clusters for the fixed-location NTFS structure and other contiguous data (if necessary) and saves the new file allocation table. If the necessary sectors cannot be made available because they are unreadable, for example, the conversion process fails, and the FAT volume remains in the same state it was in before the attempted conversion.
Creates NTFS elementary data structures in FAT free space. These are the fixed-size tables and structures common to any NTFS volume. The size of these tables varies depending on the size of the volume, but does not depend on the number of files on the volume.
Creates the NTFS master file table and directory listings in the FAT free space. The space required for this step is variable and depends on the total number of files and folders on the FAT volume.
Marks as free, in the NTFS bitmap, those NTFS clusters being used by FAT-specific structures. After the conversion is complete, the FAT metadata overhead can be reclaimed as free space to NTFS.
Writes the NTFS boot sector. This is the final action that causes the volume to be recognized as NTFS instead of FAT. If the conversion fails at any step prior to this, the volume is still a valid FAT volume and is recognized as such.
Almost all writes are to FAT free space, so a failure preserves the FAT intact. The following situations are the only times when a failure might cause problems.
At the end of Step 2, when Convert.exe overwrites the FAT
The algorithm for relocating clusters guarantees that if a failure occurs during this stage, Chkdsk can fix the disk without any loss of data.
In Step 6, when Convert.exe writes the boot sector
If a failure occurs during this step, and the volume being converted is the system volume (the active, primary partition used to start the system), there is a chance that the system could be left in a state where it would not start. In the unlikely event that this takes place, you can start the system by using a Windows XP Professional startup floppy disk. For more information about creating a Windows XP Professional startup floppy disk, see article Q119467, How to Create a Bootable Disk for an NTFS or FAT Partition. To find this article, see the Microsoft Knowledge Base link on the Web Resources page at http://www.microsoft.com/windows/reskits/webresources
Defragmenting NTFS Volumes
Windows XP Professional provides two methods of defragmenting NTFS volumes: the Disk Defragmenter snap-in and the new defrag command-line tool. You can use either tool as part of a frequent and regular maintenance program to maintain the optimum performance of NTFS volumes.
Disk defragmentation is improved in Windows XP Professional. Both tools in Windows XP Professional can now defragment the following:
NTFS volumes that use any cluster size
In Windows 2000, you can defragment only NTFS volumes that have cluster sizes smaller than or equal to 4 KB. Using Disk Defragmenter in Windows XP Professional, you can defragment volumes that use any cluster size.
Files smaller than 16 clusters
Disk Defragmenter in Windows 2000 cannot move files smaller than 16 clusters, so free space smaller than 16 clusters is ignored. In Windows XP Professional, Disk Defragmenter can defragment files of any cluster size.
The MFT
The master file table (MFT) is defragmented along with other files on the volume. Because the first fragment of the MFT cannot be moved, the MFT is typically contained within two fragments when sufficient space is available on the volume. In this case, the MFT is considered defragmented. If the MFT is contained within three or more fragments, Disk Defragmenter looks for free space where the MFT might fit. If sufficient free space exists, the MFT is moved as a whole (minus the first fragment). If space is not available, the MFT is not defragmented.
Note
Windows XP Professional reserves a portion of the volume for the MFT known as the MFT zone. Neither Disk Defragmenter nor the defrag command moves files into this area. For more information about the MFT Zone, see The MFT Zone later in this chapter.
For more information about using Disk Defragmenter on FAT and NTFS volumes, see Troubleshooting Disks and File Systems in this book.
Optimizing NTFS Performance
NTFS performance is affected by many factors, such as cluster size, fragmentation level, and the use of programs such as antivirus software. In addition, NTFS features such as compression and Indexing Service can also affect performance. You can optimize the performance of NTFS volumes by using the following guidelines.
Cluster Size
Before you format an NTFS volume, evaluate the types of files to be stored on the volume so that you can determine whether to use the default cluster size. Some important questions to answer include:
Are the files typically the same size?
Are the files smaller than the default cluster size?
Do the files remain the same size or grow larger?
If the files are typically smaller than the default cluster size (for example, 4 KB) and do not increase, use the default cluster size to reduce wasted disk space. However, smaller clusters can increase fragmentation, especially when files grow to fill more than one cluster. Therefore, adjust the cluster size accordingly when you format the volume. If the files you store tend to be large or increase in size, use 16- or 32-KB clusters instead of the default 4-KB cluster size.
Note
Compression is supported only on volumes that use 4 KB or smaller clusters.
Cluster size is also an issue for volumes that were converted from FAT to NTFS in Windows 2000 or earlier because the default cluster size for converted volumes is 512 bytes, and the MFT was most likely fragmented during the conversion. For optimum performance, back up the data on the volume, reformat the volume, specify the appropriate cluster size, and then restore the data.
For more information about choosing a cluster size, see Cluster Size earlier in this chapter.
Short File Names
Every time you create a file with a long file name, NTFS creates a second file entry that has a similar 8.3 short file name. A file with an 8.3 short file name has a file name containing 1 to 8 characters and a file name extension containing 1 to 3 characters. The file name and file name extension are separated by a period.
If you have a large number of files (300,000 or more) in a folder, and the files have long file names with the same initial characters, the time required to create the files increases. The increase occurs because NTFS bases the short file name on the first six characters of the long file name. In folders with more than 300,000 files, the short file names start to conflict after NTFS uses all of the 8.3 names that are similar to the long file names. Repeated conflicts between a generated short file name and existing short file names cause NTFS to regenerate the short file name from 6 to 8 times.
To reduce the time required to create files, you can use the fsutil behavior set disable8dot3 command to disable the creation of 8.3 short file names. (You must restart your computer for this setting to take effect.) For more information about disabling 8.3 short file names, see MS-DOS-Readable File Names on NTFS Volumes later in this chapter.
If you want NTFS to generate 8.3 names, you can improve performance by using a naming scheme in which long file names differ at the beginning instead of at the end of the name.
For more information about short file names, see File Names in Windows XP Professional later in this chapter.
Folder Structure
NTFS supports volumes with large numbers of files and folders, so create a folder structure that works best for your organization. Some guidelines to consider when designing a folder structure include:
Avoid putting a large number of files into a folder if you use programs that create, delete, open, or close files quickly or frequently. The better solution is to logically separate the files into folders so that you can distribute the workload on multiple folders at a time.
If there is no way to logically separate the files into folders, put all the files into one folder, and then disable 8.3 file name generation. If you must use 8.3 names, use a file naming scheme that ensures that the first six characters are unique.
Warning
The time required to run Chkdsk.exe increases with larger folders. For more information about determining how long Chkdsk takes to complete, see Troubleshooting Disks and File Systems in this book.
Fragmentation
Heavily fragmented volumes do not perform as well as volumes that are defragmented regularly. You can reduce fragmentation by running the Disk Defragmenter snap-in or the command-line tool Defrag.exe weekly during idle times. For more information about defragmenting NTFS volumes, see Defragmenting NTFS Volumes earlier in this chapter.
Antivirus Programs
Antivirus programs add overhead to the system to scan for viruses, thus impacting file system performance. However, the impact varies among antivirus programs. When you evaluate antivirus programs, measure baseline performance to determine which programs cause the least impact in your environment. Many antivirus software vendors offer tuning guides that you can use to customize the software for your organization while minimizing performance impact.
Compression
Compression adds overhead to the system because a compressed NTFS file is decompressed, copied, and then recompressed as a new file even when the file is copied in the same computer. If your server is CPU-bound, avoid using compression. For more information about compression, see File Compression earlier in this chapter.
Indexing Service
If users frequently search for files on NTFS volumes in computers running Windows 2000 or Windows XP Professional, you can reduce search times dramatically by enabling Indexing Service. Indexing Service also works well when users search for content inside documents.
After you enable Indexing Service, it uses system resources to build and maintain its index, and NTFS begins tracking all file changes in the NTFS change journal. Both of these actions result in a slight performance decrease. However, for volumes that contain frequently searched files, the benefits gained from increased search speed outweigh the performance impact caused by enabling Indexing Service.
For more information about Indexing Service, see Indexing Service earlier in this chapter.
Last Access Time
Each file and folder on an NTFS volume contains an attribute called Last Access Time. This attribute shows when the file or folder was last accessed, such as when a user performs a folder listing, adds files to a folder, reads a file, or makes changes to a file. The most up-to-date Last Access Time is always stored in memory and is eventually written to disk within two places:
The file s attribute, which is part of its MFT record.
A directory entry for the file. The directory entry is stored in the folder that contains the file. Files with multiple hard links have multiple directory entries.
The Last Access Time on disk is not always current because NTFS looks for a one-hour interval before forcing the Last Access Time updates to disk. NTFS also delays writing the Last Access Time to disk when users or programs perform read-only operations on a file or folder, such as listing the folder s contents or reading (but not changing) a file in the folder. If the Last Access Time is kept current on disk for read operations, all read operations become write operations, which impacts NTFS performance.
Note
File-based queries of Last Access Time are accurate even if all on-disk values are not current. NTFS returns the correct value on queries because the accurate value is stored in memory.
NTFS eventually writes the in-memory Last Access Time to disk as follows.
Within the file s attribute
NTFS typically updates a file s attribute on disk if the current Last Access Time in memory differs by more than an hour from the Last Access Time stored on disk, or when all in-memory references to that file are gone, whichever is more recent. For example, if a file s current Last Access Time is 1:00 P.M., and you read the file at 1:30 P.M., NTFS does not update the Last Access Time. If you read the file again at 2:00 P.M., NTFS updates the Last Access Time in the file s attribute to reflect 2:00 P.M. because the file s attribute shows 1:00 P.M. and the in-memory Last Access Time shows 2:00 P.M.
Within a directory entry for a file
NTFS updates the directory entry for a file during the following events:
When NTFS updates the file s Last Access Time and detects that the Last Access Time for the file differs by more than an hour from the Last Access Time stored in the file s directory entry. This update typically occurs after a program closes the handle used to access a file within the directory. If the program holds the handle open for an extended time, a lag occurs before the change appears in the directory entry.
When NTFS updates other file attributes such as Last Modify Time, and a Last Access Time update is pending. In this case, NTFS updates the Last Access Time along with the other updates without additional performance impact.
Note
NTFS does not update a file s directory entry when all in-memory references to that file are gone.
If you have an NTFS volume with a high number of folders or files, and a program is running that briefly accesses each of these in turn, the I/O bandwidth used to generate the Last Access Time updates can be a significant percentage of the overall I/O bandwidth. To increase the speed of access to a folder or file, you can use the fsutil behavior set disablelastaccess command to disable updating the Last Access Time. After you use this command and restart the computer, the Last Access Time is no longer updated. If you create a new file, the Last Access Time remains the same as the File Creation Time. For more information about using the fsutilbehavior set disablelastaccess command, see Windows XP Professional Help.
NTFS Compatibility with Windows NT 4.0
Your ability to access your NTFS volumes when you use a multiple-boot configuration to start Windows NT and Windows XP Professional depends on which version of Windows NT you are using. If you are running Windows NT 4.0 Service Pack 4 or later, you can read basic volumes formatted by using the new version of NTFS. Computers running Windows 2000 and Windows XP Professional can read the new version of NTFS on both basic and dynamic volumes.
Note
Computers accessing NTFS volumes across the network are not affected.
When a Windows XP Professional volume is mounted in a computer running Windows NT 4.0 Service Pack 4 or later, most of the new NTFS features are not available. However, most read and write operations are permitted if they do not make use of any new NTFS features. The following features are affected by this configuration.
Reparse points
Windows NT cannot perform any operations that make use of reparse points.
Disk quotas
When you run Windows NT on a multiple-boot configuration that also runs Windows XP Professional, Windows NT ignores disk quotas implemented by Windows XP Professional, allowing you to use more disk space than your quota allows.
Encryption
Windows NT cannot perform any operations on files encrypted by Windows XP Professional.
Sparse files
Windows NT cannot perform any operations on sparse files.
Change journal
Windows NT ignores the change journal. No entries are logged when a user accesses files.
Warning
Because NTFS data structures are not the same for Windows NT 4.0 and Windows XP Professional, Windows NT 4.0 disk tools such as Chkdsk and Autochk do not work on NTFS volumes formatted or upgraded by Windows XP Professional. These tools check the version stamp of NTFS. After installing Windows XP Professional, you must run the updated version of these disk tools on their NTFS volumes.
Cleanup Operations on Windows NT Volumes
Because files on volumes formatted by using the version of NTFS included with Windows XP Professional can be read and written to by Windows NT 4.0 Service Pack 4 or later, Windows XP Professional might need to perform cleanup operations to ensure the consistency of the data structures of a volume after it is mounted on a computer running Windows NT.
Windows XP Professional does not perform cleanup operations on volumes previously mounted by using Windows 2000.
Cleanup operations affect the following features.
Reparse points
Computers running Windows NT 4.0 or earlier cannot access files that have reparse points, so no cleanup operations are necessary.
Disk quotas
If disk quotas are turned off, Windows XP Professional performs no cleanup operations. If disk quotas are turned on, Windows XP Professional cleans up the quota information by rebuilding the index. If a user exceeds the disk quota while the NTFS volume is mounted by a Windows NT 4.0 Service Pack 4 or later system, and disk quotas are strictly enforced, all further disk allocations of data by that user using Windows XP Professional fail. The user can still read and write data to any existing file but cannot increase the size of a file. However, the user can delete and shrink files. When usage falls below the assigned disk quota, disk allocations of data can resume.
Encryption
Encrypted files cannot be accessed by computers that are running Windows NT 4.0 or earlier, so no cleanup operations are necessary.
Sparse files
Computers running Windows NT 4.0 or earlier cannot access sparse files, so no cleanup operations are necessary.
Change journal
Computers that are running Windows NT 4.0 or earlier do not log file changes in the change journal. When Windows XP Professional starts, the change journals on volumes accessed by Windows NT are reset to indicate that the journal history is incomplete. Applications that use the change journal must be able to accept incomplete journals.
Object identifiers
Windows XP Professional maintains two references to the object identifier: one on the file and one in the volume-wide object identifier index. If you delete a file that has an object identifier, Windows XP Professional must scan and clean up the entry in the index.
NTFS Recoverability
NTFS is a recoverable file system that guarantees the consistency of the volume by using standard transaction logging and recovery techniques. In the event of a system failure, NTFS runs a recovery procedure that accesses information stored in a transaction log file. The NTFS recovery procedure guarantees that the volume is restored to a consistent state. Transaction logging requires very little overhead.
NTFS ensures the integrity of all NTFS volumes by performing disk recovery operations whenever a volume is mounted after the computer is restarted or after the volume is dismounted.
NTFS also uses a technique called cluster remapping to minimize the effects of a bad sector on an NTFS volume.
Warning
If either the MBR or boot sector is corrupted, you might not be able to access data on the volume. For more information about recovering from MBR or boot sector errors, see Troubleshooting Disks and File Systems in this book.
Recovering Data with NTFS
NTFS views each operation that modifies a file on a volume as a transaction and manages each one as an integral unit. NTFS might also break a single complex operation into multiple transactions. After a transaction is started, it is either completed, or it is rolled back if an event occurs that causes the operation to fail, and the NTFS volume returns to its state before the transaction began. Events that can cause an operation to fail include bad sectors, transient low-memory conditions, and disconnected devices.
To ensure that a transaction can either be completed or rolled back, NTFS performs the following steps for each transaction:
Records the metadata operations of a transaction in a log file cached in memory.
Records the actual metadata operations in memory.
Marks the transaction in the cached log file as committed.
Flushes the log file to disk.
Flushes the actual metadata operations to disk.
The preceding steps 4 and 5 occur in a lazy fashion after the transaction is completed, meaning that the flush operations are not tied to the transaction itself. Instead, NTFS modifies the log and metadata quickly in memory, and then flushes later at a convenient time to boost performance.
NTFS guarantees that the log records containing the metadata operations of the transaction are written to disk before the metadata that is modified in the transaction is written to disk. After NTFS updates the cache, NTFS commits the transaction by recording in the cached log file that the transaction is complete. After the cached log file is flushed to disk, all committed transactions are guaranteed to be completed, even if the system crashes before the changes are written to disk.
Note
Applications can specify the FILE_FLAG_WRITE_THROUGH Win32 flag to instruct the system to write through any intermediate cache and go directly to disk. The system can still cache write operations, but cannot lazily flush them.
If a system failure occurs, NTFS has enough information in the log to complete or abort any partial NTFS transaction. During recovery operations, NTFS redoes each committed transaction found in the log file. Then NTFS locates in the log file the transactions that were not committed at the time of the system failure and undoes each metadata operation recorded in the log file. Because NTFS flushes the log to disk before any metadata changes are written to disk, NTFS has complete information available about any metadata changes that need to be rolled back during recovery.
Caution
NTFS uses transaction logging and recovery to guarantee that the volume structure is not corrupted. For this reason, all file system data is accessible after a system failure. NTFS guarantees user data only if the program used to create the data uses the FILE_FLAG_WRITE_THROUGH Win32 flag. If the program does not use this flag, user data can be lost due to a system failure. If a system failure does occur, NTFS shows either the previous data, the new data, or zeros. Users do not see random data on the volume as the result of a crash.
Caching and Data Recovery
The cache is the area of RAM that contains the most recently used data. When you write data to disk, the lazy-writetechnique in Windows XP Professional indicates that the data is written when it is still in the cache. Cache memory can also be on the disk controller, such as cache memory available on SCSI controllers, or on the disk unit, such as cache memory available on Advanced Technology Attachment (ATA) disks. The following information can help you decide whether to enable the disk or the controller cache:
Write caching improves disk performance, particularly if large amounts of data are being written to the disk.
Control of the write-back cache is a firmware function provided by the disk manufacturer. See the documentation supplied with the disk or disk controller. You cannot configure the write-back cache from Windows XP Professional.
Write caching does not impact the reliability of the file system s own metadata. NTFS instructs the disk device driver to ensure that metadata is written whether or not write caching is enabled. Non-metadata is typically written to disk and can be cached.
Read caching in the disk does not affect the reliability of a file system.
Cluster Remapping
When NTFS detects a bad sector, NTFS dynamically remaps the cluster containing the bad sector a recovery technique called cluster remapping and allocates a new cluster for the data. If the error occurred during a read, NTFS returns a read error to the calling program, and the data is lost. If the error occurs during a write, NTFS writes the data to the new cluster, and no data is lost.
NTFS puts the address of the cluster containing the bad sector in the bad cluster file, $BadClus, in the MFT so that the bad sector is not reused.
Warning
Cluster remapping is not a backup alternative. After errors are detected, the disk must be monitored closely and replaced if the detect list grows. This type of error is displayed in the system log of Event Viewer.
FAT uses a form of cluster remapping, but only when the volume is initially formatted. If a bad sector occurs on a FAT volume after it is formatted, data stored within the associated cluster can be permanently lost. NTFS handles cluster remapping dynamically and continuously, ensuring the integrity of your data.
NTFS Data Structures
This section is useful for administrators who need information about the on-disk structures of NTFS volumes. These structures give NTFS basic advantages over other file systems used in Windows XP Professional.
Master File Table and Metadata Files
When you format a volume using NTFS, Windows XP Professional creates a master file table (MFT) and metadata files. The MFT is a relational database that consists of rows of file records and columns of file attributes. It contains at least one entry for every file on an NTFS volume, including the MFT itself.
Because the MFT stores information about itself, NTFS reserves the first 16 records of the MFT for metadata files (approximately 16 KB), which are used to describe the MFT. Metadata files that begin with a dollar sign ($) are described in Table 13-12. The remaining records of the MFT contain the file and folder records for each file and folder on the volume.
Table 13-12: Metadata Files Stored in the Master File Table
System File
File Name
MFT Record
Purpose of the File
Master file table
$Mft
0
Contains one base file record for each file and folder on an NTFS volume. If the allocation information for a file or folder is too large to fit within a single record, other file records are allocated as well.
Master file table mirror
$MftMirr
1
Guarantees access to the MFT in case of a single-sector failure. It is a duplicate image of the first four records of the MFT.
Log file
$LogFile
2
Contains a list of transaction steps used for NTFS recoverability. The log file is used by Windows XP Professional to restore consistency to NTFS after a system failure. The size of the log file depends on the size of the volume, but you can increase the size of the log file by using the Chkdsk command. For more information about the log file, see NTFS Recoverability earlier in this chapter. For more information about Chkdsk, see Troubleshooting Disks and File Systems in this book.
Volume
$Volume
3
Contains information about the volume, such as the volume label and the volume version.
Attribute definitions
$AttrDef
4
Lists attribute names, numbers, and descriptions.
Root file name index
.
5
The root folder.
Cluster bitmap
$Bitmap
6
Represents the volume by showing free and unused clusters.
Boot sector
$Boot
7
Includes the BPB used to mount the volume and additional bootstrap loader code used if the volume is bootable.
Bad cluster file
$BadClus
8
Contains bad clusters for a volume.
Security file
$Secure
9
Contains unique security descriptors for all files within a volume.
Upcase table
$Upcase
10
Converts lowercase characters to matching Unicode uppercase characters.
NTFS extension file
$Extend
11
Used for various optional extensions such as quotas, reparse point data, and object identifiers.
12 15
Reserved for future use.
The data segment locations for both the MFT and the backup MFT, $Mft and $MftMirr respectively, are recorded in the boot sector. The $MftMirr is a duplicate image of either the first four records of the $Mft or the first cluster of the $Mft, whichever is larger. If any MFT records in the mirrored range are corrupted or unreadable, NTFS reads the boot sector to find the location of the $MftMirr. NTFS then reads the $MftMirr and uses the information in $MftMirr instead of the information in the MFT. If possible, the correct data from the $MftMirr is written back to the corresponding location in the $Mft. For more information about the NTFS boot sector, see Troubleshooting Disks and File Systems in this book.
Note
To improve NTFS performance, the $LogFile and $Bitmap metadata files on newly formatted NTFS volumes are located in a different position on the disk than they were in Windows 2000. (The MFT record numbers do not change.) This new location improves performance by 5 to 8 percent, making NTFS performance similar to FAT.
NTFS creates a file record for each file and a folder record for each folder created on an NTFS volume. The MFT includes a separate file record for the MFT itself. These file and folder records are 1 KB each and are stored in the MFT. The attributes of the file are written to the allocated space in the MFT. Besides file attributes, each file record contains information about the position of the file record in the MFT. Figure 13-16 shows the contents of an MFT record for a small file or folder. Small files and folders (typically, 900 bytes or smaller) are entirely contained within the file s MFT record.
Figure 13-16: MFT record for a small file or folder
Typically, each file uses one file record. However, if a file has a large number of attributes or becomes highly fragmented, it might need more than one file record. If this is the case, the first record for the file, the base file record, stores the location of the other file records required by the file.
Folder records contain index information. Small folder records reside entirely within the MFT structure, while large folders are organized into B-tree structures and have records with pointers to external clusters that contain folder entries that cannot be contained within the MFT structure.
The benefit of using B-tree structures is evident when NTFS enumerates files in a large folder. The B-tree structure allows NTFS to group, or index, similar file names and then search only the group that contains the file, minimizing the number of disk accesses needed to find a particular file, especially for large folders. Because of the B-tree structure, NTFS outperforms FAT for large folders because FAT must scan all file names in a large folder before listing all of the files.
MFT Zone
To prevent the MFT from becoming fragmented, NTFS reserves 12.5 percent of volume by default for exclusive use of the MFT. This space, known as the MFT zone, is not used to store data unless the remainder of the volume becomes full.
Depending on the average file size and other variables, as the disk fills to capacity, either the MFT zone or the unreserved space on the disk becomes full first.
Volumes that have a small number of large files exhaust the unreserved space first.
Volumes with a large number of small files exhaust the MFT zone space first.
In either case, fragmentation of the MFT occurs when one region or the other becomes full. You can change the size of the MFT zone for newly created volumes by using the fsutil behavior set mftzone command. This command uses four settings, 1 4, which correspond to a percentage of the disk to be used as the MFT zone. The MFT zone sizes follow:
Setting 1, the default, reserves approximately 12.5 percent of the disk.
Setting 2 reserves approximately 25 percent.
Setting 3 reserves approximately 37.5 percent.
Setting 4 reserves approximately 50 percent.
In most computers, the default setting of 1 is adequate. The default setting accommodates volumes with an average file size of 8 KB. If you want to store a large number of smaller files (between 2 KB and 7 KB), you can use the fsutil behavior set mftzone command to increase the size of the MFT zone for new volumes. You must restart the computer before the new MFT zone size takes effect.
After you increase the size of the MFT zone, NTFS does not immediately allocate space to accommodate the size of the new MFT zone. Instead, NTFS exhausts the original reserved space before increasing the size of the MFT zone. When the original space is exhausted, NTFS looks for the next contiguous space large enough to hold the additional MFT zone, which can cause the MFT to become fragmented. Therefore, the fsutil behavior set mftzone command works best when you use the command to set the zone size, reboot, and then create the volume.
To determine the current size of the MFT zone on a Windows XP Professional-based computer, use the fsutil behavior query mftzone command. If you have not modified the size of the MFT zone, a message appears that indicates the MFT zone is not currently set, which means that the default setting of 1 is used. Otherwise, the command returns the current value, either 1, 2, 3, or 4. The current setting applies to all NTFS volumes in the computer.
NTFS File Attributes
Every allocated sector on an NTFS volume belongs to a file. Even the file system metadata is part of a file. NTFS views each file (or folder) as a set of file attributes. File elements such as its name, its security information, and even its data are file attributes. Each attribute is identified by an attribute type code and an optional attribute name.
When a file s attributes can fit within the MFT file record for that file, they are called resident attributes. Attributes such as file name and time stamp are always resident. When the amount of information for a file does not fit in its MFT file record, some file attributes become nonresident. Nonresident attributes are allocated one or more clusters of disk space. A portion of the nonresident attribute remains in the MFT and points to the external clusters. NTFS creates the Attribute List attribute to describe the location of all attribute records. Table 13-13 lists the file attributes currently defined by NTFS.
Table 13-13: NTFS File Attribute Types
Attribute Type
Description
Standard Information
Information such as timestamp and link count.
Attribute List
Locations of all attribute records that do not fit in the MFT record.
File Name
A repeatable attribute for both long and short file names. The long name of the file can be up to 255 Unicode characters. The short name is the 8.3, case-insensitive name for the file. Additional names, or hard links, required by POSIX can be included as additional file name attributes.
Data
File data. NTFS supports multiple data attributes per file. Each file typically has one unnamed data attribute. A file can also have one or more named data attributes, each using a particular syntax.
Object ID
A volume-unique file identifier. Used by the distributed link tracking service. Not all files have object identifiers.
Logged Tool Stream
Similar to a data stream, but operations are logged to the NTFS log file just like NTFS metadata changes. This attribute is used by EFS.
Reparse Point
Used for mounted drives. This is also used by Installable File System (IFS) filter drivers to mark certain files as special to that driver.
Index Root
Used to implement folders and other indexes.
Index Allocation
Used to implement the B-tree structure for large folders and other large indexes.
Bitmap
Used to implement the B-tree structure for large folders and other large indexes.
Volume Information
Used only in the $Volume system file. Contains the volume version.
Volume Name
Used only in the $Volume system file. Contains the volume label.
MS DOS-Readable File Names on NTFS Volumes
By default, Windows XP Professional generates MS DOS-readable file names on all NTFS volumes for use by 16-bit programs that run under Windows XP Professional. To improve performance on volumes with many long, similar names, you can use the fsutil behavior set command to disable 8.3 name creation. For more information about using this command, see Windows XP Professional Help.
Warning
Although disabling 8.3 name creation increases NTFS performance under Windows XP Professional, some 16-bit applications might not be able to access files and folders that have long file names. Also, some third-party programs cannot be installed on NTFS volumes if 8.3 names are disabled. In this case, use the fsutil behavior set command to enable short file names, restart the computer, and then try installing the program again.
Windows XP Professional does not generate short (8.3) file names for files created by POSIX-based applications on an NTFS volume whether short file names are disabled or not. This means that MS DOS-based and 16-bit Windows-based applications cannot view these file names if they are not valid 8.3 file names. Therefore, you must use standard MS-DOS 8.3 naming conventions if you want to use MS DOS-based or 16-bit Windows-based applications to work with files that are created by POSIX applications.