Figure 12-3: Foreign Disk Volumes dialog box
As you administer disk storage, you might need to add new hard disks or move hard disks from one computer to another. If a hard disk fails, you need to remove it and replace it with a new hard disk. After you connect the hard disk to the computer, you must perform certain steps before you can access or create volumes on the disk.
This section discusses the following:
Adding new disks to a computer.
Moving and removing disks.
Importing foreign disks.
When you first start Disk Management after installing a new hard disk, a wizard appears that provides a list of the new disks detected by Windows XP Professional. Follow the instructions in the wizard to initialize the disk by creating the partition structures, such as the MBR or the GUID partition table, necessary for data storage.
Next, the wizard offers to convert the disks to dynamic. Click to select the check box next to each disk that you want to convert to dynamic, and then follow the instructions to complete the wizard.
| Note | If you cancel the wizard before the partition structures are written, the disk status remains Not Initialized until you right-click the disk, and then click Initialize Disk. |
After you complete the wizard that installs the disk, the Plug and Play Manager assigns a number to the disk, which appears in Disk Management. The disk numbers are not necessarily assigned in a certain order, and disk numbers might change after you restart the computer.
For more information about Plug and Play Manager, see Managing Devices in this book.
You can move basic and dynamic disks from one computer to another. For example, if a computer becomes inoperable but you know the hard disk still works, you can move the disk to a computer that is running Windows XP Professional and access the data on the disk.
Before you move disks and install them in a computer that is running Windows XP Professional, you must review these guidelines.
Do not move dynamic disks to computers running Windows 95, Windows 98, Windows Me, Windows NT 4.0 or earlier, or Windows XP Home Edition because these operating systems cannot read dynamic disks. If you want to make the disk readable by an operating system that cannot read dynamic disks, you must use Windows XP Professional or Windows 2000 to back up or move the data to another disk, delete all volumes, and then right-click the dynamic disk and click Convert to Basic Disk.
Move all disks that contain multidisk volumes, such as spanned and striped volumes, at the same time. If you move only one disk and leave the other disk in the original computer, the data in the striped or spanned volumes becomes inaccessible on both disks. You must move the disks at the same time to ensure the data is accessible on the target computer. For more information about moving multidisk volumes, see Importing Foreign Disks later in this chapter.
Move GPT disks only to other Itanium-based computers because x86-based computers cannot read the partition structures on the disk. If you move a GPT disk to an x86-based computer running Windows 2000 with Service Pack 1 or greater or Windows XP Professional, the Disk Management snap-in shows that the GPT disk contains one volume with the status GPT Protective Partition. However, you cannot access any data on the GPT disk nor can you delete the volume. As a result, the disk is unusable in any x86-based computer unless you convert the disk to an MBR disk.
In Windows XP Professional, you can convert a GPT disk to MBR by using the clean command in DiskPart, which removes all data and partition structures from the disk. You cannot use the Disk Management snap-in in Windows XP Professional to perform the conversion. However, you can use Disk Management in Windows XP 64 Bit Edition to convert a GPT disk to an MBR disk and vice versa, but the disk must be empty. For more information about changing the partition style of a disk, see Managing GPT Disks in Itanium-based Computers later in this chapter.
Windows XP Professional cannot access volume sets or stripe sets that were created by using Windows NT 4.0. If you must move disks that contain volume sets or stripe sets to Windows XP Professional, you have three choices:
You can back up and then delete these volumes before you move the disks, and then create new dynamic volumes and restore the data.
If the volume sets or stripe sets are in a computer running Windows 2000, you can convert the disks that contain them to dynamic before you move the disks to a computer running Windows XP Professional. If you use this method, it is recommended that you back up the data as a precaution before converting the disks to dynamic. After you move the disks, Windows XP Professional can access them normally.
If the volume sets or stripe sets are in a computer running Windows NT 4.0, you can use the command-line tool Ftonline.exe after you move the disks to access the volumes in Windows XP Professional. Access is only valid for the current session so that you can back up the data before you delete the volumes. If you reboot, you must run Ftonline again. For more information about using Ftonline.exe, click Tools in Help and Support Center, and then click Windows Support Tools.
Do not move disks that contain mirror sets or stripe sets with parity to a computer running Windows XP Professional. You can, however, move disks from computers running Windows NT 4.0 to computers running Windows XP Professional if the disks contain primary partitions, extended partitions, and logical drives.
Do not move a dynamic disk that contains the system or boot volume to another computer unless you have no other way to recover data. Startup problems can occur if you move the disk back to the original computer and attempt to start Windows XP Professional from the disk.
You can, however, move a basic disk that contains a system or boot volume to another computer, access data on the disk, and then move the disk back to the original computer and successfully start Windows XP Professional.
If you move a dynamic disk that does not contain a system or boot volume to a computer that has never contained dynamic disks, the target computer uses the disk group identity from the original computer. This is not a problem unless you try to move the disk back to the original computer, and the original computer contains other dynamic disks. In this case, the original computer cannot import the foreign disk. To resolve this problem, move the disk to a different computer that has an existing disk group (that is, the computer has existing dynamic disks), import the disk, and then take the disk back to the original computer and import it.
To move a hard disk from one computer to another, follow this procedure:
Review the preceding limitations to ensure that you can access the data on the disks after you move them.
As a precaution, back up the data on the disk.
Remove the disk from the original computer.
Although you do not need to turn off the computer to remove an external disk or hot-swappable disk, if the Safely Remove Hardware icon appears in the taskbar notification area, you must use the Safely Remove Hardware application to alert Windows XP that you are removing the disk. If the Safely Remove Hardware icon is not in the notification area, you must use Device Manager to uninstall the disk before you unplug it. However, to move an internal disk, you must turn off and unplug the original computer before you remove the disk. Then turn off and unplug the target computer before you add the disk. For more information about removing external disks, see Managing Devices in this book.
Install the disk in a computer that is running Windows XP Professional.
Log on to Windows XP Professional as a member of the Administrators group, and then open Disk Management.
On the Action menu, click Rescan Disks. If the disk does not appear in Disk Management, open Device Manager, and then from the Action menu click Scan for hardware changes.
All newly attached disks appear in the Disk Management snap-in, but only basic disks are immediately accessible. If the disks you moved were dynamic disks, they appear as Foreign disks and you must import them before you can access data on them. For more information, see Importing Foreign Disks later in this chapter.
Basic volumes are assigned the next available drive letter, which might differ from the drive letter used by the previous operating system. For more information about how Windows XP Professional assigns drive letters, see the Microsoft Knowledge Base link on the Web Resources page at http://www.microsoft.com/windows/reskits/webresources Search the Knowledge Base by using the keywords LDM and cmdcons.
After you remove a dynamic disk from a computer, the remaining online dynamic disks retain information about the removed disk and its volumes in the dynamic disk database. As a result, Disk Management still displays the removed hard disk but shows it as Offline and assigns it the status of Missing.
You can delete all references to the removed disk by updating the dynamic disk database. To do this, use Disk Management to remove all volumes on the missing disk. After you remove all the volumes, right-click the missing disk, and then click Remove Disk. The missing disk is no longer displayed in Disk Management.
You need at least one online dynamic disk to retain information about missing disks and their volumes. When you remove the last dynamic disk, you lose the information, and the missing disks are no longer displayed in Disk Management.
For more information about disk and volume error conditions, see Troubleshooting Disks and File Systems in this book.
If you move one or more dynamic disks from a disk group to another computer that has its own disk group, the dynamic disks you moved are marked as Foreign until you import the disks into the existing disk group. You must import the disks before you can access volumes on the disk.
In computers that are running any combination of Windows 2000 and Windows XP Professional, you do not need to import existing dynamic disks because the disks are imported automatically each time you start either operating system.
You cannot import dynamic disks into computers running Windows XP Home Edition because it cannot read dynamic disks.
In Disk Management, right-click any disk that is marked as Foreign, and then click Import Foreign Disks.
Select the disk group that you want to import.
Even if multiple disk groups are present, you must import one group at a time. If you want to view the disks that are part of a disk group, select the disk group, and then click the Disks button.
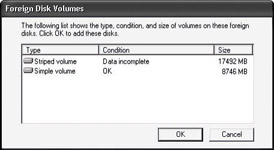
Carefully review the information in the Foreign Disk Volumes dialog box to ensure that you can access the volumes after you import the disks.
As Figure 12-3 shows, the Foreign Disk Volumes dialog box describes what will happen to each volume after you import the disks. If a volume condition shows as OK, you can access the volume after you import the disks. However, if a volume condition shows as Data incomplete, you must import the remaining disks that contain the multidisk volume before you can access the volume.
Figure 12-3: Foreign Disk Volumes dialog box
Because spanned and striped volumes span multiple disks, the status of a multidisk volume can become complicated if you do not move all of the disks at the same time. Another complication can arise when you move a disk and then later move additional disks. Although you can move volumes incrementally, the procedure can be complicated and is therefore not recommended. For this reason, when you move volumes that span multiple disks, you need to move them all at the same time.
The following describes the volume states that occur when you move the specified volume types:
You can import spanned or striped volumes into computers running Windows XP Professional, Windows XP 64 Bit Edition, or any edition of Windows 2000.
Whenever possible, move all disks that contain spanned or striped volumes at the same time. Moving the disks at the same time ensures that the volumes have the Healthy status after import. If you move only some disks from one system to another, the volume becomes disabled during import and also becomes disabled on the original system. As long as you do not delete the volume on either the original or the target system, you can move the remaining disks later. When you move all disks over to the other system, the volume returns its original state.
Do not import mirrored or RAID 5 volumes into computers running Windows XP Professional or Windows 2000 Professional. Because these operating systems do not support mirrored or RAID 5 volumes, you cannot access data on these volumes after the import. You must move the volume back to a computer running Windows 2000 Server to access the volume.
Because dynamic disks store drive letter information in the dynamic disk database, imported volumes use their existing drive letters unless those drive letters are already used. If the previous drive letter is unavailable, then Disk Management assigns the next available drive letter to the imported volume.
For more information about how Windows XP Professional assigns drive letters, see the Microsoft Knowledge Base link on the Web Resources page at http://www.microsoft.com/windows/reskits/webresources Search the Knowledge Base by using the keywords LDM and cmdcons.
For more information about disk groups and importing disks, see article Q222189, Description of Disk Groups in Windows 2000 Disk Management, in the Microsoft Knowledge Base. To find this article, see the Microsoft Knowledge Base link on the Web Resources page at http://www.microsoft.com/windows/reskits/webresources