Chapter 9 -- Creating Forms
You can use forms to give your users a familiar interface for viewing and entering data into a database, but forms provide far more than just an interface. Forms provide a rich set of objects that can respond to user (or system) events so that you can enable your users to accomplish their information management tasks as easily and as intuitively as possible.
This chapter covers:
- Designing Forms
- Creating a New Form
- Adding Objects to Forms
- Manipulating Objects
- Managing Forms
Designing Forms
Visual FoxPro provides you with a powerful Form Designer to make form design fast and easy. You can have:
- Various types of objects on the forms.
- Data bound to objects on the form.
- Top-level or child forms.
- Multiple forms that can be manipulated together.
- Forms based on your own custom templates.
Forms and form sets are objects with their own properties, events, and methods that you can set in the Form Designer. A form set consists of one or more forms that can be manipulated as a unit. If you have four forms in your form set, for example, you can display or hide them as a unit with a single command at run time.
Creating a New Form
You can create new forms in the Form Designer, and you can see how each object will appear to the user as you design it.
To create a new form
- In the Project Manager, select Forms and choose New.
-or-
From the File menu, choose New, select Form, and choose New File.
-or-
- Use the CREATE FORM command.
The Form Designer with toolbars: Form Designer, Controls, Layout, and Palette
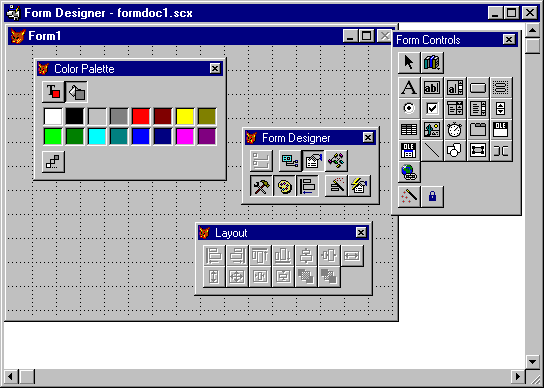
For a more detailed description of the Form Designer, see Chapter 8, Managing Data Through Forms, in the User s Guide.
Setting the Data Environment
Each form or set of forms includes a data environment. The data environment is an object that includes the tables or views the form interacts with and the relationships between tables that the form expects. You can visually design the data environment in the Data Environment Designer and save it with the form.
The data environment can automate opening and closing tables and views when the form is run. In addition, the data environment helps you set the ControlSource property for controls by populating the ControlSource property setting box in the Properties window with all the fields in your data environment.
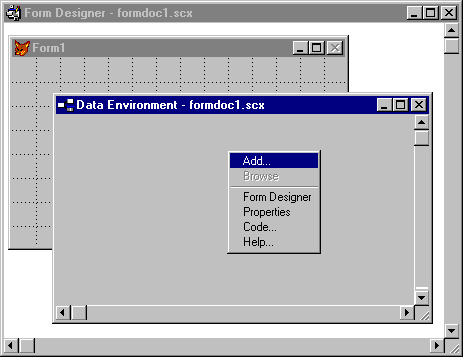
To open the Data Environment Designer
- From the View menu, choose Data Environment.
- From the Shortcut menu, choose Add.
- In the Open dialog box, choose a table or view to add to the data environment.
The Data Environment Designer
Common Data Environment Properties
The following data environment properties are commonly set in the Properties window:
| Property | Description | Default Setting |
| AutoCloseTables | Controls whether tables and views are closed when the form is released. | True (.T.) |
| AutoOpenTables | Controls whether tables and views in the data environment are opened when the form is run. | True (.T.) |
| InitialSelectedAlias | Specifies the table or view that is selected when the form is run. | "" at design time. If not specified, at run time the first cursor added to the DataEnvironment is initially selected. |
Adding a Table or View to the Data Environment Designer
When you add tables or views to the Data Environment Designer, you can see the fields and indexes that belong to the table or view.
To add a table or view to the Data Environment
- From the Data Environment Designer, choose Add from the DataEnvironment menu.
- In the Add Table or View dialog box, choose a table or view from the list.
-or-
If no database or project is open, choose Other to select a table.
You can also drag a table or view from an open project or the Database Designer into the Data Environment Designer.
When the Data Environment Designer is active, the Properties window displays objects and properties associated with the data environment. Each table or view in the data environment, each relationship between tables, and the data environment itself is a separate object in the Object box of the Properties window.
Removing a Table from the Data Environment Designer
When you remove a table from the data environment, any relationships that the table is involved in are also removed.
To remove a table or view from the Data Environment Designer
- In the Data Environment Designer, select the table or view.
- From the DataEnvironment menu, choose Remove.
Setting Relationships in the Data Environment Designer
If you add tables to the Data Environment Designer that have persistent relationships set in a database, the relationships are automatically added in the data environment. If the tables don t have persistent relationships, you can still relate them in the Data Environment Designer.
To set relationships in the Data Environment Designer
- Drag a field from the primary table onto the matching index tag in the related table.
The Data Environment Designer with relationships set between tables
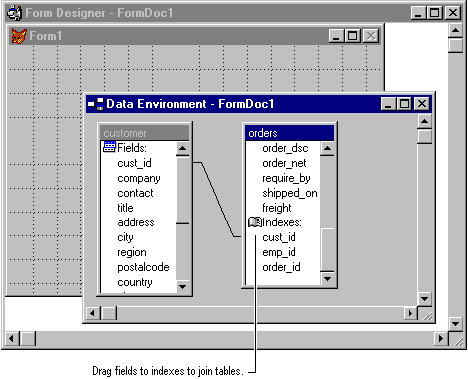
You can also drag a field from the primary table to a field in the related table. If there is no index tag in the related table corresponding to the field in the primary table, you're prompted to create the index tag.
Editing Relationships in the Data Environment Designer
When you set a relation in the Data Environment Designer, a line between the tables indicates the relationship.
To edit the properties of the relation
- In the Properties window, select the relation from the Object box.
The properties of the relation correspond to clauses and keywords in the SET RELATION and SET SKIP commands.
The RelationalExpr property is set by default to the name of the primary key field in the primary table. If the related table is indexed on an expression, you need to set the RelationalExpr property to this expression. For example, if the related table is indexed on UPPER(cust_id), you need to set RelationalExpr to UPPER(cust_id).
If the relation is not a one-to-many relationship, set the OneToMany property to false (.F.). This corresponds to using the SET RELATION command without issuing SET SKIP.
Setting the OneToMany property of a relation to true (.T.) corresponds to issuing the SET SKIP command. When you skip through the parent table, the record pointer remains on the same parent record until the record pointer moves through all related records in the child table.
Note If you want a one-to-many relationship in the form, set the OneToMany property to true (.T.), even if a persistent one-to-many relationship has been established in a database.
Creating Single- and Multiple-Document Interfaces
Visual FoxPro allows to you to create two types of applications:
- Multiple-document interface(MDI) applications consist of a single main window, and the application s windows are contained within or float on top of the main window. Visual FoxPro is primarily an MDI application, with the command window, edit windows, and designer windows contained within the main Visual FoxPro window.
- Single-document interface(SDI) applications consist of one or more independent windows, each of which appears separately on the Windows desktop. Microsoft Exchange is an example of an SDI application, in which each message you open appears in its own independent window.
An application consisting of single window is usually an SDI application, but some applications mix SDI and MDI elements. For example, Visual FoxPro displays its debugger as an SDI application, which in turn contains MDI windows of its own.
To support both types of interfaces, Visual FoxPro allows you to create several types of forms:
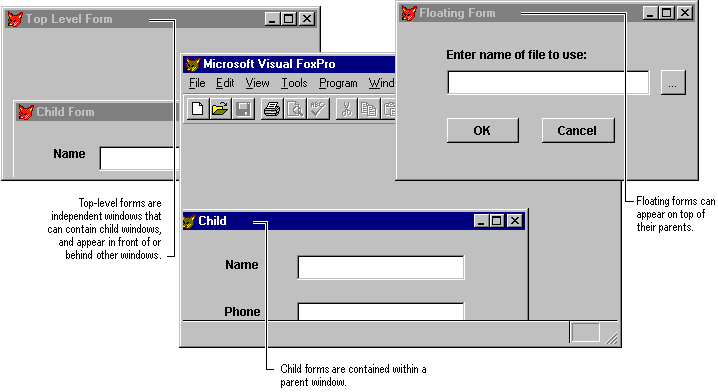
- Child form. A form contained within another window, used in creating MDI applications. Child forms cannot be moved outside the bounds of their parent form (the main form), and when minimized appear at the bottom of their parent form. If their parent form is minimized, they are minimized along with it.
- Floating form. A form that belongs to a parent (main) form, but is not contained within it. Instead, floating forms can be moved anywhere on the screen. They cannot be moved behind their parent window. If minimized, a floating form appears at the bottom of the desktop. If their parent form is minimized, floating forms are minimized along with it. Floating forms are also used in creating MDI applications.
- Top-level form. An independent form without parent form, used to create an SDI application, or to serve as the parent for other child forms in an MDI application. Top-level forms work at the same level as other Windows applications, and can appear in front of or behind them. They appear on the Windows taskbar.
Child, floating, and top-level forms
Specifying a Form Type
You create all types of forms in much the same way, but you set specific properties to indicate how the form should behave.
If you're creating a child form, you specify not only that it should appear inside another form, but also whether it is an MDI-compliant child form, which indicates how the form behaves when maximized. If the child form is MDI-compliant, it combines with the parent form, sharing the parent form s title bar and caption, menus, and toolbars. A child form that is not MDI-compliant maximizes into the full client area of the parent, but retains its own caption and title bar.
To specify a child form
- Create or edit the form using the Form Designer.
- Set the form s ShowWindow property to one of the following values:
- 0 In Screen. The child form s parent will be the main Visual FoxPro window.
- 1 In Top-Level Form. The child form s parent will be the top-level form that is active when the child window is displayed. Use this setting if you want the child window to appear inside any top-level window other than the main Visual FoxPro window.
- 0 In Screen. The child form s parent will be the main Visual FoxPro window.
- Set the form s MDIForm property to .T. (true) if you want the child form to be combined with the parent when maximized, or to .F. (false) if the child window should be retained as a separate window when maximized.
A floating form is a variation of a child form.
To specify a floating form
- Create or edit the form using the Form Designer.
- Set the form s ShowWindow property to one of the following values:
- 0 In Screen. The floating form s parent will be the main Visual FoxPro window.
- 1 In Top-Level Form. The floating form s parent will be the top-level form that is active when the floating window is displayed.
- 0 In Screen. The floating form s parent will be the main Visual FoxPro window.
- Set the form s Desktop property to .T. (true).
To specify a top-level form
- Create or edit the form using the Form Designer.
- Set the form s ShowWindow property to 2 As Top-Level Form.
Displaying a Child Form Inside a Top-Level Form
If you've created a child form in which the ShowWindow property is set to 1 In Top-Level Form, you don't directly specify the top-level form that acts as the child form s parent. Instead, Visual FoxPro assigns the child form to a parent at the time the child window is displayed.
To display a child form inside a top-level form
- Create a top-level form.
- In the event code of the top-level form, include the DO FORM command, specifying the name of the child form to display.
For example, create a button in the top-level form, and then in the Click event code for the button, include a command such as this one:
DO FORM MyChildNote The top-level form must be visible and active when the child form is displayed. Therefore, you cannot use the Init event of the top-level form to display a child form, because the top-level form will not yet be active.
- Activate the top-level form, and then if necessary, trigger the event that displays the child form.
Hiding the Main Visual FoxPro Window
If you're running a top-level form, you might not want the main Visual FoxPro window to be visible. You can use the Visible property of the Application object to hide and show the main Visual FoxPro window as needed.
To hide the main Visual FoxPro window
- In the Init event of the form, include the following line of code:
Application.Visible = .F. - In the Destroy event of the form, include the following line of code:
Application.Visible = .T.
Make sure that you also provide a way to close the form by using THISFORM.Release in some method or event.
Note You can also include the following line in a configuration file to hide the main Visual FoxPro window:
SCREEN = OFF For more information about configuring Visual FoxPro, see Chapter 3, Configuring Visual FoxPro, in the Installation Guide.
Adding a Menu to a Top-Level Form
To add a menu to a top-level form
- Create a top-level form menu. For more information about creating menus for top-level forms, see Chapter 11, Designing Menus and Toolbars.
- Set the form s ShowWindow property to 2 As Top-Level Form.
- In the Init event of the form, run the menu program and pass it two parameters:
DO menuname.mpr WITH oForm, lAutoRename
oForm is an object reference to the form. In the Init event of the form, pass THIS as the first parameter.
lAutoRename specifies whether or not a new unique name is generated for the menu. If you plan to run multiple instances of the form, pass .T. for lAutoRename.
For example, you can call a menu called
mySDImenuwith this code:DO mySDImenu.mpr WITH THIS, .T.
Extending Forms with Form Sets
You can manipulate multiple forms as a group by including them in a form set. A form set has these benefits:
- You can show or hide all the forms in a form set at one time.
- You can visually arrange multiple forms at once to control their relative positions.
- Because all the forms in a form set are defined in a single .scx file with a single data environment, you can automatically synchronize record pointers in multiple forms. If you change the record pointer in a parent table in one form, the child records in another form are updated and displayed.
Note All the forms and all the objects on the forms are loaded when you run the form set. Loading many forms with a lot of controls might take several seconds.
Creating a New Form Set
A form set is a parent container for one or more forms. When you are in the Form Designer, you can create a form set.
To create a form set
- From the Form menu, choose Create Formset.
If you don t want to work with multiple forms as a group of forms, you don t need to create a form set. Once you've created a form set, you can add forms to it.
Adding and Removing Forms
Once you've created a form set, you can add new forms and remove forms.
To add additional forms to a form set
- From the Form menu, choose Add New Form.
To remove a form from a form set
- In the Form box at the bottom of the Form Designer, select the form.
- From the Form menu, choose Remove Form.
If you have a single form in a form set, you can remove the form set so that you have only the form.
To remove a form set
- From the Form menu, choose Remove Formset.
Forms are saved in table format to a file with an .scx extension. When you create a form, the .scx table contains a record for the form, a record for the data environment, and two records for internal use. A record is added for each object you add to the form or to the data environment. If you create a form set, an additional record is added for the form set and for each new form. The parent container of each form is the form set. The parent container of each control is the form that it is placed on.
Tip When you run a form set, you may not want all forms in the form set initially visible. Set the Visible property to false (.F.) for forms you don t want displayed when the form set runs. Set the Visible property to true (.T.) when you want the forms displayed.
Adding Objects to Forms
To design the functionality you want in a form, you add the appropriate controls, set form and control properties, and write event code.
You can add the following types of objects to a form:
- Controls
- Containers
- User-defined classes
- OLE objects
Understanding Container and Control Objects
Objects in Visual FoxPro belong in one of two categories, depending on the nature of the class they are based on:
- Containers can hold other containers or controls. They can act as the parent object for other objects. For example, a form, as a container, is the parent object of a check box on that form.
- Controls can be placed in containers, but cannot be the parent for other objects. For example, a check box cannot contain any other object.
The Form Designer allows you to design both containers and controls.
| Container | Can contain |
| Column | Headers, and any objects except form sets, forms, toolbars, timers, and other columns |
| Command button group | Command buttons |
| Form set | Forms, toolbars |
| Form | Page frames, grids, any controls |
| Grid | Columns |
| Option button group | Option buttons |
| Page frame | Pages |
| Page | Grids, any controls |
Adding Visual FoxPro Containers
In addition to form sets and forms, Visual FoxPro provides four base container classes.
| Visual FoxPro Container Classes | |
| Command button group | Option button group |
| Grid | Page frame |
To add container objects to a form
- In the Form Controls toolbar, select the desired container object (button group, grid, or page frame) button and drag it to size in the form.
When you add a command button group or an option button group to a form in the Form Designer, the group contains two buttons by default. When you add a page frame to a form, the page frame contains two pages by default. You can add more buttons or pages by setting the ButtonCount property or the PageCount property to the number you want.
When you add a grid to a form, the ColumnCount property is set to 1 by default, which indicates AutoFill. At run time, the grid will display as many columns as there are fields in the RowSource table. If you don t want AutoFill, you can specify the number of columns by setting the grid s ColumnCount property.
For more information about these container objects, see Chapter 10, Using Controls.
Collection and Count Properties
All container objects in Visual FoxPro have a count property and a collection property associated with them. The collection property is an array referencing each contained object. The count property is a numeric property indicating the number of contained objects.
The collection and count properties for each container are named according to the type of object that can be contained in the container. The following table lists the containers and the corresponding collection and count properties.
| Container | Collection Property | Count Property |
| Application | Objects Forms | Count FormCount |
| FormSet | Forms | FormCount |
| Form | Objects Controls | Count ControlCount |
| PageFrame | Pages | PageCount |
| Page | Controls | ControlCount |
| Grid | Columns | ColumnCount |
| CommandGroup | Buttons | ButtonCount |
| OptionGroup | Buttons | ButtonCount |
| Column | Controls | ControlCount |
| ToolBar | Controls | ControlCount |
| Container | Controls | ControlCount |
| Control | Controls | ControlCount |
These properties allow you to use a loop to programmatically manipulate all or specific contained objects. For example, the following lines of code set the BackColor property of columns in a grid to alternating green and red:
o = THISFORM.grd1 FOR i = 1 to o.ColumnCount IF i % 2 = 0 && Even-numbered column o.Columns(i).BackColor = RGB(0,255,0) && Green ELSE o.Columns(i).BackColor = RGB(255,0,0) && Red ENDIF ENDFOR Adding Visual FoxPro Controls to a Form
You can easily add any of the standard Visual FoxPro controls to your form by using the Controls toolbar.
Standard Visual FoxPro Controls
Check box
Hyperlink
List box
Spinner
Combo box
Image
OLE Bound Control
Text box
Command button
Label
OLE Container Control
Timer
Edit box
Line
Shape
To add controls to a form
- In the Form Controls toolbar, select the desired control button and click or drag it to size in the form.
For more information about which control to choose, see Chapter 10, Using Controls.
Adding Data-Bound Controls to a Form
You can bind controls to data in a table, view, table field, or view field by setting the ControlSource property of a control to a field or the RecordSource property of a grid to a table or view. But you can also create data-bound controls by dragging fields or tables to the form directly from:
- The Project Manager
- The Database Designer
- The Data Environment Designer
The class of control created this way depends on the Field Mappings settings in the Properties tab of the Table Designer or the Field Mapping tab of the Options dialog box.
For more information about setting default control classes, see the Table Designer or the Field Mapping tab of the Options dialog box.
Adding User-Defined Objects to a Form
One of the most powerful features of Visual FoxPro is the ability to create classes that can easily be used and reused in various pieces of your applications. Once you've created classes, you can add them to your forms.
To add an object based on a custom class
- In the Project Manager, drag the class onto the container.
You can also add your classes directly from the Form Controls toolbar when you add them to your toolbar.
Adding Class Libraries to the Controls Toolbar
You need to register your class libraries before they can be displayed in the Form Controls toolbar.
To register a class library
- From the Tools menu, choose Options.
- In the Options dialog box, choose the Controls tab.
- Choose Add.
- In the Open dialog box, choose a class library to add to the Selected list and choose Open.
- Repeat steps 3 and 4 until you've added all the libraries you want to register.
Classes in the class libraries in the Selected list can be used in the Form Designer as easily as Visual FoxPro base classes can be used.
Controls tab of the Options dialog box
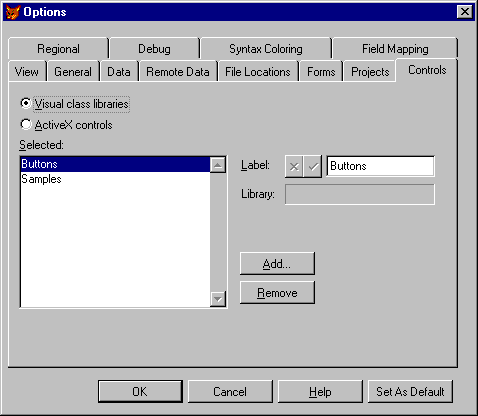
Tip If you want the class libraries to be available from the Form Controls toolbar every time you run Visual FoxPro, choose Set as Default in the Options dialog box.
You can also register libraries directly in the Form Designer.
To register a class library in the Form Designer

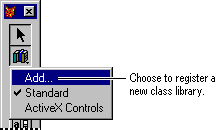
- In the Form Controls toolbar, choose the View Classes button.
- From the submenu, choose Add.
Submenu of the View Classes button
- In the Open dialog box, choose a class library to add to the Form Controls toolbar and choose Open.
Adding Objects to a Form from a Class Library
Once you've added class libraries in the Classes tab of the Options dialog box or from the View Classes submenu, you can access them in the Form Designer.
To add a custom object from the Controls toolbar

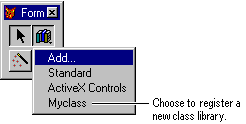
- In the Form Controls toolbar, choose the View Classes button.
- From the list of registered class libraries, select the library that contains the control you want to add to the form.
The toolbar is populated with the controls in the library you selected.
User-defined class library added to the View Classes submenu
- Click the control you want and drag it to size in the form.
Note You can remove a visual class library from the View Classes toolbar menu by selecting the library in the Selected list in the Controls tab of the Options dialog box, and choosing Remove.
When you add objects to a form based on anything other than the Visual FoxPro base classes, a relative path to the class library (.vcx file) is stored in the form s .scx file. If you move either the form or the class library to a different location, Visual FoxPro displays a dialog box when you try to run the form so that you can manually locate the class library.
Determining What Controls Are on a Form
To determine how many controls are on the form, you can use the ControlCount property. The Controls[n] property of the form allows you to reference each control on the form. The following program prints the Name property of all the controls on the currently active form.
ACTIVATE SCREEN && to print to the main Visual FoxPro window FOR nCnt = 1 TO Application.ActiveForm.ControlCount ? Application.ActiveForm.Controls[nCnt].Name ENDFOR Adding Properties and Methods to a Form
You can add as many new properties and methods as you want to a form set or to a form that isn t part of a form set. Properties hold a value; methods hold procedural code to be run when you call the method. The new properties and methods are scoped to the form and you reference them the same way you reference other properties or methods of the form.
Creating New Properties
If you have a form set, properties and methods that you add in the Form Designer are scoped to the form set. If you don t have a form set, the properties and methods are scoped to the form.
To add a new property to a form
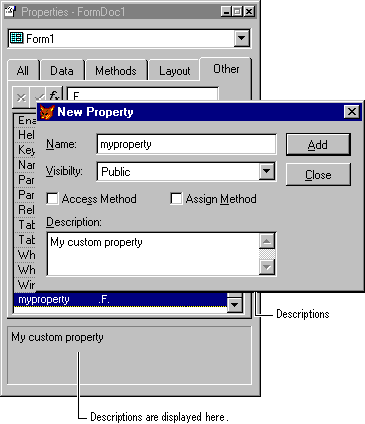
- From the Form menu, choose New Property.
- In the New Property dialog box, type the name of the property. You can also include a description of the property that can be displayed at the bottom of the Properties window.
Adding a property to a form
Creating an Array Property
An array property is scoped to the form like any other property, but can be manipulated with the Visual FoxPro array commands and functions.
To create an array property
- Add a new property to the form.
- In the Name box of the New Property dialog box, type the name of the array property and include the size and dimensions of the array.
For example, to create a two-dimensional array with 10 rows, you could type arrayprop[10,2] in the Name box of the New Property dialog box.
Array properties are read-only in design mode, but you can manage, redimension, and assign values to the elements of the array property at run time. For an example of using an array property, see Managing Multiple Instances of a Form later in this chapter.
Creating New Methods
You can add methods to the form that can be called the same way the form class methods can be called.
To create a new method for a form
- From the Form menu, choose New Method.
- In the New Method dialog box, type the name of the method. You can optionally include a description of the method.
You call a user-defined method the same way you call base class methods, using the following syntax:
ObjectName.MethodName
Your method can also accept parameters and return values. In this case, you call the method in an assignment statement:
cVariable = ObjectName.MethodName(cParameter, nParameter)
Including Predefined Constants
To use predefined constants in your methods, you can include a header file in a form or a form set using #INCLUDE. A header file typically contains compile-time constants defined with the #DEFINE preprocessor directive.
To include a file in a form
- From the Form menu, choose Include File.
- In the Include File dialog box, specify the file in the Include File text box.
-or-
Choose the dialog button to open the Include dialog box and choose the file.
- Choose OK.
Manipulating Objects
There are several ways you can manipulate objects at design time:
- Set the size and position of objects by dragging them in the Form Designer window.
- Align controls by choosing alignment tools on the Layout toolbar or options on the Format menu.
- Set colors by choosing foreground and background colors in the Palette toolbar.
- Set properties in the Properties window. The primary point of control for all objects in your form is the Properties window.
Setting Properties at Design Time
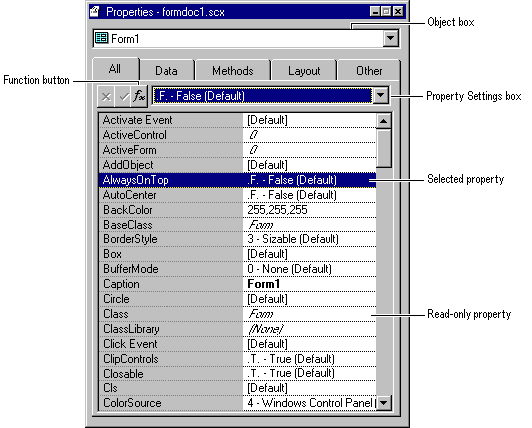
The Properties window opens with the properties or events of the selected object displayed. If more than one object is selected, the properties that the objects have in common are displayed in the Properties window. To edit the properties or events of a different object, choose the appropriate object from the Object box or select a different control in the form.
The Properties window
To set a property
- In the Properties window, select a property in the Property and Events list.
- In the Property Settings box, type or choose the desired setting for the selected property.
Note Properties that are read-only at design time, such as the Class property of an object, are displayed in the Properties and Events list in the Properties window in italics.
If the property requires a character value, you don t have to include the value in quotation marks. If you want the caption of a form to be CUSTOMER, type CUSTOMER in the Property Settings box. If you want the caption of a form to be CUSTOMER, with the quotation marks displayed in the window title, type CUSTOMER in the Property Settings box.
Setting Properties with Expressions
You can also set properties to the results of expressions or functions through the Properties window.
To set a property with an expression
- In the Properties window, choose the Function button to open the Expression Builder.
-or-
- In the Property Settings box, type = followed by an expression.
For example, you can set the Caption property of a form to indicate the currently active table when the form is run by typing =ALIAS( ) in the Property Settings box.
A property expression is evaluated when the you set it in the Properties window and when the object is initialized at run time or design time. Once the object is created, the property setting doesn t change until you or a user explicitly changes it.
Troubleshooting If you set a property to the result of a user-defined function, the function is evaluated when you set the property or modify or run the form. If there is an error in the user-defined function, you might not be able to open your form.
You can also set the property to the user-defined function in the Init event of the object, as in the following example:
THIS.Caption = myfunction( ) If there is an error in the user-defined function, you still won t be able to run the form this way, but you ll be able to modify it.
Defining Form Behavior
When you are designing a form in the Form Designer, the form is live: except for setting the Visible property to false (.F.), visual and behavioral changes you make are immediately reflected in the form. If you set the WindowState property to 1 Minimized or 2 Maximized, the form in the Form Designer immediately reflects this setting. If you set the Movable property to false (.F.), a user will not be able to move the form at run time and you won t be able to move the form at design time either. You might want to design the functionality of your form and add all the appropriate controls before you set some of the properties that determine form behavior.
The following form properties are commonly set at design time to define the appearance and behavior of the form.
| Property | Description | Default |
| AlwaysOnTop | Controls whether a form is always on top of other open windows. | False (.F.) |
| AutoCenter | Controls whether the form is automatically centered in the main Visual FoxPro window or on the desktop when the form is initialized. | False (.F.) |
| BackColor | Determines the color of the form window. | 255,255,255 |
| BorderStyle | Controls whether the form has no border, a single-line border, a double-wide border, or a system border. If the BorderStyle is 3 - System, the user will be able to resize the form. | 3 |
| Caption | Determines the text displayed in the title bar of the form. | Form1 |
| Closable | Controls whether the user can close the form by double-clicking the close box. | True (.T.) |
| DataSession | Controls whether the tables in the form are opened in work areas that are globally accessible or private to the form. | 1 |
| MaxButton | Controls whether or not the form has a maximize button. | True (.T.) |
| MinButton | Controls whether or not the form has a minimize button. | True (.T.) |
| Movable | Controls whether or not the form can be moved to a new location on the screen. | True (.T.) |
| ScaleMode | Controls whether the unit of measurement in object size and position properties is foxels or pixels. | Determined by settings in the Options dialog box. |
| Scrollbars | Controls the type of scroll bars a form has. | 0 - None |
| TitleBar | Controls whether a title bar appears at the top of the form. | 1 - On |
| ShowWindow | Controls whether the window is a child (in screen), floating, or top-level window. | 0 - In Screen |
| WindowState | Controls whether the form is minimized (in Windows only), maximized, or normal. | 0 - Normal |
| WindowType | Controls whether the form is modeless (the default) or modal. If the form is modal, the user must close the form before accessing any other elements of your application s user interface. | 0 Modeless |
You can use the LockScreen property to make run-time adjustment of control layout properties appear cleaner.
Assigning Icons to Forms
In Visual FoxPro for Windows, you can assign an icon to the form; the icon is displayed when the window is minimized in Windows NT and in the title bar in Windows 95. To assign an icon to a form, set the form s Icon property to the name of an .ico file.
To assign an icon to a form
- Open the form.
- Open the Properties window.
- Set the Icon property to the .ico file that you want to display.
Editing Event and Method Code
Events are user actions, such as clicks and mouse movements, or system actions, such as the progression of the system clock. Methods are procedures that are associated with the object and that are specifically invoked programmatically. For a discussion of events and methods, see Chapter 3, Object-Oriented Programming. You can specify the code to be processed when an event is triggered or a method is invoked.
To edit event or method code
- From the View menu, choose Code.
- Select the event or method in the Procedure box.
- In the Edit window, write the code you want to be processed when the event is triggered or the method is invoked.
For example, you could have a command button on a form with the caption Quit. In the Click event for the button, include the line:
THISFORM.Release
Tip To move between procedures in the Code Editing window, press PAGE DOWN or PAGE UP.
When the user clicks the command button, the form is removed from the screen and from memory. If you don t want to release the form from memory, you could instead include the following line in the click event:
THISFORM.Hide Note If code associated with the Init event of a form set, a form, or any object on any form in a form set returns false (.F.), the form will not be created.
Saving Forms
You need to save your form before you can run it. If you try to close the Form Designer when the form has not been saved, Visual FoxPro prompts you to save or discard the changes you've made.
To save a form
- In the Form Designer, choose Save from the File menu.
Saving Forms and Controls as Classes
You can also save a form, or a subset of the controls on a form, as a class definition. If you intend to create subclasses based on the form or reuse the controls in other forms, save the form as a class definition.
To save a form or selected controls as a class definition
- From the File menu, choose Save As Class.
- In the Save As Class dialog box, choose Current form or Selected controls.
The Save As Class dialog box
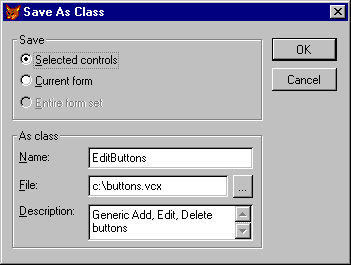
- In the Name box, enter a name for the class.
- In the File box, enter a filename for the class to be stored to.
- Choose OK.
If you don t give the filename an extension, the default extension of .vcx is added when the file is saved. Once a form has been saved as a class definition, you can modify it with the MODIFY CLASS command. For more information about creating classes, see Chapter 3, Object-Oriented Programming.
Running a Form
You can run a form directly from the interface or in program code.
Running a Form Interactively
There are several ways to run the form you've designed.

If you're working in the Form Designer, you can test the form by clicking the Run button on the Form Designer toolbar. To reopen the form in the Form Designer, close the form or choose the Modify Form button on the toolbar.
You can also run a form from a project or programmatically.
To run a form interactively
- In the Project Manager, select the form and choose Run.
-or-
- Type DO FORM in the Command window.
You can also run the form by choosing Do from the Program menu, choosing Form in the List Files of Type box, selecting the form, and choosing Do.
Running a Form from a Program
To programmatically run a form, include the DO FORM command in the code associated with an event, in method code, or in a program or procedure.
Naming the Form Object
By default, when you use the DO FORM command, the name of the form object is the same as the name of the .scx file. For example, the following line of code runs Customer.scx. Visual FoxPro automatically creates an object variable for the form named customer:
DO FORM Customer To name a form object
- Use the NAME clause of the DO FORM command.
For example, the following commands run a form, creating two form object variable names:
DO FORM Customer NAME frmCust1 DO FORM Customer NAME frmCust2 Manipulating the Form Object
If you issue the DO FORM command from the Command window, the form object is associated with a public variable. You can access the form object through the variable name. For example, the following commands, issued in the Command window, open a form named Customer and change its caption.
DO FORM Customer Customer.Caption = "Hello" If you then issue the following command in the Command window, O is displayed in the active output window, indicating that Customer is an object:
? TYPE("Customer") If you issue the DO FORM command in a program, the form object is scoped to the program. If the program or procedure completes, the object is gone, but the form remains visible. For example, you could run the following program:
*formtest.prg DO FORM Customer After you run the program, the form remains visible and all of the controls on the form are active, but TYPE("Customer") returns U indicating that Customer is an undefined variable. The following command, issued in the Command window, would generate an error:
Customer.Caption = "Hello" You can, however, access the form by using the ActiveForm, Forms, and FormCount properties of the application object.
Scoping the Form to the Form Object Variable
The LINKED keyword of the DO FORM command allows you to link the form to the form object. If you include the LINKED keyword, when the variable associated with the form object goes out of scope, the form is released.
For example, the following command creates a form linked to the object variable frmCust2:
DO FORM Customer NAME frmCust2 LINKED When frmCust2 is released, the form is closed.
Closing an Active Form
To allow users to close the active form by clicking the close button or by choosing Close from the form s Control menu, set the Closable property of the form.
To allow a user to close the active form
- In the Properties window, set the Closable property to true (.T.).
-or-
- Use the RELEASE command.
For example, you can close and release the frmCustomer form by issuing the following command in a program or in the Command window:
RELEASE frmCustomer You can also allow a user to close and release a form by including the following command in the Click event code for a control, such as a command button with a caption of Quit :
THISFORM.Release You can also use the RELEASE command in the code associated with an object on the form, but any code you've included in the Release method will not be executed.
Troubleshooting When you release a form, you release from memory the object variable created for the form. There is a single variable for a form set, so you can t release forms in a form set without releasing the form set. If you want to release the form set, you can use RELEASE THISFORMSET. If you want to remove a form from the screen so that a user can no longer see it or interact with it, you can use THISFORM.Hide.
Setting Properties at Run Time
The object model in Visual FoxPro gives you a great deal of control over properties at run time.
Referencing Objects in the Object Hierarchy
To manipulate an object, you need to identify it in relation to the container hierarchy. At the highest level of the container hierarchy (the form set or form) you need to reference the object variable. Unless you use the NAME clause of the DO FORM command, the object variable has the same name as the .scx file.
Properties are manipulated by referencing the object variable, the control, and the property, separated by dots (.):
objectvariable.[form.]control.property = Setting
The following table lists properties or keywords that make it easier to reference an object in the object hierarchy:
| Property or keyword | Reference |
| ActiveControl | The control on the currently active form that has the focus |
| ActiveForm | The currently active form |
| ActivePage | The active page on the currently active form |
| Parent | The immediate container of the object |
| THIS | The object or a procedure or event of the object |
| THISFORM | The form that contains the object |
| THISFORMSET | The form set that contains the object |
For example, to change the caption of a command button on the form frmCust in a form set stored in Custview.scx, use the following command in a program or in the Command window:
CustView.frmCust.cmdButton1.Caption = "Edit" Use the THIS, THISFORM, and THISFORMSET keywords to reference objects from within a form. For example, to change the Caption of a command button when the command button is clicked, include the following command in the Click event code for the command button:
THIS.Caption = "Edit" The following table gives examples of using THISFORMSET, THISFORM, THIS, and Parent to set object properties:
| Command | Where to include the command |
| In the event or method code of any control on any form in the form set except for frm1. |
| In the event or method code of any control except for cmd1 on the same form that cmd1 is on. |
| In the event or method code of the control whose caption you want to change. |
| In the event or method code of a control on a form. The command changes the background color of the form to dark red. |
Setting Properties at Run Time with Expressions
You can also set properties at run time using expressions or functions.
To set properties to expressions at run time
- Assign an expression to the property.
-or-
- Assign the result of a user-defined function to the property.
For example, you could set the caption of a button to be Edit or Save, depending on the value of a variable. Declare the variable in the calling program for your form:
PUBLIC glEditing glEditing = .F.
Then use an IIF expression in the Caption setting:
frsSet1.frmForm1.cmdButton1.Caption = ; IIF(glEditing = .F., "Edit", "Save") You could determine the size of a button and set the caption using expressions with fields in a table:
* set button width to length of 'Call ' + first and last names frmForm1.cmdButton1.Width = 5 + ; LEN(ALLTRIM(employee.first_name + " " + employee.last_name)) * set button caption to 'Call ' + first and last names frmForm1.cmdButton1.Caption = "Call " + ; ALLTRIM(employee.first_name + " " + employee.last_name) You could also set the caption using a user-defined function:
frsSet1.frmForm1.cmdButton1.Caption = setcaption() Setting Multiple Properties
You can set multiple properties at once.
To set multiple properties
- Use the WITH ... ENDWITH structure.
For example, to set multiple properties of a column in a grid in a form, you could include the following statement in any event or method code in the form:
WITH THISFORM.grdGrid1.grcColumn1 .Width = 5 .Resizable = .F. .ForeColor = RGB(0,0,0) .BackColor = RGB(255,255,255) .SelectOnEntry = .T. ENDWITH
Calling Methods at Run Time
The syntax for calling methods of an object is:
Parent.Object.Method
Once an object has been created, you can call the methods of that object from anywhere in your application. The following commands call methods to display a form and set the focus to a command button:
* form set saved in MYF_SET.SCX myf_set.frmForm1.Show myf_set.frmForm1.cmdButton1.SetFocus To hide the form, issue this command:
myf_set.frmForm1.Hide Responding to Events
The code you include in an event procedure is executed when the event takes place. For example, the code you include in the Click event procedure of a command button runs when the user clicks the command button.
Calling the procedural code associated with an event does not cause the event to occur. For example, the following statement causes the code in the Activate event of frmPhoneLog to be executed, but it doesn t activate the form:
frmPhoneLog.Activate Calling the Show method of a form causes the form to be displayed and activated, at which point the code in the Activate event is executed:
frmPhoneLog.Show Example of Manipulating Objects
The following example sets properties and calls event code from various objects within a form set. The example includes two forms, frmLeft and frmRight, in a formset.
Sample form set in the Form Designer
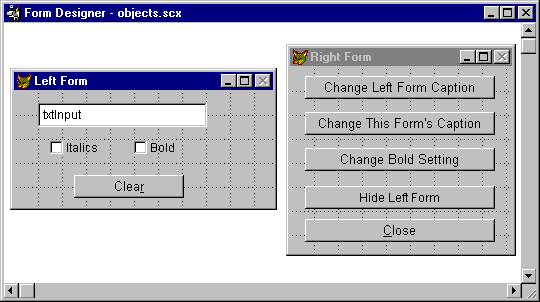
The two check boxes and the command button on frmLeft have event code associated with them. The name of the text box on frmLeft is txtInput.
Event Code for Objects in LeftForm
| Object | Event | Code |
| chkItalic | Click | |
| chkBold | Click | |
| cmdClear | Click |
|
Setting a Property of Another Control on the Same Form
You can set the properties of one control from within the event code of another by using the THISFORM keyword or the Parent property. The following two commands are executed when a user initially clicks on the Italic and the Bold check boxes, setting the appropriate text box properties:
THISFORM.txtInput.FontItalic = .T. THIS.Parent.txtInput.FontBold = .T. In this case, THISFORM and THIS.Parent can be used interchangeably.
Sample form set at run time
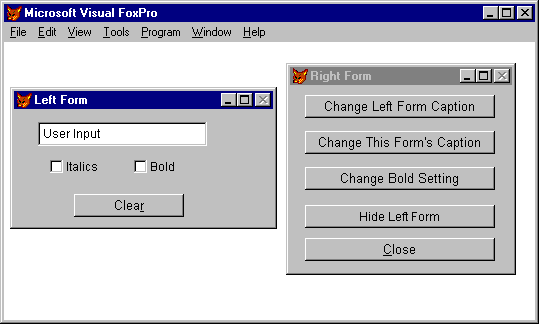
The code in the click event for cmdClear uses THISFORM to reset the values of the other controls on the form.
Setting Another Form s Properties
You can also set properties of one form from another. Form2 contains five command buttons. The first button on the form has this code in its Click event:
THISFORMSET.frmLeft.Caption = ; ALLTRIM(ThisFormSet.frmLeft.txtInput.Value) Notice that the form set and the form need to be referenced when setting properties from within a different form.
User clicks Change Left Form Caption command button on Right Form
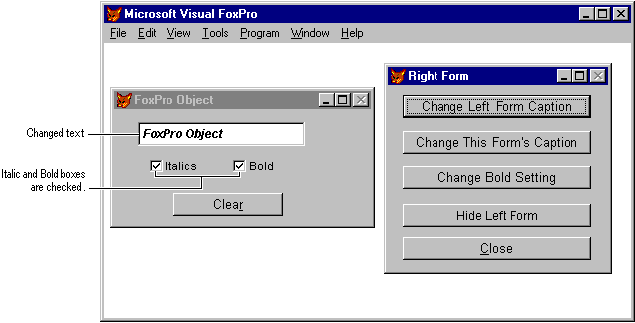
The click event code of the second command button on frmRight demonstrates setting a property of a form from within an object on the form:
THISFORM.Caption = ; ALLTRIM(ThisFormSet.frmLeft.txtInput.Value) If the user chooses this button, the caption of frmRight changes to the value in the text box on frmLeft.
Accessing Objects on Different Forms
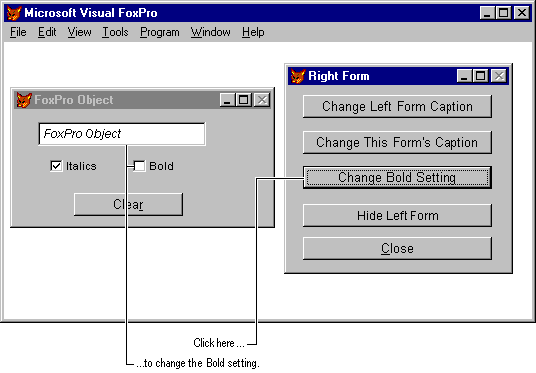
The following code in the Click event of the Change Bold Setting command button changes the value of the Bold check box on frmLeft and calls the event code associated with this control.
THISFORMSET.frmLeft.chkBold.Value = ; NOT THISFORMSET.frmLeft.chkBold.Value THISFORMSET.frmLeft.chkBold.InteractiveChange The last line of the example calls the InteractiveChange event of chkBold. You could also call this procedure with the following command:
THISFORMSET.frmForm1.chkBold.InteractiveChange( ) If this procedure call is omitted, the value of the check box changes, but the FontBold property of the text box is never changed.
User clicks Change Bold Setting command button on Right Form
Checking Properties and Calling Method Code
of Another Form
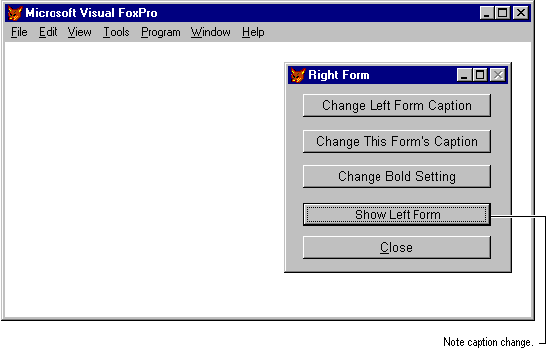
The following code in the Click event of the Hide Left Form command button hides or shows frmLeft, depending on the value of the Visible property, and changes the button caption as appropriate:
IF ThisFormSet.frmLeft.Visible ThisFormSet.frmLeft.Hide THIS.Caption = "Show Left Form" ELSE ThisFormSet.frmLeft.Show THIS.Caption = "Hide Left Form" ENDIF Notice that the THIS keyword is used within event code of a control to reference properties of the control.
User clicks Hide Left Form command button on Right Form
The following command in the Click event of the Quit command button releases the form set, causing both forms to close:
RELEASE ThisFormSet Managing Forms
The following procedures describe common tasks associated with managing forms in an application.
Hiding a Form
You can hide a form so that it is not visible to a user. When the form is hidden, the user cannot interact with the form, but you still have full programmatic control of them.
To hide a form
- Use the Hide method.
For example, in the code associated with the Click event of a command button, you could include the following line of code:
THISFORM.Hide
When the user clicks the command button, the form remains in memory, but is not visible.
Releasing a Form
You can allow a user to release a form when he or she is finished interacting with it. When you release a form, you can no longer access properties and methods of the form.
To release a form
- Call the Release method.
For example, in the code associated with the Click event of a command button, you could include the following line of code:
THISFORM.Release When the user clicks the command button, the form closes.
Passing Parameters to a Form
Sometimes you want to pass parameters to forms when you run them to set property values or specify operational defaults.
To pass a parameter to a form created in the Form Designer
- Create properties on the form to hold the parameters, such as ItemName and ItemQuantity.
- In the Init event code for the form, include a PARAMETERS statement such as:
PARAMETERS cString, nNumber - In the Init event code for the form, assign the parameters to the properties, as in this example:
THIS.ItemName = cString THIS.ItemQuantity = nNumber - When running the form, include a WITH clause in the DO FORM command:
DO FORM myform WITH "Bagel", 24
Returning a Value From a Form
You can use forms throughout your application to allow users to specify a value.
To return a value from a form
- Set the WindowType property of the form to 1 to make the form modal.
- In the code associated with the Unload event of the form, include a RETURN command with the return value.
- In the program or method that runs the form, include the TO keyword in the DO FORM command.
For example, if
FindCustIDis a modal form that returns a character value, the following line of code stores the return value to a variable namedcCustID:DO FORM FindCustID TO cCustID
For more information, see RETURN and DO FORM.
Troubleshooting If you get an error, make sure the WindowType is set to 1 (Modal).
Saving a Form as HTML
You can use the Save As HTML option on the File menu when you're creating a form to save the contents of a form as an HTML (Hypertext Markup Language) file.
To save a form as HTML
- Open the form.
- Choose Save As HTML on the File menu. (You will be asked to save the form if it has been modified.)
- Enter the name of the HTML file to create and choose Save.
Managing Multiple Instances of a Form
You can have multiple instances of a class definition active at a time. For example, you can design one order form but have several open orders in your application. Each uses the same form definition but is displayed and manipulated individually.
When you have multiple instances of a form, the key points to remember are:
- Create an array property in the launching form to hold the object variables associated with each instance of the multiple instance form. The easiest way to keep track of instance variables when you don t know ahead of time how many there will be is to use an array.
- For the form that is to have multiple instances, set the DataSession property to 2 Private Data Session. A private data session provides a separate set of work areas for each instance of the form so that selected tables and record pointer positions are all independent.
The following example provides code that demonstrates creating multiple instances of a form. For the sake of brevity, this code is not optimized; it is intended only to present the concepts.
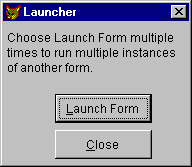
The following form launches multiple instances:
Launcher Form
Property Setting for Launch.scx
| Object | Property | Setting |
| frmLaunch | aForms[1] | |
Event Code for Launch.scx
| Object | Event | Code |
| cmdQuit | Click | |
| cmdLaunch | Click |
|
In refining the code in this example, you could manage the array of form objects so that empty array elements reused as forms are closed and new forms are opened, rather than always redimensioning the array and increasing the number of elements by one.
The form that can have multiple instances is Multi.scx. The data environment for this form contains the Employee table.
Multiple instances of Multi.scx

Property Setting for Multi.scx
| Object | Property | Setting |
| txtFirstname | ControlSource | |
| txtLastName | ControlSource | |
| frmMulti | DataSession | 2 - Private Data Session |
When you choose Launch Form in the Launcher form, an instance of the Multi form is created. When you close the Launcher form, the property array aForms is released and all instances of Multi are destroyed.
Visual FoxPro provides some functions and properties to help you manage multiple instances of objects. For more information, see AINSTANCE( ), AUSED( ), and DataSessionID in the Language Reference.
Setting the Design Area for a Form
You can set the maximum design area for the Form Designer in the Options dialog box.
Forms tab of the Options dialog box
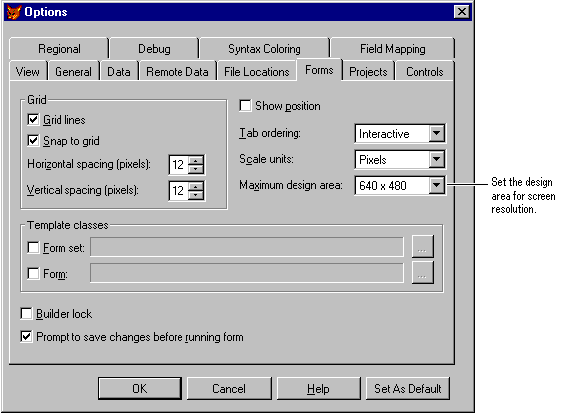
To set the maximum design area for a form
- From the Tools menu, choose Options.
- In the Options dialog box, choose the Forms tab.
- In the Maximum design area box, choose the pixel coordinates for the maximum design area.
When you set the maximum design area, the background of the Form Designer is white within the design area boundaries and gray in areas beyond the maximum design area. If you develop applications on a monitor with a resolution of 1024 x 768, for example, you can set your design resolution to 640 x 480 and know that the forms you design will always fit on 640 x 480 screens.
Within the design area, be sure to account for standard window attributes such as toolbars. For example, in a 640 x 480 screen, a form with a status bar and one toolbar docked at the top or the bottom of the screen can have a maximum height of 390 pixels.
| Main Visual FoxPro window attribute | Required pixels |
| Title and menu | 38 |
| Status bar | 23 |
| Docked toolbar | 29 |
Using Local and Remote Data in a Form
You can create forms that can be easily switched between using local data and data that is stored remotely (for example, on a database server). This allows you to create a prototype application using local or test data, then switch to remote or live data without substantial changes to your forms.
For example, if your Visual FoxPro application is a front end for a large customer table stored on a database server, you can create a local .dbf file that contains a small but representative sampling of the data. You can then create, test, and debug your forms based on this small set of data. When you're ready to distribute your application, you can link your form to the large data set.
The key to being able to switch between local and remote data is to make sure that you use views instead of directly linking your form (and its controls) to a table. To access remote data, you must use a view in any event. Therefore, to facilitate switching between local and remote data, create a view for the local data as well. When you create the form, you can add both views to its data environment, then switch between them as needed.
To create a form that can switch between local and remote data
- Create two views of the data, one that points to the remote data, and another that points to the local data.
- Create a new form.
- Open the Data Environment Designer for the form, and then add both views.
- Right-click the Data Environment Designer, and then choose Properties.
- In the Properties window, set the Alias property for both cursors to the same name.
- Set the data environment s OpenViews property to either 1 Local Only or 2 Remote Only, depending on which view you wanted to use when running the form.
Note Because you are using the same alias for both views, do not choose 0 Local and Remote (the default).
- On the form, add the controls you need and set their ControlSource properties to the appropriate fields in the view. Because both views have the same alias, the controls will respond automatically to whichever view is active when the form is run.
After the form is created, you can switch the views alias by changing the data environment s OpenViews property. You can do this in the Data Environment while using the Form Designer. Alternatively, you can write code and attach it to an event, which is useful if you want to switch views at run time. For example, you could put this code in the form s Activate event:
THISFORM.DataEnvironment.OpenViews = 2 && Use remote view If you create a form that can be switched between local and remote data, you must also design your navigation code to accommodate both views, particularly if you are designing forms with one-to-many relationships. For example, if your form only accesses a local table or view, you might use code such as the following in a Next command button to move to the next record in a cursor:
SKIP 1 THISFORM.Refresh() However, this code is inefficient when you're navigating in a remote view, because it assumes that the cursor contains all the data required by the form. As a rule, you want to minimize the amount of data that you download from the remote data source.
The solution is to use a parameterized view. For example, the definition for a view used to edit customer information could be:
SELECT * FROM CUSTOMERS WHERE ; CUSTOMERS.COMPANY_NAME = ?pCompanyName When the form runs, it can prompt the user for a customer name using a dialog box or by allowing the user to enter a name in a text box. The code for a Display button would then be similar to the following:
pCompanyName = THISFORM.txtCompanyName.Value REQUERY("customer") THISFORM.Refresh() For more information about parameterized views, see Creating a Parameterized View in Chapter 8, Creating Views.
Setting Form Templates
You can create your own form class to use a template for all your new forms, or you can use one of the sample classes that ship with Visual FoxPro.
When you create a new form, it is based on the template form that is set in the Options dialog box. If no template is specified, the new form is based on the Visual FoxPro Form base class. For more information about Visual FoxPro classes, see Chapter 3, Object-Oriented Programming.
Advantages of Using Form Templates
Form templates allow you to set default properties for your forms so that you can easily give all the forms in your application a consistent look and feel. You could include a company logo, for instance, and use a consistent color scheme in all your forms by designing a template form class with these attributes. If the company logo changes, you could change the picture in the template form class and all the forms you created based on the template would automatically inherit the new logo.
You can add custom properties and methods to the Visual FoxPro form class so that these properties and methods are available to each form in your application. If you are used to creating variables and user-defined procedures that are scoped to a form, using custom properties and methods provides this functionality, and also allows you to have a cleaner encapsulation model.
Specifying the Default Form Template
You can specify a form class from a registered class library for your form template.
To specify a default form template
- From the Tools menu, choose Options.
- In the Options dialog box, choose the Forms tab.
- In the Template classes area, select the Form check box.
If no form template has been selected, the Open dialog box opens so that you can choose a form class. If a form template has been selected, you can change it by choosing the dialog button and selecting another class.
- Choose Set as Default if you want the template to be used in subsequent sessions of Visual FoxPro.
- Choose OK.
Forms tab of the Options dialog box
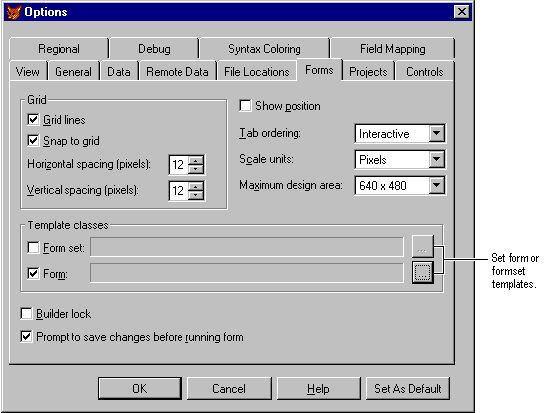
Using Form Templates
You can specify form set templates the same way you set form templates. The following combinations are possible:
- Both form set and form templates are specified.
Choosing Form in the New dialog box (and all the other ways to create a new form) will automatically create a form set based on the template form set class. When you choose Add New Form from the Form menu in the Form Designer, a form based on your form template is added to the form set.
- Only the form set template is specified.
Choosing Form in the New dialog box (and all the other ways to create a new form) will automatically create a form set based on the template FormSet class. When you choose Add New Form from the Form menu in the Form Designer, a form based on the Visual FoxPro Form base class is added to the form set.
- Only the form template is specified.
Choosing Form in the New dialog box (and all the other ways to create a new form) will automatically create a form based on the template Form class.
- No templates are specified.
Choosing Form in the New dialog box (and all the other ways to create a new form) will automatically create a form based on the Visual FoxPro Form base class.
EAN: N/A
Pages: 58