Creating and Updating Contact Information
|
| < Day Day Up > |
|
Microsoft Office Specialist Think of your Outlook Contacts list as a powerful electronic Rolodex, where you can store all the information you need to stay in touch with and manage contacts. For each contact, you can store the following types of contact information:
-
Name, job title, and company name
-
Business, home, and other addresses
-
Business, home, fax, mobile, pager, and other phone numbers
-
E-mail, Web page, and instant messaging addresses
You can also store the following details for each contact:
-
Professional information, including department, office, profession, manager's name and assistant's name
-
Personal information, including nickname, spouse's name, birthday, anniversary, and the title and suffix to use in correspondence
-
The directory server and e-mail alias to use for online meetings
See Also For information about conducting online meetings using NetMeeting, refer to 'Scheduling and Hosting Online Meetings' in Chapter 5, 'Scheduling and Managing Meetings.'
-
The address of the contact's free/busy information server
You can create an entry for a contact with as little as a name, or as much information as you want. You can add general notes, and track all the Outlook activities that are connected with each contact. You can add to or change the information for a contact at any time. To save time, you can create contact entries for people who work for the same company based on an existing contact from that company.
In this exercise, you will create and edit contact entries.
| Important | You can work through this exercise in your own Contacts folder or in the practice Contacts folder. If you use your own contacts, substitute them for the names given in the exercise. |
USE the SBSContacts data file in the practice file folder for this topic. This practice file is located in the My Documents\Microsoft Press\Outlook 2003 SBS\Contacts folder and can also be accessed by clicking Start/All Programs/Microsoft Press/Outlook 2003 Step by Step.
BE SURE TO start Outlook before beginning this exercise.
OPEN the SBSContacts data file from within Outlook.
-
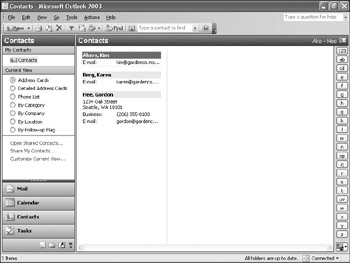
In the Navigation Pane, expand the SBS Contacts folder, and click the Contacts folder.
The contents of the practice Contacts folder are displayed, showing address cards for each of the contacts.
-
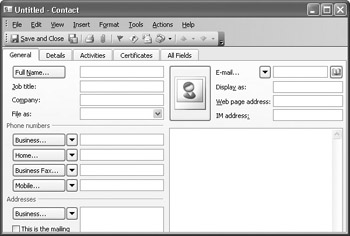
On the toolbar, click the New Contact button.
A new, blank Contact form appears.
-
In the Full Name box, type Gordon Hee, and press the [TAB] key.
Outlook completes the 'File as' box, indicating that the contact entry will be filed by the person's last name.
-
In the Job title box, type Sales Associate, and press [TAB].
-
In the Company box, type The Garden Company, and press [TAB] again.
Outlook formats the name to appear as Garden Company, The.
-
In the Phone numbers area, click in the Business box, type 2065550100, and then press [TAB].
Troubleshooting The first time you enter a phone number for a contact, Outlook might open a dialog box and prompt you to enter your own country and area code. This information allows Outlook to set up dialing rules. You must enter your area code in the dialog box, and then click OK; you can't close the dialog box without entering the requested information.
Notice that Outlook automatically formats the phone number.
-
In the Addresses area, click in the text box, type 1234 Oak Street, press the [ENTER] key, and type Seattle, WA 10101.
Tip Outlook automatically checks addresses for standard elements such as street address, city, state, and zip code. If Outlook cannot identify these elements, the Check Address dialog box appears, prompting you to enter each item in its own box. You can also open the Check Address dialog box by clicking the Address button.
-
Click in the E-mail box, type Gordon@gardenco.msn.com, and then press [TAB].
| Tip | In a networked organization (for example, if you are connected to a Microsoft Exchange Server), you don't need to type the full e-mail address-you can use the internal e-mail alias for your contact instead. For this contact, that address might be simply gordon. |
-
Click the Save and Close button.
The Contact form closes. Your Contacts folder is displayed, containing the new address card for Gordon Hee.
-
In the Contacts folder, double-click the entry for Kim Akers.
The Kim Akers - Contact form appears.
-
In the Business box, type 206-555-0100 and press [ENTER].
Notice that Outlook automatically formats the phone number.
-
Click in the Address box, type 1234 Oak Street, press the [ENTER] key, and type Seattle, WA 10101.
-
Click the down arrow to the right of the Business button, and then click Home.
The button label changes to indicate that you are displaying Kim's home address information.
-
Type 111 Magnolia Lane, press [ENTER], and type Seattle, WA 10101.
-
Click in the Web page address box, and type www.gardenco.msn.com.
The address is automatically formatted as blue and underlined to show that it is a Web address, or URL.
-
On the Actions menu, click New Contact from Same Company.
A new Contact form opens, already containing the company name, address, phone number, and Web page address.
-
In the Full Name box, type Britta Simon, press the [TAB] key, and in the Job title box, type Associate Buyer.
-
Click in the E-mail box, type Britta@gardenco.msn.com.
-
Click the Save and Close button in each of the open forms.
The Contact forms close, and the Contacts folder is displayed.
-
In the Contacts folder, double-click the entry for Karen Berg.
The Karen Berg - Contact form appears.
-
Click the Details tab.
-
Click in the Spouse's name box, and type James. Then click the down arrow to the right of the Birthday box, scroll forward two months, and click 18.
-
Click the Close button.
-
Click Yes when prompted to save changes, and then click No when prompted to create an event in your personal Calendar.
The Contact form closes, saving the updated information, and the Contacts folder is displayed.
New in Office 2003-Contact Picture The contact form now includes space for a picture, so you can associate a face with the name and other information in the form.
To add a picture to a contact:
-
In your Contacts folder, open the contact.
-
On the General tab, click the Add Contact Picture button.
-
Browse to the picture you want to insert, select it, and click OK.
The picture is resized to fit the space in the form.
If you use Windows Messenger or MSN Messenger, you can easily add entries from your Outlook Contacts list to your Messenger contact list. Follow these steps:
-
Enter the contact's IM address into his or her Contact form. Save and close the form.
-
In the Contacts folder, right-click the contact entry, and click New Message to Contact on the shortcut menu.
-
In the new message window, point to the contact's name in the To box.
A Person Names smart tag appears next to the To box.
-
Click the Person Names smart tag, and then click Add to Messenger Contacts in the drop-down list.
-
In the Add a Contact dialog box, click the Finish button and close the message window. If you are prompted to save changes, click No.
See Also For more information about instant messaging and the Person Names smart tag, see 'Creating and Sending Instant Messages,' in Chapter 1, 'Working with Outlook.'
|
| < Day Day Up > |
|
EAN: 2147483647
Pages: 116