Using Search Folders
|
| < Day Day Up > |
|
Microsoft Office Specialist Search Folders, like Outlook’s Find feature, show all the files that match a set of search criteria, and can show files from different folders together in one place. Unlike Find, when you create a Search Folder, it becomes part of your mailbox and is always kept up to date.
New in Office 2003—Search Folders The default Outlook 2003 installation includes three Search Folders: The For Follow Up folder displays messages flagged for follow-up, the Large Messages folder displays messages larger than 100 kilobytes (KB), and the Unread Mail folder displays mes sages that are marked as unread.
Search Folders are virtual folders. Each message in your mailbox is stored in only one Outlook folder (such as your Inbox), but it might appear in many Search Folders. Changing or deleting a message in a Search Folder changes or deletes the message in the Outlook folder where it is stored.
In this exercise, you will first experiment with the default Search Folders and then create and use a custom Search Folder.
USE the SBSOrganizing data file in the practice file folder for this topic. This practice file is located in the My Documents\Microsoft Press\Outlook 2003 SBS\Organizing folder and can also be accessed by clicking Start/All Programs/Microsoft Press/Outlook 2003 Step by Step.
BE SURE TO start Outlook and open the SBSOrganizing data file before beginning this exercise.
OPEN your own Outlook mailbox.
-
In the All Mail Folders list, click the plus sign next to Search Folders (in your own Outlook mailbox, not the SBS Organizing data file), and then click Large Mail.
In the content pane, the Large Mail Search Folder displays all your Outlook items that are larger than 100 kilobytes.
Troubleshooting Depending on your previous use of Outlook, the default Search Folders might be empty.
-
Click the Unread Mail Search Folder.
In the content pane, the Unread Mail Search Folder displays the Outlook items that are marked as unread, from all your Outlook folders.
-
In the All Mail Folders list, expand the SBS Organizing data file.
The Search Folder provided as part of the SBS Organizing practice data file doesn’t currently display any saved searches.
-
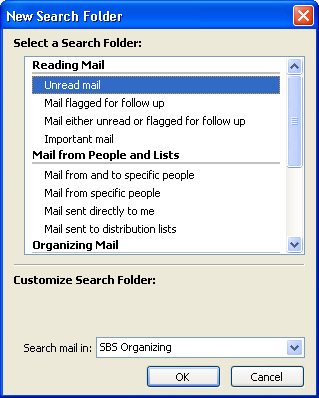
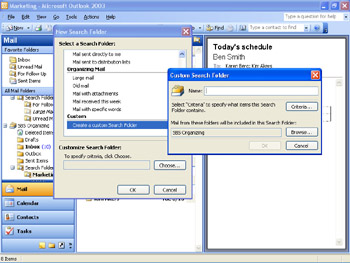
Right-click the practice Search Folders folder, and then click New Search Folder on the shortcut menu.
The New Search Folder dialog box appears.
-
In the Select a Search Folder list, under Mail from People and Lists, click Mail from and to specific people.
A browse box appears in the Customize Search Folder area at the bottom of the dialog box.
-
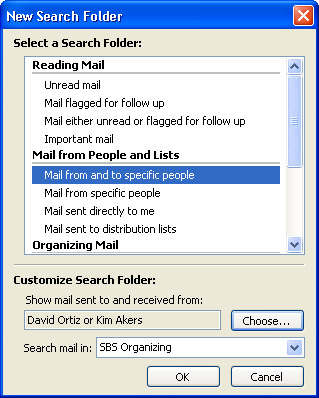
Click the Choose button.
The Select Names dialog box appears.
-
In the Show Names from the list, click Contacts. Then in the Name list, double-click David Ortiz and then Kim Akers, and then click OK.
In the New Search Folder dialog box, David Ortiz and Kim Akers are now listed in the “Show mail sent to and received from” box.
-
In the Search mail in drop-down list, click SBS Organizing. Then click OK.
-
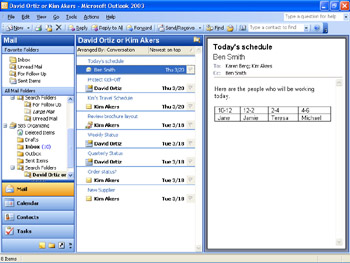
If necessary, double-click the Search Folders folder to expand it, and then click the David Ortiz Search Folder.
The new Search Folder displays all the mail sent to or received from David Ortiz or Kim Akers.
-
Click the first message to display it in the Reading Pane.
-
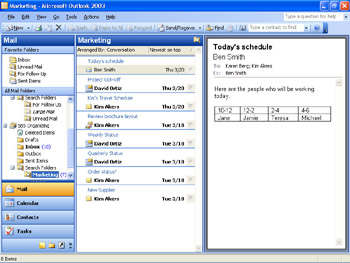
Right-click the new Search Folder, and then click Rename on the shortcut menu.
The name of the folder is selected for editing.
-
Type Marketing, and press the [ENTER] key.
The Search Folder is renamed.
-
On the File menu, point to New, and then click Search Folder.
The New Search Folder dialog box appears.
-
In the Select a Search Folder list, scroll to the Custom area, click Create a custom Search Folder, and then click the Choose button.
The Custom Search Folder dialog box appears.
-
In the Name box, type Home Show, and then click Criteria.
The Search Folder Criteria dialog box appears.
-
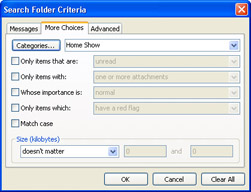
Click the More Choices tab, and then click the Categories button.
The Categories dialog box appears.
-
In the Available Categories list, select the Home Show check box, and then click OK.
In the Search Folder Criteria dialog box, Home Show appears in the text box to the right of the Categories button.
-
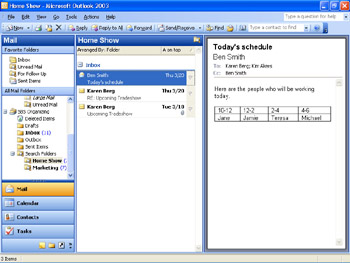
Click OK in each of the three open dialog boxes.
The new Home Show Search Folder appears in the Navigation Pane, and the content pane displays the items that are categorized as Home Show-related.
See Also For more information about creating categories and assigning Outlook items to categories, see “Finding and Categorizing Messages” earlier in this chapter.
|
| < Day Day Up > |
|
EAN: 2147483647
Pages: 116