Lesson 6: Making Computer Resources into Client Computers
Computer resource discovery methods collect general information about computers on the network. The logon discovery process runs a program called SMSBOOT1.EXE, which queries the computer during the logon process and builds a DDR. The DDR is created on the logon point and then sent to the site database.
Until client installation methods are enabled, the computer resources will not contain SMS client agents. However, through discovery, the Systems Management application is installed in the Control Panel on Windows 32-bit computer resources. The Systems Management application manages client agent installations. The SMS client agents enable inventory collection, remote support, software distribution, software metering, and event-to-trap translation.
After this lesson, you will be able to
- Configure client installation methods.
- Describe the process of SMS updates to logon points and CAPs.
Client Installation
There are five client installation methods: NetWare Bindery Server Logon Client Installation, NetWare NDS Logon Client Installation, Windows Networking Logon Client Installation, Manual Client Installation, and Windows NT Remote Client Installation. With the exception of Manual Client Installation, these installation methods are accessed from the Client Installation Methods node of the SMS console tree (Figure 2-15).

Figure 2-15. The client installation methods highlighted in the SMS Administrator console.
Like logon discovery, the first four client installation methods listed above require that a user at the computer resource logs on to the network. Windows NT Remote Client Installation occurs in the background and does not require a user to log on to the network.
All client installation methods provide the same service: installing client agents. Each method services a specific type of computer resource. NetWare Bindery Server Logon Client Installation installs client agents on computers that log in to NetWare 3.x, and NetWare 4.x servers running in bindery emulation mode. NetWare NDS Logon Client Installation installs client agents on computers that log in to the NetWare 4.x NDS. Windows Networking Logon Client Installation installs client agents on computers that log on to Windows NT/2000 domains.
Manual Client Installation is designed to install client agents on any supported operating system when a user runs the Manual Client Installation program, SMSMAN.EXE for Windows 32-bit operating systems (Windows 95/98, Windows NT 3.5x, 4.0, and Windows 2000) or SMSMAN16.EXE for Windows 16-bit operating systems (Windows 3.x and Windows for Workgroups 3.11). The manual client installation programs are stored in the Smslogon share on SMS logon points. These are the same programs used for manual computer resource discovery. However, SMSMAN and SMSMAN16 will only run client installation if a logon client installation method is enabled. For example, only if Windows Networking Logon Client Installation is enabled, can Manual Client Installation install client agents. Manual Client Installation provides a way to discover resources and install client agents when logon scripts are neither used nor updated using SMS.
Windows NT Remote Client Installation is designed specifically for background client agent installation on Windows NT/2000 computers. SMS uses a Windows NT/2000 user account to establish a connection to the Windows NT/2000 computer.
Discovery and Its Relationship to Client Installation Methods and Agents
A computer resource does not have to be discovered before client installation occurs. Any undiscovered resource will be automatically discovered when a client installation method runs on the computer. DDRs are then sent to CAPs before being transmitted to the site server and written to the site database.
Both CAPs and logon points are involved in the discovery and client installation process. Logon points contain modified logon scripts that initiate the discovery or client installation routine. CAPs contain the client agent software that is installed when a client installation method is enabled. Both CAPs and logon points send DDRs to the site server.
Each logon discovery method is paired with a logon client installation method. For example, Windows Networking Logon Discovery is paired with Windows Networking Logon Client Installation. The settings for these two functions are synchronized with each other using the `Keep logon point lists for discovery and installation synchronized' option. For example, if NetWare NDS Logon Discovery is configured to modify login scripts, NetWare NDS Client Installation will also be configured to modify login scripts. The option to synchronize settings can be changed through the properties of either the client installation method or the discovery method.
Before client installation methods are enabled, it is recommended that the client agents you wish to install are enabled and configured from the Client Agents node in the SMS console tree (Figure 2-16). Once this step is complete, enabling client installation methods will send the agent installation routines to the CAPs.
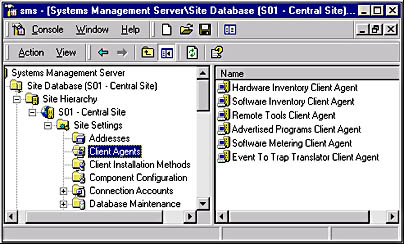
Figure 2-16. The client agents appearing in the SMS administrator console.
If a client agent is enabled, disabled, or reconfigured after client installation methods run, Heartbeat Discovery can send these changes to the client computers. Logon discovery methods may also apply changes to client computers but the client computer must first log on to the network. Therefore, Heartbeat Discovery should be enabled so that client computer configurations automatically update regardless of network logon.
The most common steps to configure SMS after an installation are:
- Assign site boundaries.
- Enable the discovery methods that are applicable to your network environment.
- Enable and configure the client agents you plan to use on client computers.
- Enable and configure client installation methods.
Part 2 of this training manual discusses how to configure and use the various client agents for client computer management.
Enabling Client Agents and Client Installation Methods
In the following exercises, you will first enable Heartbeat Discovery, an important discovery method for managing client agent settings on client computers. Enabling this feature will make updates to the client computers happen regardless of client computer network logon. You will then enable and configure the Hardware and Software Inventory Client Agents in preparation for the exercises in Chapter 3, "Administering Inventory Collection." To conclude the following exercises, you will enable two client installation methods.
Exercise 11: Enabling Heartbeat Discovery
- Click the Start button, then point to Programs.
- Point to Systems Management Server, then click SMS Administrator Console.
- Expand the SMS console tree to locate and select the Discovery Methods node.
- Select Heartbeat Discovery from the details pane. Then from the Action menu, choose Properties.
- Select the `Enable Heartbeat Discovery' checkbox.
- Set the `Send every' value to 1 Hours.
- Click OK to close the Heartbeat Discovery Properties dialog box.
A menu of choices appears.
The sms (Systems Management Server) MMC appears.
The discovery methods appear in the details pane.
The Heartbeat Discovery Properties dialog box appears.
Do not close the SMS Administrator console, as it will be used in the next exercise.
Exercise 12: Enabling Hardware and Software Inventory Client Agents
In a production SMS environment, it is best to enable all client agents you plan to use. For the purposes of clarity for this self-study exercise, only two client agents will be enabled. Hardware and software inventory will be discussed in Chapter 3.
- From the SMS console tree, select the Client Agents node.
- Select the Hardware Inventory Client Agent from the details pane. Then from the Action menu, choose Properties.
- Select the `Enable hardware inventory on clients' checkbox.
- Change the Run every value to 1 Hours.
- Click OK to close the Hardware Inventory Client Agent Properties dialog box.
- Select the Software Inventory Client Agent from the details pane. Then from the Action menu, choose Properties.
- Select the `Enable software inventory on clients' checkbox.
- Change the Run every value to 1 Hours.
- Select the Inventory Collection tab to review the settings under this tab. Do not change these settings. In Chapter 3 you will reconfigure this client agent.
- Click OK to close the Software Inventory Client Agent Properties dialog box.
The client agents appear in the details pane.
The Hardware Inventory Client Agent Properties dialog box appears.
The Inventory schedule options appear and the `Simple schedule' radio button is selected.
The Software Inventory Client Agent Properties dialog box appears.
The `Inventory schedule' options appear and the `Simple schedule' radio button is selected.
Do not close the SMS Administrator console, as it will be used in the next exercise.
Exercise 13: Enabling Client Installation Methods
In the previous exercise, you enabled the hardware and software inventory client agents. However, client agents will not be installed until an installation method is enabled. In this exercise, you will enable the Windows Networking Logon Client Installation method and the Windows NT Remote Client Installation method. The first installation method will be used to install the hardware and software inventory client agents on Computer 2, the Windows NT Workstation computer. The second installation method will be used to install the hardware and software inventory client agents on Computer 1, the site server.
- From the SMS console tree, select the Client Installation Methods node.
- Select Windows Networking Logon Client Installation from the details pane. Then from the Action menu, choose Properties.
- Select the Enable Windows Networking Logon Client Installation checkbox. Notice that the Keep logon point lists for discovery and installation synchronized is selected.
- Select the Logon Settings tab. Notice that the `Modify user logon scripts' option is selected. This option was automatically selected because this installation method is synchronized with its corresponding discovery method.
- Click OK to close the Windows Networking Logon Client Installation Properties dialog box.
- From the details pane, select Windows NT Remote Client Installation. Then from the Action menu, choose Properties.
- Select the `Enable Windows NT Remote Client Installation' checkbox.
- Notice that all three checkboxes, Windows NT Server, Windows NT Workstation, and domain controllers are selected.
- Click OK to close the Windows NT Remote Client Installation Properties dialog box.
- Close the SMS Administrator console.
The client installation methods appear in the details pane.
The Windows Networking Logon Client Installation Properties dialog box appears.
The Windows NT Remote Client Installation Properties dialog box appears.
The `System types' box appears.
Since the site server is a domain controller, this client installation method will run on the site server.
NOTE
In Chapter 3 you will run the client agent installation process to collect hardware and software inventory.
EAN: 2147483647
Pages: 107