Lesson 1:Creating and Managing a SQL Server Database
3 4
The first step in implementing the physical database is to create the database object. By using the information that you obtained when you gathered the system requirements and the details that you identified in the logical database design, you can create the database object and define the database characteristics. You can also modify these characteristics after you have created the database object. This lesson discusses the process of creating the database object, the methods used to create the database, how to view information about the database and modify database characteristics, and how to delete a database.
After this lesson, you will be able to:
- Create a database object in SQL Server and define its characteristics.
- View information about the database and modify database characteristics.
- Delete a database object from SQL Server.
Estimated lesson time: 35 minutes
Creating a SQL Server Database
When creating a database, you must first determine the name of the database, its size, and the files and filegroups used to store it. You should consider several factors before creating your database:
- Permission to create a database defaults to members of the sysadmin and dbcreator fixed server roles, although permissions can be granted to other users.
- The user who creates the database becomes the owner of the database.
- A maximum of 32,767 databases can be created on a server.
- The name of the database must follow the rules for identifiers.
As stated earlier in this training kit, three types of files are used to store a database: primary files, which contain the startup information for the database; secondary files, which hold all of the data that does not fit into the primary data file; and the transaction log, which holds the log information used to recover the database. Every database has at least two files: a primary file and a transaction log file.
When you create a database, the files that make up the database fill with zeros to overwrite any existing data that previously deleted files left on the disk. Although it means that the files take longer to create, this action prevents the operating system from having to fill the files with zeros when data is written to the files for the first time during normal database operations. This feature improves the performance of day-to-day operations.
When you create the database, you should specify the maximum size that a file is permitted to grow. This specification prevents the file from growing, as data is added, until the disk space is exhausted.
SQL Server implements a new database in two steps:
- SQL Server uses a copy of the Model database to initialize the new database and its metadata.
- SQL Server then fills the rest of the database with empty pages (except for pages that have internal data recording how the space is used in the database).
Any user-defined objects in the Model database are copied to all newly created databases. You can add any objects to the Model database, such as tables, views, stored procedures, data types, and so on, to be included in all new databases. Each new database inherits the database option settings from the Model database.
Methods for Creating a SQL Server Database
SQL Server provides several methods that you can use to create a database: the Transact-SQL CREATE DATABASE statement, the console tree in SQL Server Enterprise Manager, and the Create Database wizard, which you can access through SQL Server Enterprise Manager.
CREATE DATABASE Statement
You can use the CREATE DATABASE statement to create a database and the files that store the database. The CREATE DATABASE statement enables you to specify a number of parameters that define the characteristics of the database. For example, you can specify the maximum size to which a file can grow or the growth increment for that file. When a simple CREATE DATABASE database_name statement is specified with no additional parameters, the database is made the same size as the Model database. For specific information about the CREATE DATABASE statement and the parameters that you can define, refer to the Transact-SQL reference in SQL Server Books Online.
You can execute a CREATE DATABASE statement in SQL Query Analyzer. The following example creates a database called Products and specifies a single file. The file specified becomes the primary file, and a one-megabyte (MB) transaction log file is automatically created. Because neither megabytes nor kilobytes (KB) are specified in the SIZE parameter for the primary file, the primary file is allocated in megabytes. Because there is no file specification for the transaction log file, the transaction log file has no MAXSIZE and can grow to fill all available disk space:
USE master GO CREATE DATABASE Products ON ( NAME = prods_dat, FILENAME = 'c:\program files\microsoft SQL server\mssql\data\prods.mdf', SIZE = 4, MAXSIZE = 10, FILEGROWTH = 1 ) GO
Enterprise Manager
You can create a database directly in SQL Server Enterprise Manager. To create a database in Enterprise Manager, expand the console tree for your server, right-click the Databases node, and click New Database. When the Database Properties dialog box appears, modify the default parameters as necessary in order to create the new database. Figure 4.1 shows the Database Properties dialog box when it first opens.
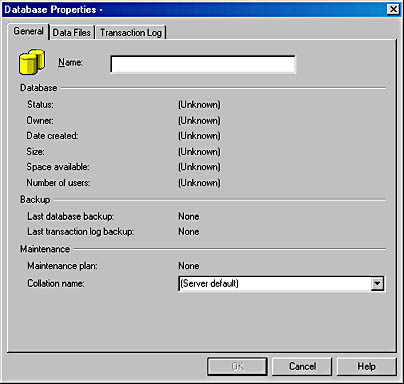
Figure 4.1 The General tab of the Database Properties dialog box for a new database.
Create Database Wizard
The Create Database wizard walks you through the steps necessary to create a new database. You can access the wizard by selecting Wizards from the Tools menu and then selecting Create Database Wizard. From there, complete the steps in the wizard. Figure 4.2 shows several options on the Name The Database And Specify Its Location screen that you can modify when you run the Create Database wizard.
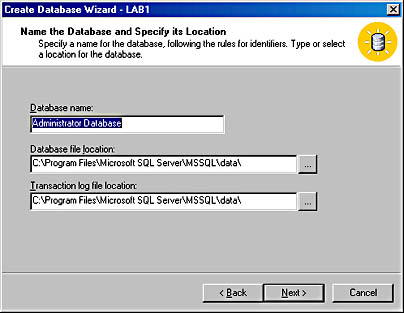
Figure 4.2 The Name The Database And Specify Its Location screen of the Create Database wizard.
Managing a SQL Server Database
Once you have created the new database in SQL Server, you can view information about the database, modify the characteristics of the database, or delete the database.
Viewing Information about a Database
You can view the definition of a database and its configuration settings when you are troubleshooting or considering making changes to a database. SQL Server provides several methods that you can use to view information about a database: the sp_helpdb system stored procedure, the DATABASEPROPERTYEX statement, and SQL Server Enterprise Manager.
The sp_helpdb system stored procedure reports information about a specified database or all databases. The DATABASEPROPERTYEX statement returns the current setting of the specified database option or property for the specified database. The statement returns only one property setting at a time. You can also use SQL Server Enterprise Manager to view database settings. In the console tree, open the Properties dialog box for the specific database. The Properties dialog box contains a number of tabs that include information about how the database is configured.
Modifying a Database
After you have created a database, you can modify the original definition. Before changes are made, however, it is sometimes necessary to take the database out of normal operating mode. The following table provides a list of many of the types of modifications that you can make to database properties. The table also lists the methods that you can use to complete these tasks. SQL Server Books Online provides detailed information about how to accomplish each of these tasks.
| Type of Modification | Modification Methods |
|---|---|
| Increasing the size of a database | ALTER DATABASE statement The database properties in SQL Server Enterprise Manager |
| Changing the physical location of a database | ALTER DATABASE statement |
| Shrinking a database | DBCC SHRINKDATABASE statement The Shrink Database option in SQL Server Enterprise Manager, accessed through the node for the specific database |
| Setting a database to shrink | The sp_dboption system stored procedure The database properties in SQL Server Enterprise Manager |
| Shrinking a database file | DBCC SHRINKFILE statement |
| Adding data or transaction log files | ALTER DATABASE statement The database properties in SQL Server Enterprise Manager |
| Deleting data or log files | ALTER DATABASE statement The database properties in SQL Server Enterprise Manager |
| Adding a filegroup to a database | ALTER DATABASE statement The database properties in SQL Server Enterprise Manager |
| Changing the default filegroup | ALTER DATABASE statement |
| Changing database options | ALTER DATABASE statement sp_dboption system stored procedure The database properties in SQL Server Enterprise Manager |
| Renaming a database | sp_renamedb system stored procedure |
| Changing the database owner | sp_changedbowner system stored procedure |
Setting Database Options
You can set a number of database-level options that determine the characteristics of the database. Only the system administrator, database owner, and members of the sysadmin and dbcreator fixed server roles and db_owner fixed database roles can modify these options. These options are unique to each database and do not affect other databases. You can set the database options by using the SET clause of the ALTER DATABASE statement, the sp_dboption system stored procedure, or in some cases, SQL Server Enterprise Manager.
NOTE
Server-wide settings are set by using the sp_configure system stored procedure or SQL Server Enterprise Manager. Specify connection-level settings by using SET statements.
After you set a database option, a checkpoint is automatically issued that causes the modification to take effect immediately.
SQL Server includes five categories of database options, which are described in the following table:
| Option Type | Description |
|---|---|
| Auto options | Control certain automatic behaviors |
| Cursor options | Control cursor behavior and scope |
| Recovery options | Control the recovery model for the database |
| SQL options | Control American National Standards Institute (ANSI) compliance options |
| State options | Control whether the database is online or offline, who can connect to the database, and whether the database is in read-only mode (a termination clause can be used to control how connections are terminated when the database is transitioned from one state to another) |
Deleting a SQL Server Database
You can delete a non-system database when it is no longer needed or if it is moved to another database or server. When a database is deleted, the files and their data are deleted from the disk on the server. When a database is deleted, it is permanently deleted and cannot be retrieved without using a previous backup. System databases (Msdb, Master, Model, and Tempdb) cannot be deleted.
The Master database should be backed up after a database is deleted, because deleting a database updates the system tables in the Master database. If the Master needs to be restored, any database that has been deleted since the last backup of the Master will still have references in the system tables and might generate error messages.
You can delete a database by using the DROP DATABASE statement or by deleting it from the console tree in SQL Server Enterprise Manager.
Exercise 1: Creating and Managing a Database

In this exercise, you will use the CREATE DATABASE statement to create a database that is based on the database design that you developed in Chapter 3, "Designing a SQL Server Database." You will then delete this database and use SQL Server Enterprise manager to re-create it. From there, you will view the database, expand the primary file, and add and delete a second data file. To perform this exercise, you should be logged into your Windows 2000 Server computer as Administrator. You will use SQL Query Analyzer and SQL Server Enterprise Manager for the exercise.
To use the CREATE DATABASE statement to create a database
- Open SQL Query Analyzer and connect to your local server.
- If the Object Browser window is open, close it.
You should close the Object Browser window because later in the exercise, you will be deleting the database that you create. If the Object Browser window is open and the new database appears in the console tree, you cannot delete the database unless you close the window.
- In the Editor pane of the Query window, enter the following Transact-SQL code:
USE master GO CREATE DATABASE BookShopDB
This code creates a database with the name BookShopDB.
- Directly beneath the code that you just entered in the Editor pane, enter the following code:
ON PRIMARY ( NAME = Bookshop_dat, FILENAME = 'C:\Program Files\Microsoft SQL Server\MSSQL\Data\Bookshop.mdf', SIZE = 4, MAXSIZE = 10, FILEGROWTH = 1 )
This code defines the primary file. The logical name of the file, which is used in any Transact-SQL statements executed after the database is created, is Bookshop_dat. The path and filename used by the operating system is C:\Program Files\Microsoft SQL Server\MSSQL\Data\Bookshop.mdf. The initial size of the file is 4 MB, and the maximum size that the file can grow to is 10 MB. The growth increment of the file is 1 MB.
- Directly beneath the code that you just entered in the Editor pane, enter the following code:
LOG ON ( NAME = bookshop_log, FILENAME = ' C:\Program Files\Microsoft SQL Server\MSSQL\Data\Bookshop.ldf', SIZE = 2, MAXSIZE = 5, FILEGROWTH = 1 ) GO
This code defines the log file. The logical name of the file, which is used in any Transact-SQL statements executed after the database is created, is Bookshop_log. The path and filename used by the operating system is C:\Program Files\Microsoft SQL Server\MSSQL\Data\Bookshop.ldf. The initial size of the file is 2 MB, and the maximum size that the file can grow to is 5 MB. The growth increment of the file is 1 MB.
- Execute all of the code as one statement.
The Messages tab of the Results pane displays two messages. One says that 4 MB of disk space has been allocated to the primary file, and the other says that 2 MB of disk space has been allocated to the transaction log file.
- Leave SQL Query Analyzer open.
To view the BookShopDB database
- Open SQL Server Enterprise Manager.
- Expand the console tree until the list of databases on your computer is displayed.
The BookShopDB should be listed under the Databases node.
- Right-click BookShopDB, then click Properties.
The BookShopDB Properties window appears.
- Click the Data Files tab.
Notice that the bookshop_dat file is displayed in the Database Files list. The space allocated to the file is 4 MB. Also notice that the file growth is set to 1 MB and that the maximum file size is 10 MB.
- Click the Transaction Log tab.
Notice that the bookshop_log file is displayed in the Transaction Log Files list. The space allocated to the file is 2 MB. Also notice that the file growth is set to 1 MB and that the maximum file size is 5 MB.
- Click the Transaction Log tab.
- Review the remaining tabs in the BookShopDB Properties dialog box, then close the dialog box.
- Close SQL Server Enterprise Manager.
To use the DROP DATABASE statement to drop a database
- Make SQL Query Analyzer active.
- In the Editor pane, enter and execute the following code:
DROP DATABASE bookshopdb
The Messages tab of the Results pane displays two messages saying that the database files have been deleted.
- Close SQL Query Analyzer.
To use SQL Server Enterprise Manager to create a database
- Open SQL Server Enterprise Manager.
- Expand the console tree until the Databases node is displayed.
- Right-click the Databases node, then click New Database.
The Database Properties dialog box appears.
- In the Name text box on the General tab, type BookShopDB.
- Click the Data Files tab and review the settings on that tab.
Notice that the initial size is 1 MB and that the file growth is unrestricted. For the purpose of this exercise, you do not need to change the default settings.
- Click the Transaction Log tab and review the settings on that tab.
You will notice that, like the primary data file, the initial size is 1 MB and the file growth is unrestricted. Again, you do not need to change the default settings for this exercise.
- Click OK.
- Expand the Database node.
The BookShopDB has been added to the list of databases.
To view the BookShopDB database
- Right-click the BookShopDB node and select Properties.
The BookShopDB Properties dialog box appears.
- Review the Data Files tab and the Transaction Log tab.
Notice that the database files have been configured with the default settings.
- Review the other tabs.
- Close the BookShopDB Properties dialog box.
- In the console tree, expand the BookShopDB node.
A list of object categories appears.
- Review each category to determine which objects are created by default when you create a database.
To increase the size of a database
- Right-click the BookShopDB node and select Properties.
The BookShopDB Properties dialog box appears.
- Click the Data Files tab.
- In the Space Allocated (MB) column of the BookShopDB_Data row (in the Database Files list), change that value from 1 MB to 2 MB.
- Press Tab or click somewhere outside the cell where you just changed the value.
To add a data file to a database
- In the File Name column of the second row (in the Database Files list), type Bookdata2.
- Press Tab or click somewhere outside the cell where you just entered the value.
Default values are added to each column for the new row.
- In the Space Allocated (MB) column of the Bookdata2 row (in the Database Files list), change that value from 1 MB to 2 MB.
- Press Tab or click somewhere outside the cell where you just changed the value.
To delete a data file from a database
- Select the Bookdata2 row from the Database Files list.
- Click the Delete button.
The Bookdata2 file is deleted from the database.
- Click OK.
- Close SQL Server Enterprise Manager.
Lesson Summary
When creating a database, you must first determine the name of the database, its size, and the files and filegroups used to store it. When you create the database, you should specify the maximum size to which the file is permitted to grow. SQL Server provides several methods that you can use to create a database: the Transact-SQL CREATE DATABASE statement, the console tree in SQL Server Enterprise Manager, and the Create Database wizard (which you can access through SQL Server Enterprise Manager). Once you have created the new database in SQL Server, you can view information about the database. SQL Server provides several methods that you can use to view information about a database: the sp_helpdb system stored procedure, the DATABASEPROPERTYEX statement, and SQL Server Enterprise Manager. After you have created a database, you can modify the original definition. Before changes are made, however, it is sometimes necessary to take the database out of normal operating mode. You can set a number of database-level options that determine the characteristics of the database. These options are unique to each database and do not affect other databases. You can delete a non-system database when it is no longer needed (or if it is moved to another database or server). When a database is deleted, the files and their data are deleted from the disk on the server. You can delete a database by using the DROP DATABASE statement or by deleting it from the console tree in SQL Server Enterprise Manager.
EAN: 2147483647
Pages: 97