Lesson 2: Assigning Permissions to Users and Roles
This lesson explores how to grant and deny permissions to users and roles as well as how to revoke permissions. You will explore how role and user permissions interact with each other and how being assigned to more than one role can affect a user's permissions.
After this lesson, you will be able to
- Grant permissions to users and roles
- Deny permissions to users and roles
- Revoke permissions from users and roles
Estimated lesson time: 75 minutes
Permission States
Permissions for a user or role can be in one of three states: granted, denied, or revoked. Permissions are stored as entries in the sysprotects system table. If a permission is granted or denied, an entry is recorded in the sysprotects table. If a permission has not been granted or denied, or if it has been revoked after being granted or denied, there is no entry for that permission in the sysprotects system table. Note that a permission is in the revoked state if it has never been granted or denied; it does not have to be revoked with the REVOKE statement. The following table summarizes the three states of a permission.
| Permission state | State of entry in state sysprotects table | Effect |
|---|---|---|
| GRANT | Positive | Can perform action, can be overridden by role membership |
| DENY | Negative | Cannot perform action, cannot be overridden by role membership |
| REVOKE | None | Cannot perform action, can be overridden by role membership |
Granted permissions are cumulative—users can perform all of the actions that they have been granted individually or as a result of Windows NT group membership, as well as all of the actions granted to any roles to which they belong. Role hierarchies mean that users can get permissions indirectly by being members of a role that is in turn a member of another role to which permissions have been granted.
The DENY statement prevents users from performing actions. It overrides a permission, whether the permission was granted to a user directly or to a role to which the user belongs.
Users have permission to perform an action only if both of the following are true:
- They have been granted the permission directly or they belong to a role that has directly or indirectly been granted the permission.
- The permission has not been denied to the user directly or to any of the roles of which the user is a member.
Figure 12.1 shows an example of a user who is a member of a Windows NT group (NT group A) and a database role (role C). NT group A is a member of role A, and role C is a member of role B. The figure shows how the user accumulates permissions directly from NT group A and role C and indirectly from role A and role B. Notice that the DELETE permission is revoked from role C, but this does not prevent members of role C from getting the DELETE permission from role B.

Figure 12.1 How granted and revoked permissions interact
Figure 12.2 shows the same roles, NT group, and user as Figure 12.1. Notice that the DELETE permission is denied to role C; this prevents members of role C from getting the permission from role B..
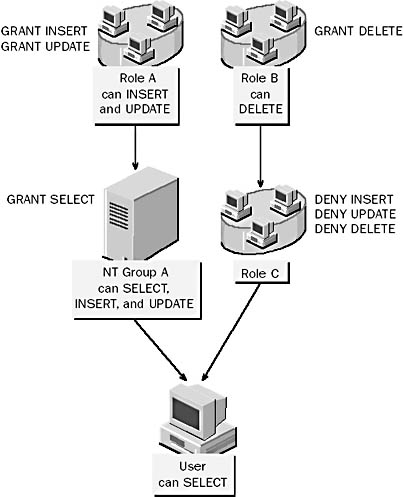
Figure 12.2 How granted and denied permissions interact
Each of the following tables shows a further example of accumulated permissions.
| Account | Permission assigned | Result |
|---|---|---|
| Role A | GRANT SELECT | Members of role A have SELECT permission |
| Role B, member of role A | GRANT INSERT | Members of role B have SELECT permissions (because role B is a member of role A) and INSERT permission |
| User A, member of role B | DENY INSERT | User A has SELECT permission because it is a member of role A. User A does not have INSERT permission because INSERT has been denied to this user |
| Role A | DENY SELECT | Members of role A do not have SELECT permission |
| Account | Permission assigned | Result |
|---|---|---|
| Role B, member of role A | GRANT SELECT | Members of role B do not have SELECT permission because role B is a member of role A, which denies the SELECT permission |
| User A, member of role B | GRANT INSERT | User A has INSERT permission only |
| Role A | GRANT SELECT | Members of role A have SELECT permission |
| Role B, member of role A | REVOKE SELECT | Members of role B have SELECT permission because they still get it from role A |
| User A, member of role B | GRANT INSERT | User A has SELECT permissions (because the user is a member of role B) and INSERT permissions |
Granting Permissions
You grant permissions to security accounts to allow them to perform activities or work with data in a database.
Consider the following facts when you grant permissions:
- You can grant permissions in the current database only.
- The right to grant permissions defaults to members of the sysadmin, db_owner, and db_securityadmin roles and to object owners.
- The CREATE DATABASE statement permission can be granted only to users and roles in the master database. This is because records are added to system tables in the master database when you create a new database.
Use SQL Server Enterprise Manager or the GRANT statement to grant permissions. The syntax for the GRANT statement for statement permissions is as follows:
GRANT {ALL | statement [,...n]} TO security_account[,...n] |
The syntax for the GRANT statement for object permissions is as follows:
GRANT {ALL [PRIVILEGES] | permission[,…n]} { [(column[,…n])] ON {table | view} | ON {table | view}[(column[,…n])] | ON {stored_procedure | extended_procedure} } TO security_account[,…n] [WITH GRANT OPTION] [AS {group | role}] |
When used to assign statement permissions, the ALL argument specifies that all statement permissions are granted. When used to assign object permissions, the ALL argument specifies that all object permissions that apply to the specified object are granted. Only the system administrator and database owner can use the ALL argument.
NOTE
Windows NT usernames must be enclosed in brackets when they are referenced in a statement — for example, [STUDYSQL\Paul].
Example 1
In this example, SELECT permissions are given to the orders role, and additional permissions are given to a few users. These users (Eva, Ivan, and David) then have all permissions on the Products table because they are also members of the orders role. (Do not try to perform these examples on your SQL Server. You will perform practical exercises using roles later in the chapter.)
USE Northwind GRANT SELECT ON Products TO orders GO GRANT INSERT, UPDATE, DELETE ON Products TO Eva, Ivan, David GO |
Figure 12.3 shows how the Object Properties dialog box looks after the permissions in this example have been assigned.
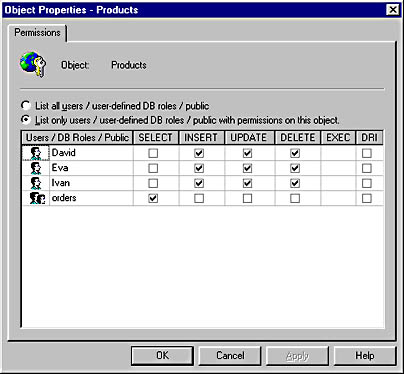
Figure 12.3 The Object Properties dialog box for the Products table after permissions have been granted
Example 2
This example demonstrates how to grant CREATE DATABASE permissions.
USE master GRANT CREATE DATABASE TO Eva, Ivan, [STUDYSQL\Paul] |
Figure 12.4 shows how the Permissions tab of the Master Properties dialog box looks after the permission in this example has been assigned.
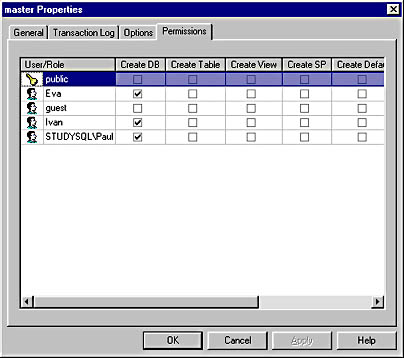
Figure 12.4 The Permissions tab of the Master Properties dialog box after CREATE DATABASE permission has been granted
Example 3
This example demonstrates how to grant CREATE TABLE permissions.
USE Northwind GRANT CREATE TABLE TO Eva, Ivan, [STUDYSQL\Paul] |
Figure 12.5 shows the Permissions tab of the Northwind Properties dialog box after the permission in this example has been assigned.
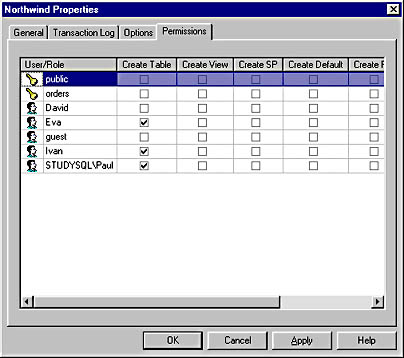
Figure 12.5 The Permissions tab of the Northwind Properties dialog box after CREATE TABLE permission has been granted
Exercise: Granting Statement Permissions
In this exercise, you will grant statement permissions. You will allow the user Cathy to create views and stored procedures. You will find the script for this exercise in C:\Sqladmin\Exercise\Ch12\StGrant.sql installed on your hard disk drive from the Supplemental Course Materials CD-ROM.
- To grant statement permissions
- Log on to Windows NT as Administrator or another account that is a member of the local Administrators group.
- Start SQL Server Query Analyzer, and connect with Microsoft Windows NT authentication.
- Execute the following statements to allow Cathy to create views and stored procedures.
- From SQL Server Enterprise Manager, verify the permissions granted to Cathy. You can see these permissions by right-clicking the StudyNwind database and selecting Properties. In the Properties dialog box, select the Permissions tab.
You are connected as a member of the System Administrators (sysadmin) role.
USE StudyNwind GRANT CREATE VIEW, CREATE PROCEDURE TO Cathy |
Exercise: Testing the Statement Permissions
In this exercise, you will test the statement permissions assigned to Cathy in the previous exercise. You will find the script for this exercise in C:\Squladmin \Exercise\Ch12\TestStat.sql.
- To test the statement permissions
- Open a new query window and connect with SQL Server authentication as Cathy with the password password.
- Execute the following SQL statements to create a view:
- Execute a CREATE TABLE statement:
USE StudyNwind GO CREATE VIEW test_view as SELECT firstname, lastname FROM Employees |
Were you able to create the view?
Answer
USE StudyNwind CREATE TABLE testtable (column1 INT NOT NULL, column2 CHAR(10) NOT NULL) |
Did the statement execute successfully? Why or why not?
Answer
Exercise: Granting Object Permissions
In this exercise, you will grant object permissions. Use the information in the following table to complete this exercise. You will find the script for this exercise in C:\Sqladmin\Exercise\Ch12\ObjGrant.sql installed on your hard disk drive from the Supplemental Course Materials CD-ROM.
| Role | Object | Permissions to assign |
|---|---|---|
| Public | Categories table | GRANT ALL |
| Public | Products table | GRANT ALL |
- To grant object permissions
- Switch to SQL Server Query Analyzer, and close all query windows.
- Open a new query window, and connect with Windows NT authentication.
- Execute the following Transact-SQL statements to implement the permissions listed in the preceding table:
- Verify the permissions that have been granted in SQL Server Enterprise Manager. To see these permissions, right-click the Categories or Products table in the Enterprise Manager and select Properties. In the Properties dialog box, click the Permissions button.
You are connected as a member of the System Administrators (sysadmin) role.
USE StudyNwind GRANT ALL ON Categories TO public GRANT ALL ON Products TO public |
Exercise: Testing the Object Permissions
In this exercise, you will log on as different users to test the permissions of users and roles. You will find the script for this exercise in C:\Sqladmin\Exercise\Ch12 \TestObj.sql installed on your hard disk drive from the Supplemental Course Materials CD-ROM.
- To test the object permissions
- Switch to SQL Server Query Analyzer, and close all query windows.
- Open a new query window and, using SQL Server authentication, connect as Carl with the password password.
- Execute each of the following Transact-SQL statements to test permissions for Carl:
- Open a new query window and, by using SQL Server authentication, connect as Umberto with the password password.
- Execute each of the following Transact-SQL statements to test permissions for Umberto:
Remember that Carl is a member of the Cust_Mgmt and db_datareader roles.
USE StudyNwind SELECT * FROM Customers SELECT * FROM Categories SELECT * FROM Products SELECT * FROM Orders |
Which tables can Carl query? Which tables is he not able to query? Why?
Answer
USE StudyNwind SELECT * FROM Customers SELECT * FROM Categories SELECT * FROM Products SELECT * FROM Orders |
Which tables can Umberto query? Which tables is he not able to query? Why?
Answer
Denying Permissions
You occasionally may want to limit the permissions of a certain user or role by denying permissions to that security account. Denying permissions on a security account does the following:
- Negates the permissions that were previously granted to the user or role
- Deactivates permissions that are inherited from another role
- Ensures that a user or role does not inherit permissions from any other role in the future
Consider the following facts when you deny permissions:
- You can deny permissions in the current database only.
- Permission to deny permissions defaults to members of the sysadmin, db_owner, and db_securityadmin roles and to object owners.
Use SQL Server Enterprise Manager or the DENY statement to deny permissions. The syntax for the DENY statement for statement permissions is as follows:
DENY {ALL | statement[,…n]} TO security_account[,…n] |
The syntax for the DENY statement for object permissions is as follows:
DENY {ALL [PRIVILEGES] | permission[,…n]} { [(column[,…n])] ON { table | view} | ON {table | view} [( column[,…n])] | {procedure | extended_procedure} } TO security_account |
Example 4
In this example, SELECT permissions are granted to the orders role. SELECT, INSERT, and UPDATE permissions are then denied for a few users that are members of the role. These users (Eva, Ivan, and David) cannot have these forms of access to the Products table, even though the SELECT permission was granted to the orders role.
USE Northwind GO GRANT SELECT ON Products TO orders GO DENY SELECT, INSERT, UPDATE ON Products TO Eva, Ivan, David |
Figure 12.6 shows the Properties dialog box for the Products table after the permissions in this example have been assigned.
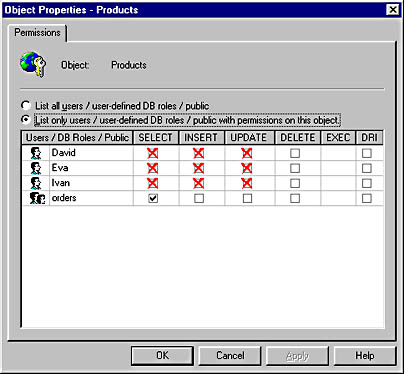
Figure 12.6 The Object Properties dialog box for the Products table after permissions have been denied
Example 5
This example denies users Eva, Ivan, and STUDYSQL\Paul the ability to create databases.
USE master DENY CREATE DATABASE TO Eva, Ivan, [STUDYSQL\Paul] |
Figure 12.7 shows the Permissions tab of the Master Properties dialog box after the permission in this example has been assigned.
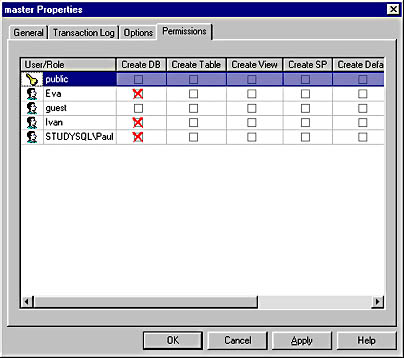
Figure 12.7 The Permissions tab of the Master Properties dialog box after CREATE DATABASE permission has been denied
Example 6
This example denies users Eva, Ivan, and STUDYSQL\Paul the ability to create tables.
USE Northwind DENY CREATE TABLE TO Eva, Ivan, [STUDYSQL\Paul] |
Figure 12.8 shows the Permissions tab of the Northwind Properties dialog box after the permission in this example has been assigned.
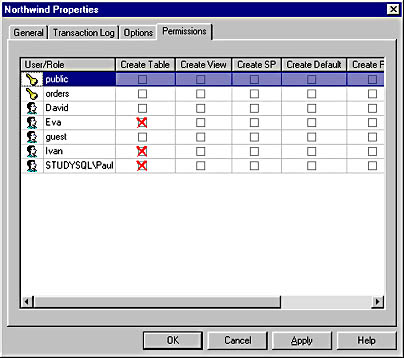
Figure 12.8 The Permissions tab of the Northwind Properties dialog box after CREATE TABLE permission has been denied
Exercise: Denying Object Permissions
In this exercise, you will deny object permissions. Use the information in the following table to complete this exercise. You will find the script for this exercise in C:\Sqladmin\Exercise\Ch12\ObjDeny.sql installed on your hard disk drive from the Supplemental Course Materials CD-ROM.
| Role | Object | Permissions to assign |
|---|---|---|
| Cust_Mgmt | Customers table | DENY ALL |
| Public | Categories table | DENY ALL |
- To deny object permissions
- Switch to SQL Server Query Analyzer, and close all query windows.
- Open a new query window, and connect with Windows NT authentication.
- Execute the following Transact-SQL statements to implement the permissions that are listed in the preceding table:
- Verify the permissions that have been granted in SQL Server Enterprise Manager. To see these permissions, right-click the Customers or Categories table in the Enterprise Manager and select Properties. In the Properties dialog box, click the Permissions button.
You are connected as a member of the System Administrators (sysadmin) role.
USE StudyNwind DENY ALL ON Customers TO Cust_Mgmt DENY ALL ON Categories TO public |
Exercise: Testing the Object Permissions
In this exercise, you will log on as different users to test the permissions of users and roles. You will find the script for this exercise in C:\SqladminExercise\Ch12 \TestObj.sql installed on your hard disk drive from the Supplemental Course Materials CD-ROM.
- To test the object permissions
- Switch to SQL Server Query Analyzer, and close all query windows.
- Open a new query window and, using SQL Server authentication, connect as Carl with the password password.
- Execute each of the following Transact-SQL statements to test permissions for Carl:
- Open a new query window and, by using SQL Server authentication, connect as Umberto with the password password.
- Execute each of the following Transact-SQL statements to test permissions for Umberto:
Remember that Carl is a member of the Cust_Mgmt and db_datareader roles.
USE StudyNwind SELECT * FROM Customers SELECT * FROM Categories SELECT * FROM Products SELECT * FROM Orders |
Which tables can Carl query? Which tables is he not able to query? Why?
Answer
USE StudyNwind SELECT * FROM Customers SELECT * FROM Categories SELECT * FROM Products SELECT * FROM Orders |
Which tables can Umberto query? Which tables is he not able to query? Why?
Answer
Revoking Granted and Denied Permissions
You can deactivate a granted or denied permission by revoking it. Revoking is similar to denying permissions in that both actions remove a granted permission. The difference is that while revoking a permission removes a granted permission, it does not prevent the user or role from inheriting that permission in the future.
You can also remove a previously denied permission by revoking the DENY statement for the permission.
Consider the following facts when you revoke permissions:
- You can revoke permissions in the current database only.
- Revoking a permission removes the entries in the sysprotects system table that were created by granting and denying the permission.
- Permission to revoke permissions defaults to members of the sysadmin, db_owner, and db_securityadmin roles and to object owners.
You can use SQL Server Enterprise Manager or the REVOKE statement to remove a previously granted or denied permission.
The syntax for the REVOKE statement for statement permissions is as follows:
REVOKE {ALL | statement[,...n]} FROM security_account[,...n] |
The syntax for the REVOKE statement for object permissions is as follows:
REVOKE [GRANT OPTION FOR] {ALL [PRIVILEGES] | permission[,…n]} { {[(column[,…n])] ON {table | view} | {procedure | extended_procedure} } FROM security_account[,…n] [AS {group | role}] |
Example 7
This example revokes multiple statement permissions from multiple users.
USE Northwind REVOKE SELECT, INSERT, UPDATE ON Products FROM Eva, Ivan |
Figure 12.9 shows the Products Object Properties dialog box after the permissions in this example have been assigned.
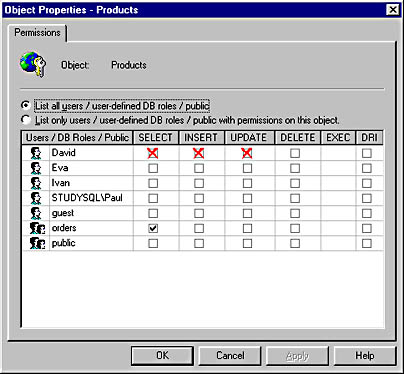
Figure 12.9 The Object Properties dialog box for the Products table after permissions have been revoked
Example 8
This example revokes the CREATE TABLE permissions granted to the user Eva. It removes the permissions that allowed Eva to create a table through her user account; however, she still can create tables if CREATE TABLE permissions have been granted to any roles of which she is a member.
USE Northwind REVOKE CREATE TABLE FROM Eva |
Figure 12.10 shows the Permissions tab of the Northwind Properties dialog box after the permission in this example has been assigned.

Figure 12.10 The Permissions tab of the Northwind Properties dialog box after CREATE TABLE permission has been revoked
When a Revoke Is Not a Revoke
Because a revoke will remove previously granted or denied permissions, the result of a revoke may be that an account no longer has permissions, or it may be that an account now has permissions. For this reason, you must carefully consider the result of revoking or denying permissions. The following example illustrates this somewhat confusing behavior. Assume that User is a member of role A.
- Permission is granted to role A—User has permissions based on membership in role A.
- Permission is denied to User—User has no permissions. The deny for User overrides the grant from role A.
- Permission is revoked from User—User has permissions because the denied permission is revoked and User now goes back to having permission based on membership in role A.
- Permission is revoked from role A—User has no permissions because the granted permission is revoked from the role from which User was getting permissions.
Exercise: Revoking Object Permissions
In this exercise, you will revoke object permissions. Use the information in the following table to complete this exercise. You will find the script for this exercise in C:\Sqladmin\Exercise\Ch12\ObjRevk.sql installed on your hard disk drive from the Supplemental Course Materials CD-ROM.
| Role | Object | Permissions to assign |
|---|---|---|
| Cust_Mgmt | Customers table | REVOKE ALL |
| Public | Categories table | REVOKE ALL |
| Public | Products table | REVOKE ALL |
- To revoke object permissions
- Switch to SQL Server Query Analyzer, and close all query windows.
- Open a new query window, and connect with Windows NT authentication.
- Execute the following Transact-SQL statements to implement the permissions that are listed in the table:
You are connected as a member of the System Administrators (sysadmin) role.
USE StudyNwind REVOKE ALL ON Customers FROM Cust_Mgmt REVOKE ALL ON Categories FROM public REVOKE ALL ON Products FROM public |
Exercise: Testing the Object Permissions
In this exercise, you will log on as different users to test the permissions of users and roles. You will find the script for this exercise in C:\Sqladmin\Exercise\Ch12 \TestObj.sql installed on your hard disk drive from the Supplemental Course Materials CD-ROM.
- To test the object permissions
- Switch to SQL Server Query Analyzer, and close all query windows.
- Open a new query window and, using SQL Server authentication, connect as Carl with the password password.
- Execute each of the following Transact-SQL statements to test permissions for Carl:
- Open a new query window and, by using SQL Server authentication, connect as Umberto with the password password.
- Execute each of the following Transact-SQL statements to test permissions for Umberto:
Remember that Carl is a member of the Cust_Mgmt and db_datareader roles.
USE StudyNwind SELECT * FROM Customers SELECT * FROM Categories SELECT * FROM Products SELECT * FROM Orders |
Which tables can Carl query? Which tables is he not able to query? Why?
Answer
USE StudyNwind SELECT * FROM Customers SELECT * FROM Categories SELECT * FROM Products SELECT * FROM Orders |
Which tables can Umberto query? Which tables is he not able to query? Why?
Answer
Lesson Summary
Permissions can be granted, revoked, and denied at the user or role level. Permissions granted specifically to a user must be revoked specifically from that user. The DENY statement overrides all other statements.
EAN: 2147483647
Pages: 100