Lesson 3: Transforming Data with DTS
Transforming data with DTS involves planning and designing the transformation and creating and executing a DTS package. This lesson takes you through this process.
After this lesson, you will be able to
- Describe the design and planning steps taken before using DTS
- Describe the data transformation process used by DTS
- Use DTS Designer to create, edit, and save complex data transformations
Estimated lesson time: 105 minutes
Restructuring and Mapping Data
Data transformation involves formatting and modifying data that is extracted from the data source into merged or derived values that are more useful at the destination. New values can easily be calculated from one or more columns in the source rowset, and a single source column can be decomposed into multiple destination columns.
Mapping Data Types
DTS allows you to specify the attributes of the destination columns and to indicate how the source columns are mapped to the destination columns. Transformation flags specify whether data of one type in the source can be converted to another type in the destination. For example, you can allow data type promotion, such as converting 16-bit integers to 32-bit integers, or data type demotion, such as converting 32-bit integers to 16-bit integers (data may be lost in this case). You can also require an exact match between source and destination data types.
Each database defines its own data types as well as its column and object naming conventions. DTS attempts to define the best possible data type matches between a source and destination. However, you can override DTS mappings and specify different destination data type, size, precision, and scale properties.
Merging and Separating Data
You can merge and separate data in several ways:
At the File Level
You can combine information from multiple sources and place it into a single table, or you can take information from a single source and place it into multiple tables. Heterogeneous joins are an example of combining multiple sources into a single result set that is saved at the destination.
At the Column Level
You can combine information from multiple columns and place it into a single column, or you can take information from a single column and place it into multiple columns. For example, you can summarize monthly sales totals for each product, or you can decompose a phone number that is stored in one column in order to store the area code in one column and the phone number in another.
Defining Transformation Steps
A DTS package is composed of one or more steps, which you can define. A step defines a unit of work that is performed as part of the transformation process. A step can
- Execute a SQL statement.
- Move and transform homogeneous or heterogeneous data from an OLE DB source to an OLE DB destination, using the DTS Data Pump.
- Execute a JScript, PerlScript, or VBScript script. These scripts can perform any operation that their scripting language supports, allowing the implementation of any complex procedural logic that is required. ActiveX scripts can also access and manipulate data by using ActiveX Data Objects (ADO) or any other COM Automation components.
- Launch an external program.
- Retrieve and execute other DTS packages.
For example, you can create a DTS package that summarizes sales information for each product for a given month. The DTS package drops (if the table already exists) and creates the table on the destination, gets data from the source connection (OLE DB), processes the transformation (summarization), and finally sends the data to the destination connection (OLE DB).
Creating a DTS Package
When you use DTS to transfer and transform data, you create DTS packages that describe all of the work to be performed as part of the transformation process. You can create the DTS package interactively, using the DTS wizards or DTS Designer, or programmatically, using a language that supports OLE Automation, such as Microsoft Visual Basic.
Saving a DTS Package
Saving the DTS package allows you to modify it, reuse it, or schedule it for later execution. If you do not save the DTS package, it executes immediately. You must save the DTS package if you want to schedule it for later execution.
You can save a DTS package that you create in one of three ways:
- To SQL Server—Packages saved to SQL Server are referred to as Local packages and are stored in the msdb database. Local packages are the most efficient and are available to other SQL Servers. They are listed in the Local Packages node under Data Transformation Services in the console tree.
- To Microsoft Repository—The Microsoft Repository is a database that stores descriptive information about software components and their relationships. It consists of a set of published COM interfaces and information models that define database schema and data transformations through shared metadata.
Saving a DTS package in the Microsoft Repository makes package metadata reusable and available to other applications. Using the Microsoft Repository also enables you to track data lineage at the package and row level of a table, which allows you to determine the source of each piece of data and the transformations that are applied to it.
When you save a package to the Microsoft Repository, the package is stored in the msdb database, but package metadata can be imported into the repository. Packages stored in this way are listed in the Repository Packages node under Data Transformation Services in the console tree. After you import the package metadata into the repository, you can view it using the Metadata Browser in the Metadata node under Data Transformation Services in the console tree.
- To a File—Saving a DTS package in a COM-structured storage file makes it easy to distribute the DTS package using e-mail or network file servers. DTS packages saved as files do not appear in the SQL Server Enterprise Manager console tree. To open a package file for editing, right-click Data Transformation Services in the console tree, point to All Tasks, and click Open Package.
Implementing Package Security
You can encrypt DTS packages that are saved to SQL Server or to COM-structured storage files in order to protect sensitive user names and password information. When a DTS package is encrypted, all of its collections and properties are encrypted, except for the package name, description, ID, version, and creation date.
DTS packages provide two levels of security: owner password and operator password.
Owner Password
The owner password level of security provides complete access to all collections and properties. By default, DTS packages without owner passwords are not encrypted and can be read by any user with access to the package.
Operator Password
The operator password level of security allows a user to execute but not edit or view the package definition. If an operator password is specified, an owner password must be supplied.
Defining Workflows
With DTS, you can define a workflow that controls the execution sequence of each step. Control of flow logic and conditional processing is achieved using precedence constraints. DTS tasks can also be prioritized. This section discusses using DTS Designer to edit and customize packages.
Steps, Tasks, and Precedence Constraints
Workflows control the flow of execution for the package. A package is made up of data connections (sources and destinations) and tasks that are performed using those connections. The action of executing a task is controlled by a step. A step can be subject to one or more precedence constraints. A step with no precedence constraints executes immediately. If a step has precedence constraints, it cannot execute until all of its precedence constraints have been satisfied.
In DTS Designer, steps are represented by task icons and a solid Data Transformation arrow between two data connection icons. Precedence constraints are represented by dashed blue (Completion), green (Success), or red (Failure) arrows. An arrow points to the step that is subject to the precedence constraint; this is called the destination step. If the destination step is a data transformation, the arrow points to the source data connection of the step. An arrow points from the step that must be completed to satisfy the precedence constraint; this is called the source step. If the source step is a data transformation, the arrow points from the destination data connection of the step.
To make your DTS Designer diagrams easier to read, you can add the same connection to the diagram more than once. When you do so, specify it as an existing connection. If a connection is involved in more than one transformation, it is recommended that you add the connection once for each transformation. If you do not, the diagram will have a single data connection icon with a large number of arrows (both data transformations and precedence constraints) pointing to and from it.
NOTE
The terms source and destination are used to refer to both data connections and steps in DTS Designer. When working with a source or a destination, always make sure that you know whether it is a source or destination connection or a source or destination step.In addition, arrows are used to represent both precedence constraints and data transformations in DTS Designer. When working with an arrow in a DTS diagram, make sure that you know whether it is a constraint or a Data Transformation arrow.
Steps are defined using the Workflow Properties dialog box. To open this dialog box, right-click on the destination step (either the task icon or the Data Transformation arrow if the step is a data transformation step). Then select Workflow Properties (you may need to point to Workflow to get to the Workflow Properties option) from the context menu. You can also open the Workflow Properties dialog box by right-clicking a precedence constraint arrow, but this is not recommended, as it is confusing and does not allow access to the General tab.
The Precedence tab of the Workflow Properties dialog box allows you to add precedence constraints to or remove them from the step. The order of precedence constraints in the list is not important. You can also add precedence constraints from the Workflow menu or from the toolbar in DTS Designer, but this is not recommended, as it is easy to confuse the destination and source steps using this method. The General tab of the Workflow Properties dialog box allows you to set workflow properties such as task priority and transaction management for the task of the destination step.
Precedence Constraint Types
The type of precedence constraint you select determines the requirement for executing a step:
- Success indicates that the source step must complete successfully before the destination step executes.
- Failure indicates that the source step must complete with an indication of failure before the destination step executes.
- Completion indicates that the source step must simply complete (with failure or success) before the destination step executes.
Precedence constraints create a finish-start relationship between the step being executed (the source step) and the step that will be executed (the destination step). Given two steps A and B, a precedence constraint says
Step B cannot start until step A finishes |
not
If step A finishes, step B will start |
This is important when multiple steps are involved, as a step may have many precedence constraints that all must be satisfied before it can execute.
Controlling Step Execution
Under the control of precedence constraints, steps execute in sequence, in parallel, or in a combination of these:
- Some steps must execute in a certain sequence.
- Multiple steps can execute in parallel to improve performance.
- Steps can use a combination of sequential and parallel execution.
For example, data can be loaded into a table (step B) only after the table has been successfully created (step A).
For example, a package can load data from Oracle and DB2 into separate tables simultaneously.
For example, a package can load data from several different heterogeneous files into a set of tables. The loading of data can be done in parallel, but only after the creation of the tables.
Figure 6.2 shows a package with six steps that demonstrate a combination of parallel and sequential execution. Steps A, B, and C have no precedence constraints and execute immediately. Step D waits for step A to complete successfully before executing. Step E waits for step D to complete with a failure before executing. Step F waits for step C to complete (with success or failure) before executing. Steps A, D, and E execute sequentially. Steps C and F execute sequentially. Steps A (and its sequential steps), B, and C (and its sequential step) execute in parallel.
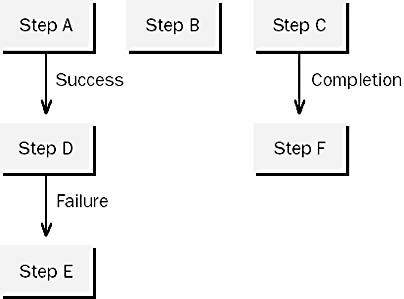
Figure 6.2 A package with steps that execute both in parallel and sequentially
Figure 6.3 shows how one step can have multiple precedence constraints. In this case, step C can execute only when both step A and step B have successfully completed.
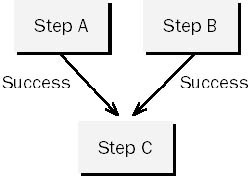
Figure 6.3 A step with multiple precedence constraints
Conditional Processing
Conditional processing using basic IF-THEN-ELSE logic allows a DTS package to respond to run-time conditions that vary. To implement conditional processing, use a combination of steps with Success and Failure precedence constraints, as shown in Figure 6.4. In the figure, step B executes only if step A completes successfully. Step C will execute if step A fails. Step C would typically send a notification such as an e-mail message or would take corrective action that is in turn the condition for another precedence constraint that then allows the original step to be repeated.

Figure 6.4 Conditional processing using precedence constraints
Specifying Task Priority
You can specify the priority of tasks. By default, each thread within the DTS package executes at the same priority as the DTS package. However, if some operations are more time-critical than others, you can assign an execution priority to each step. You can specify each step to execute at Idle, Normal, or High priority.
Exercise: Creating a Package with DTS Designer
In this exercise, you will create a package using DTS Designer. The package will transfer some of the columns from the Products table in an Access database to a new table in a SQL Server database. The package will use a custom data transformation to look up and then convert data values from the Access table to new values in the SQL Server table. You will use an ActiveX script to convert the values.
- Using DTS Designer to create a package
- Right-click Data Transformation Services in the console tree, and then click New Package.
- On the Data tool palette, click the Microsoft Access icon.
- In New Connection, type Access Connection.
- In File Name, type C:\Sqladmin\Exercise\Ch06\Nwind.mdb. Click OK to add the Microsoft Access data connection.
- On the Data tool palette, click the Microsoft OLE DB Provider For SQL Server icon.
- In New Connection, type SQL Server Connection.
- In Database, select StudyNwind. Click OK to add the SQL Server data connection.
- On the Task tool palette, click the Execute SQL Task icon.
- In Description, type Drop ProductsCopy. In Existing Connection, select SQL Server Connection.
- In SQL Statement, type
- Click Parse Query to confirm that you have typed the statement correctly. Click OK to close the dialog boxes and save the task.
- On the Task tool palette, click the Execute SQL Task icon.
- In Description, type Create ProductsCopy. In Existing Connection, select SQL Server Connection.
- In SQL Statement, type
- Click Parse Query to confirm that you have typed the statement correctly. Click OK to close the dialog boxes and save the task.
- Click Package on the menu and click Save. In Package Name, type Copy Access Products to SQL Server.
- The defaults in the Save DTS Package dialog box will save the package to SQL Server. Click OK to save the package.
- On the taskbar, click Execute. This tests the package to see that the connections and tasks are working and also creates the table, which needs to be on the server when you add the data transformation. The first step will indicate that an error occurred; this is normal since the table cannot be dropped the first time the package is executed.
- On the DTS Designer work surface, click Access Connection. Then hold down the Ctrl key and click SQL Server Connection.
- Click Workflow on the menu, and click Add Transform. A Data Transformation arrow pointing from the Access connection to the SQL Server connection is added to the work surface.
- Right-click the Data Transformation arrow and click Properties.
- In Description, type Copy data from Access to SQL Server.
- In Table Name, select Products. Click the Destination tab.
- In Table Name, select [StudyNwind].[dbo].[ProductsCopy].
- Click the Advanced tab. Click the Lookups button.
- Click Add. In the Name column, type myLookup. In the Connection column, select Access Connection, then click the ellipsis button in the Query column.
- Type the following query in the code pane of the query builder:
- Click OK to close the query builder, then click OK to close the Data Transformation Lookups dialog box and save the data lookup for your transformation.
- Click the Transformations tab.
- Click the line pointing from SupplierID to QuantityPerUnit, and click Delete. Click the line pointing from CategoryID to UnitPrice, and click Delete. Click the line pointing from QuantityPerUnit to IsAnimal, and click Delete.
- Click QuantityPerUnit in the Source Table and Destination Table columns, and then click New. Click UnitPrice in the Source Table and Destination Table columns, and then click New.
- Click CategoryID in the Source Table column and IsAnimal in the Destination Table column. In New Transformation, select ActiveX Script, and then click New.
- Replace the default code in Script by typing the following VBScript:
- Click OK to save the transformation script.
- Click OK to close the Data Transformation Properties dialog box and save your changes to the data transformation.
- Right-click Create ProductsCopy on the work surface. Point to Workflow and click Workflow Properties.
- In the Workflow Properties dialog box, click New to add a precedence constraint for the Create ProductsCopy step.
- In the Source Step column, select Drop ProductsCopy. In the Precedence column, select Completion. Note that you cannot change the Destination Step, because you are editing the precedence constraints for Create ProductsCopy, which is the destination step. Click OK to close the Workflow Properties dialog box and save the precedence constraints for Create ProductsCopy.
- Now you will add a precedence constraint for the data transformation step. Unlike the Create ProductsCopy step, which is represented by its icon, the data transformation step is represented by the arrow connecting the two data connections.
- Right-click the Data Transformation arrow (the arrow from Access Connection to SQL Server Connection) on the work surface. Click Workflow Properties.
- In the Workflow Properties dialog box, click New to add a precedence constraint for the data transformation step.
- In the Source Step column, select Drop ProductsCopy. In the Precedence column, select Completion. Note that you cannot change the Destination Step, because you are editing the precedence constraints for Create ProductsCopy, which is the destination step. Click OK to close the Workflow Properties dialog box and save the precedence constraints for Create ProductsCopy.
- On the Package menu, click Save. Close the DTS Designer dialog box.
|
CREATE TABLE StudyNwind..ProductsCopy ( ProductID int NOT NULL , ProductName nvarchar (40) NOT NULL , QuantityPerUnit nvarchar (20) NULL , UnitPrice money NULL , IsAnimal char (3) NULL ) |
SELECT CategoryName FROM Categories WHERE (CategoryID = ?) |
Function Main() Select Case _ DTSLookups("myLookup").Execute(DTSSource("CategoryID").Value) Case "Dairy Products", "Meat/Products", "Seafood" DTSDestination("IsAnimal") = "Yes" Case Else DTSDestination("IsAnimal") = "No" End Select Main = DTSTransformStat_OK End Function |
TIP
To edit individual column transformations, you need to right-click on the lines pointing from the Source Table list to the Destination Table list.
Exercise: Executing the New Package
In this exercise you will execute the package you have just created and then view the data in the new table.
- To execute the new package and verify its results
- In the console tree, expand Data Transformation Services, and click Local Packages.
- Right-click Copy Access Products to SQL Server in the details pane, and click Execute Package.
- The Executing DTS Package dialog box appears and indicates the progress of each of the steps as the package executes.
- Click OK, and click Done to close the dialog boxes.
- In the console tree, expand Databases, expand StudyNwind, and then click Tables.
- In the details pane, right-click ProductsCopy (if you do not see this table, refresh your Enterprise Manager view), point to Open Table, and click Return All Rows. A grid displays the table that was created by the DTS package. Note the values in the IsAnimal column that were set by the ActiveX script and the lookup.
Executing and Scheduling a DTS Package
Each DTS package is self-contained after you create it. A package is a complete description of all of the work to be performed as part of the transformation process. This section describes how to execute and schedule a DTS package that you have created.
Executing a DTS Package
After you save a DTS package, you can retrieve and execute it, using SQL Server Enterprise Manager or the dtsrun command-prompt utility.
The example given here shows the dtsrun command-prompt utility being used to execute a DTS package that creates and populates a summary table in the StudyNwind database on the SQL Server named SQLSERVER. The /U option specifies the sa login. If the specified login has a password, it must be specified with the /P option. Note that the name of the package is enclosed in double quotes; this is necessary if the name contains spaces. Remember that the DTS package is a complete description of all of the work to be performed as part of the transformation process.
dtsrun /SSQLSERVER /Usa /N"StudyNwind Product Totals" |
Scheduling a DTS Package
You can schedule a saved DTS package for execution at a specific time, such as daily at midnight, or at recurring intervals, such as on the first or last day of the month or weekly on Sunday at 6 a.m.
You can schedule a DTS package for execution in the following ways:
- By using the DTS Import or DTS Export Wizards when you save the DTS package to the SQL Server msdb database.
- By using SQL Server Enterprise Manager to create a SQL Server job that executes the DTS package by running the dtsrun command-prompt utility. Do this manually for packages saved as files. For Local packages and repository packages, right-click the package and select Schedule Package from the context menu.
Exercise: Transferring a Database
In this exercise, you will use the DTS Import Wizard to create a copy of the entire Northwind database.
- Transferring an entire database using DTS
- Click on your server in the console tree in SQL Server Enterprise Manager.
- Click the Tools menu, and then click Wizards.
- In the Select Wizard dialog box, expand Data Transformation Services. Double-click DTS Import Wizard. Click Next.
- In the Choose a Data Source dialog box, for Database select Northwind. Click Next.
- In the Choose a Destination dialog box, for Database select <new>. A Create Database dialog box appears.
- In Name, type NwindTransfer. Click OK to close the Create Database dialog box and create the new empty database. Click Next.
- Click Transfer Objects And Data Between SQL Server 7.0 Databases. Click Next.
- Review the default options in the Select Objects to Transfer dialog box. These options will make an exact copy of Northwind in NwindTransfer.
- In Script File Directory, type C:\Mssql7\Transfer. Click Next.
- Click Next again. You want to run the transfer immediately without saving it.
- Click Finish. The Transferring Data dialog box shows the progress of the transfer. The transfer may take a few minutes.
- When the transfer is complete, the Transferring Data dialog box indicates whether the transfer was successful. If there are errors in the transfer, they will be recorded in files with a .LOG extension in the Script file directory (C:\Mssql7\Transfer in this exercise). Click Done.
- In the console tree, right-click Databases and click Refresh.
- In the console tree, expand Databases, and then expand NwindTransfer. Click Tables, Views, and Stored Procedures in the console tree and note that all of the objects from the Northwind database have been copied to the NwindTransfer database and are displayed in the details pane.
- In the console tree, click Tables. In the details pane, right-click Customers, point to Open Table, and click Return All Rows. The query grid displays the data from the Customers table, showing that all of the data from the Northwind database has been copied to the NwindTransfer database. Close the query grid.
- Right-click NwindTransfer in the console tree, and click Delete. Click Yes to delete the NwindTransfer database, as you will not need it again.
Lesson Summary
A DTS package is composed of one or more steps, which you can define. A step is a unit of work with many possible actions. It can perform a number of actions, including but not limited to executing SQL statements and launching external programs.
With DTS you can control the execution sequence of each step. Precedence constraints and conditional processing allow you to prioritize steps.
EAN: 2147483647
Pages: 100