Lesson 1: Working with Dialog Boxes
In Lesson 2 of Chapter 4, you learned how to create a dialog class, based on a dialog template, that could be used to display a dialog box within your application. In this lesson, you will learn how to work with the dialog class in your application code. You will pass data between the dialog box controls and your application, which will process messages that originate from the controls. You will also learn how to implement dialog templates as pages in a property sheet.
After this lesson, you will be able to:Estimated lesson time: 60 minutes
- Describe how to implement dialog data exchange and dialog data validation.
- Use ClassWizard to add member variables to represent dialog data.
- Use ClassWizard to add a function that handles a message from a dialog box control.
- Describe how to implement a property sheet.
Dialog Data Exchange and Validation
Dialog data exchange (DDX) is an easy way to initialize the controls in your dialog box and to gather data input by the user. Dialog data validation (DDV) provides an easy way to validate data entry in a dialog box.
DDX and DDV are implemented within the dialog class and use a code architecture similar to the message map architecture you saw in Chapter 3. Member variables within the dialog class correspond to the controls in your dialog template. Global MFC functions are used to transfer data between the member variables and the controls and to validate data input by the user.
When ClassWizard creates a dialog class, it adds code to the class to implement the basic DDX/DDV architecture. You can then use ClassWizard to add to the dialog class member variables that correspond to controls in your dialog template, and to specify simple validation rules for the data that is entered into the controls.
When you use ClassWizard to add DDX member variables, ClassWizard performs the following tasks for you:
- The member variables are added to the class definition.
- The member variables are initialized in the class constructor.
- DDX functions are added to the class to handle the transfer of data between the DDX member variables and the dialog box controls.
- If you use ClassWizard to specify validation criteria for your variables, DDV functions are added to the class to validate the data input by the user to the dialog box controls before saving that data to the DDX member variables.
The DDX and DDV functions are global MFC functions that are provided to perform the task of transferring data between controls and dialog class variables (DDX functions), and to validate data (DDV functions). MFC defines a number of DDX functions to correspond to the various types of common controls. The most commonly used functions are DDX_Text(), which transfers data between an edit control and a CString member variable of the dialog class; and DDX_Check(), which transfers the select state of a check box control to or from a BOOL member variable of the dialog class. MFC defines a number of DDV functions to correspond to the kinds of validation that you might want to apply to string or numeric values. Example functions are DDV_MaxChars() and DDV_MinMaxInt(). You can find a complete list of these functions by going to the Index tab of the Visual C++ Help file and typing DDX_ (or DDV_) in the Keyword box.
Typically, you will define a member variable (and thus a DDX function) for every control in your dialog box that accepts user input to set its data content or its state. You need to specify validation only where it is necessary to control the range of the input data.
The following exercise shows you how to use ClassWizard to add DDX member variables and to specify validation criteria.
- Return to the MyApp project.
- Press CTRL+W to open ClassWizard. Click the Member Variables tab.
- In the Class name box, click the CConnectDialog class.
- In the Control IDs box, click IDC_USERID.
- Click Add Variable. The Add Member Variable dialog box appears.
- In the Member variable name box, type m_strUserID.
- Make sure that the Category box shows Value and the Variable type box shows CString.
- Click OK to add the variable. The variable name and type will appear selected in the Control IDs box next to the IDC_USERID. This variable will be used to set the text that appears in the User ID edit control and retrieve the text entered into the control by the user.
- Beneath the Control IDs list box is the Maximum Characters edit box. Type 15 to create a validation function that will limit the length of the input string to 15 characters.
- Repeat the above process to add a CString value variable named m_strPassword, with a maximum length of 15 characters, that is associated with the IDC_PASSWORD control ID.
- Add an int value variable named m_nAccess, which is associated with the IDC_ACCESS control ID. Note that for an integer variable you are able to specify the minimum and maximum values that can be input. In the Minimum value box, type 1, and in the Maximum value box, type 5.
- Add a BOOL value variable named m_bConnect, which is associated with the IDC_CHECKCONNECT control ID. This will set the control state to selected (TRUE) or cleared (FALSE), and retrieve the control state set by the user.
- Click OK to close ClassWizard. You can now build and run the MyApp application.
- Choose the Connect command from the Data menu and type a username and password. See how the validation rule that you specified in step 9 makes it impossible to enter more than 15 characters for a user name. To achieve this behavior, the DDV_MaxChars() function sends a EM_LIMITTEXT message to the control as it is initialized. This method of validation is more immediate and user-friendly than the alternative method of checking the value in the field after the user has clicked OK (or Connect in our case).
- As an example of the usual form of validation, type 6 in the Access level edit box and click Connect. The validation function that has been assigned to this field should display a message box warning you of the invalid value, and return you to the offending control. In a real-world application, you would probably implement the access level selection as a combo box with a limited set of values from which the user could select one—thus eliminating the need for a validation function.
- Click Cancel to close the dialog box.
How ClassWizard Implements Dialog Data Exchange and Validation
To see the code that ClassWizard has added to implement the DDX/DDV architecture, open the ConnectDialog.h file and inspect the class declaration. You will see that ClassWizard has added the following member variables:
//{{AFX_DATA(CConnectDialog) enum {IDD = IDD_CONNECTDIALOG}; CString m_strUserID; CString m_strPassword; BOOL m_bConnect; int m_nAccess; //}}AFX_DATA |
Like all code maintained by ClassWizard, these declarations are enclosed within a special //{{AFX_ comment block.
Locate the class constructor in the ConnectDialog.cpp file, which contains the following ClassWizard code to provide default initialization for the variables:
//{{AFX_DATA_INIT(CConnectDialog) m_strUserID = _T(""); m_strPassword = _T(""); m_bConnect = FALSE; m_nAccess = 0; //}}AFX_DATA_INIT |
The function that actually does the work of passing data between the dialog box controls and the application is CWnd::DoDataExchange(). An overloaded version of this function is automatically provided for you when you use ClassWizard to derive a class from CDialog. ClassWizard updates the overloaded DoDataExchange() function by adding DDX and DDV functions.
Your CConnectDialog::DoDataExchange() function can be found in the ConnectDialog.cpp file, and at present it should look as follows:
void CConnectDialog::DoDataExchange(CDataExchange* pDX) { CDialog::DoDataExchange(pDX); //{{AFX_DATA_MAP(CConnectDialog) DDX_Text(pDX, IDC_USERID, m_strUserID); DDV_MaxChars(pDX, m_strUserID, 15); DDX_Text(pDX, IDC_PASSWORD, m_strPassword); DDV_MaxChars(pDX, m_strPassword, 15); DDX_Check(pDX, IDC_CHECKCONNECT, m_bConnect); DDX_Text(pDX, IDC_ACCESS, m_nAccess); DDV_MinMaxInt(pDX, m_nAccess, 1, 5); //}}AFX_DATA_MAP } |
The pDX parameter that is passed to the DDX and DDV functions is an object of the MFC class CDataExchange, which represents the context of the current data exchange. The CDataExchange class contains a member variable m_bSaveAndValidate, which indicates the direction of the data exchange. If m_bSaveAndValidate is TRUE, then data is being passed from the controls to be validated and stored in the dialog class member variables. If m_bSaveAndValidate is FALSE, data is being passed to the onscreen dialog box to initialize the controls.
Dialog Data Exchange and Validation Process
The DoDataExchange() function is called by the CWnd::UpdateData() function. UpdateData() creates the CDataExchange object that DoDataExchange() receives as a parameter and passes to the DDX/DDV functions.
The UpdateData() function takes a single BOOL parameter that indicates the direction of the data exchange. The CDialog::OnInitDialog() function, which is called when a dialog box is created, calls the UpdateData() function with a FALSE parameter to initialize the controls in the dialog box with the values held in the dialog class member variables. When a user clicks OK in a dialog box, the default CDialog::OnOK() handler calls the UpdateData() function with a TRUE parameter to perform any data validation and to save the values in the controls to the dialog class. The process is illustrated in Figure 5.1.
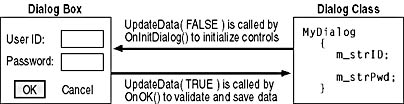
Figure 5.1 Dialog data exchange and validation
Your code might call CWnd::UpdateData() at any time to perform data exchange and validation. For example, suppose you have an image viewing application that allows the user to alter the image resolution and color depth with controls in a modeless dialog box. The updated image is displayed as soon as the user changes the values in the controls. In such a case, you might call UpdateData() every time the settings are changed so that they would be saved by the dialog class, and thus made accessible to the application drawing functions.
- Return to the MyApp project.
- On the ClassView tab, expand the CMyAppApp class icon.
- Double-click the OnDataConnect() icon to edit the function.
- Between the declaration of the CConnectDialog object and the call to the DoModal() function, add the following lines of code:
- Build and run the MyApp application. On the Data menu, click Connect. Confirm that the values you assigned to the member variables of the dialog object are displayed in the dialog box controls.
aCD.m_nAccess = 1; aCD.m_bConnect = TRUE; |
The complete function should now look as follows:
void CMyAppApp::OnDataConnect() { CConnectDialog aCD; aCD.m_nAccess = 1; aCD.m_bConnect = TRUE; aCD.DoModal(); } |
- Return to the OnDataConnect() function.
- Remove the following line:
- In its place, add the following code:
- Build and run the MyApp application and test the Connect command on the Data menu to ensure that the User ID value that you entered is displayed in the message box.
aCD.DoModal(); |
if(aCD.DoModal() == IDOK) { CString strMessage; strMessage.Format("User %s logged in", aCD.m_strUserID); AfxMessageBox(strMessage); } |
An IDOK return value from the DoModal() function signifies that the user has clicked the OK button to close the dialog box and that the data entered into the controls has passed the associated validation functions. The data entered by the user is stored in the dialog class's DDX member variables—in our case, the value entered into the User ID edit control is now contained in the CConnectDialog::m_strUserID variable.
Custom Dialog Data Exchange and Validation
You can define your own DDX and DDV functions. DDX functions take the pointer to a CDataExchange object, the ID of the dialog box control, and the dialog class member variable as parameters. DDV functions also take the pointer to a CDataExchange object and the dialog class member variable. They might also specify extra parameters to set the validation constraints, just as DDV_MinMaxInt() takes parameters to specify the minimum and maximum values. DDV functions must always be placed directly after the DDX functions to which they refer. For more information on creating custom DDX/DDV functions, refer to the Technical Note "TN026: DDX and DDV Functions" in the Visual C++ Help file.
You might also need to add your own DDV functions if you want to set validation parameters by using variable, rather than constant, values; or if you want to perform conditional validation. As an example, consider the following code. It applies a different validation function according to whether or not the IDC_FEMALE check box control is selected. The maximum age for females and males is passed as a variable.
//{{AFX_DATA_MAP(CMyClass) DDX_Check(pDX, IDC_FEMALE, m_bFemale); DDX_Text(pDX, IDC_EDIT1, m_age); //}}AFX_DATA_MAP if (m_bFemale) DDV_MinMax(pDX, m_age, 0, m_maxFemaleAge); else DDV_MinMax(pDX, m_age, 0, m_maxMaleAge); |
This code sample also illustrates the important point that all custom DDX/DDV functions must be placed outside the //{{AFX_ comment block that delimits code maintained by ClassWizard.
In the following exercise, you will add a custom validation function that will require the user to enter a value for the UserID field.
- Add the following global function declaration to the ConnectDialog.h file, outside the CConnectDialog class defintion:
- Add the DDV_Required() function definition as follows to the bottom of the ConnectDialog.cpp file:
- Locate the CConnectDialog::DoDataExchange() function implementation in the ConnectDialog.cpp file. Select the following two lines:
- Press CTRL+X to remove these two lines from their current position in the //{{AFX_DATA_MAP comment block and place them on the Clipboard.
- Use CTRL+V to paste the two lines to a new location beneath the //{{AFX_DATA_MAP comment block, but still inside the DoDataExchange() function.
- Immediately following these two lines, add the following line to call your new DDV_Required() function:
- Build and run the MyApp application and test the Connect command on the Data menu. See what happens if you try to click the Connect button without entering a User ID.
void PASCAL DDV_Required(CDataExchange * pDX, CString str); |
void PASCAL DDV_Required(CDataExchange * pDX, CString str) { if(pDX->m_bSaveAndValidate && str.IsEmpty()) { AfxMessageBox("Please enter the User ID."); pDX->Fail(); } } |
Note how the CDataExchange::m_bSaveAndValidate member variable is queried to affirm that data validation is taking place. Note, too, how the function CDataExchange::Fail() is used to abandon the validation process and restore the focus to the control that has failed the validation.
DDX_Text(pDX, IDC_USERID, m_strUserID); DDV_MaxChars(pDX, m_strUserID, 15); |
DDV_Required(pDX, m_strUserID); |
Your DoDataExchange() function should now look as follows:
void CConnectDialog::DoDataExchange(CDataExchange* pDX) { CDialog::DoDataExchange(pDX); //{{AFX_DATA_MAP(CConnectDialog) DDX_Text(pDX, IDC_PASSWORD, m_strPassword); DDV_MaxChars(pDX, m_strPassword, 15); DDX_Check(pDX, IDC_CHECKCONNECT, m_bConnect); DDX_Text(pDX, IDC_ACCESS, m_nAccess); DDV_MinMaxInt(pDX, m_nAccess, 1, 5); //}}AFX_DATA_MAP DDX_Text(pDX, IDC_USERID, m_strUserID); DDV_MaxChars(pDX, m_strUserID, 15); DDV_Required(pDX, m_strUserID); } |
Using OnInitDialog() to Initialize Controls
Certain types of controls require more than the standard initialization provided by the MFC-supplied DDX functions, or more than can be easily achieved by writing a custom DDX function. An example is the Connect to Data Source dialog box in the MyApp application, which displays a list of available data sources in a list box control. The data that the list box displays can vary as data sources are added or removed from the system. MFC provides the functions DDX_LBIndex and DDX_LBString so that you can set the initial selection and retrieve the user selection, but you cannot use these functions to set up the list box items.
The usual way to set up list box items is to provide an overloaded version of the CDialog::OnInitDialog() virtual function for your class. OnInitDialog() is the function that calls CWnd::UpdateData() (and ultimately the DDX/DDV functions) when your dialog class is initialized. OnInitDialog() is the appropriate place to perform custom initialization of dialog box controls because it is called after the control windows have been created but before they are displayed.
MFC provides classes to correspond to each of the Windows common controls. Using ClassWizard, you can create objects of these control classes as data members of your dialog class. These objects are associated with the controls in your dialog box by means of a DDX_Control() function placed in the DoDataExchange() function. You can use these control objects to initialize or update the dialog box controls.
The following exercises show you how to add an object of the MFC class CListBox to your dialog class that corresponds to the Data Source list box, and how to use the member object to initialize the list and set the initial selection.
- Press CTRL+W to open ClassWizard. Click the Member Variables tab.
- In the Class name box, click CConnectDialog.
- In the Control IDs box, click IDC_DSNLIST.
- Click Add Variable. The Add Member Variable dialog box appears.
- In the Member variable name box, type m_lbDSN.
- In the Category box, click Control.
- Click OK to add the variable. The variable name and type will appear selected in the Control IDs box next to IDC_DSNLIST.
- Click OK to close ClassWizard.
- Press CTRL+W to open ClassWizard. Click the Message Maps tab.
- In the Class name box, click CConnectDialog.
- With the CConnectDialog class name selected in the Object IDs box, click WM_INITDIALOG in the Messages box.
- Click the Add Function button.
- Click the Edit Code button. Notice that ClassWizard will include a call to the base class where it is necessary. CDialog::OnInitDialog() is called so that CWnd::UpdateData() will be called to initialize the controls. Replace the // TODO comment in the function implementation with the following code:
m_lbDSN.AddString("Accounts"); m_lbDSN.AddString("Admin"); m_lbDSN.AddString("Management"); |
Note how the m_lbDSN variable that you added is used to set up the members of the list box.
You can also use your CListBox member object to retrieve the choice made by the user. You can use the CListBox::GetCurSel() function to get the zero-based index that indicates the user's selection. You can then pass the index to the CListBox::GetText() function to retrieve the item text. In the following exercise, you will retrieve the data source name that the user selects and save it to the CMyAppApp::m_strDSN variable. This variable is used to store the name of the data source displayed on the status bar. The best place to implement this code is in a handler for the OK button for your dialog class because users click the OK button to indicate that they want to commit their selections. You must be sure to call the default CDialog::OnOK() handler as it is this function that calls the CWnd::UpdateData() function.
- Press CTRL+W to open ClassWizard. Click the Message Maps tab.
- In the Class name box, click CConnectDialog.
- In the Object IDs box, click IDOK. In the Messages box, click BN_CLICKED.
- Click the Add Function button. Accept OnOK as the name for the function.
- Click the Edit Code button. Replace the // TODO comment in the function implementation with the following code:
CMyAppApp * pApp = dynamic_cast<CMyAppApp *>(AfxGetApp()); ASSERT_VALID(pApp); int nChoice = m_lbDSN.GetCurSel(); if(nChoice != LB_ERR) { m_lbDSN.GetText(nChoice, pApp->m_strDSN); pApp->m_isDatabaseConnected = TRUE; } |
You can now build and run the MyApp application. Test your dialog box to ensure that the list box choices appear correctly. Select a data source name and click OK. The data source name that you choose should appear in the status bar pane.
Handling a Control Message
The OnOK() function that you have just implemented is an example of a control notification message handler. Recall from Lesson 3 of Chapter 3 that control notification messages are sent by controls and other child windows to notify the parent window of an interaction between the user and the control. The OnOK() function handles the BN_CLICKED message that is sent to the dialog box window (as a parameter to a WM_COMMAND message) when the user clicks the OK button once.
Different sets of notification messages are associated with the different types of controls. The Message Maps tab of ClassWizard provides a convenient quick-reference for the notification messages associated with any control that is placed in your dialog box. If you select your dialog class in the Class Name box and click on the control ID in the Object IDs box, the set of notification messages that can be generated by the control will appear in the Messages box. Selecting one of these message IDs will cause a brief explanation of the message to appear in the Description field at the bottom of the property page.
Figure 5.2 shows the Message Maps tab of the MFC ClassWizard dialog box and the list of control notification messages that it supports for an edit control (in this case, IDC_USERID).
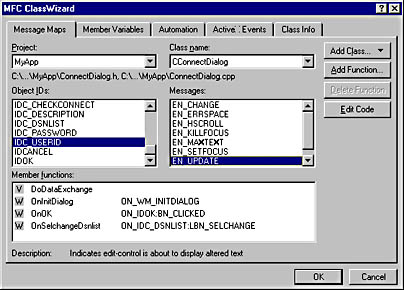
Figure 5.2 Using ClassWizard to handle control notification messages
For more detailed documentation about control notification messages, you can search for the message IDs in the Visual C++ Help index. Control notification message IDs are prefixed by an abbreviation of the control type followed by N_, as illustrated in Table 5.1.
Table 5.1 Control Notification Message ID Prefixes
| Notification message ID prefix | Control type |
|---|---|
| BN_ | Button |
| CBN_ | Combo box |
| CLBN_ | Check list box |
| EN_ | Edit control |
| LBN_ | List box |
| STN_ | Static text control |
ClassWizard will insert entry macros into the message map to handle notification messages from each of these control types. These macros are constructed by prefixing the message ID with ON_. For example, if you use ClassWizard to create a handler for the EN_UPDATE notification message from the IDC_USERID edit control (as illustrated by Figure 5.2), ClassWizard will insert a message map entry similar to the following:
ON_EN_UPDATE(IDC_USERID, OnUpdateUserid) |
NOTE
BN_CLICKED notification messages for the IDOK and IDCANCEL buttons will be mapped directly to overridden versions of the CDialog::OnOK() and CDialog::OnCancel() virtual functions. Message map entry macros are not used unless you specify the name of a different function to handle the messages. In most cases, you should use the OnOK and OnCancel functions.
MFC provides the generic ON_CONTROL and ON_NOTIFY macros to allow for the handling of custom messages. ClassWizard uses the ON_NOTIFY macro for notifications from the newer common controls that became available with Windows NT and Windows 95/98.
In the following exercise, you will add a handler function for the notification message that is sent when the user changes the selection in the Data Source box. You will use the handler function to display Help text for the current selection in the read-only edit control beneath the list box. First, you will need to create a CEdit variable to represent the edit control in your code.
- Press CTRL+W to open ClassWizard. Click the Member Variables tab.
- In the Class name box, click CConnectDialog.
- In the Control IDs box, click IDC_DESCRIPTION. Click Add Variable.
- In the Member variable name box, type m_editDesc.
- In the Category box, click Control. Click OK to add the variable.
- Click OK to close ClassWizard.
- Press CTRL+W to open ClassWizard. Click the Message Maps tab.
- In the Object IDs box, click IDC_DSNLIST. In the Messages box, click LBN_SELCHANGE.
- Click Add Function. Accept OnSelchangeDsnlist as the name for the function.
- Click Edit Code. Replace the // TODO comment in the function implementation with the following code:
- Build and run the MyApp application. Test the Connect to Data Source dialog box to ensure that the description text changes as you select different items in the Data Source box.
int nCursel = m_lbDSN.GetCurSel(); switch(nCursel) { case 0 : m_editDesc.SetWindowText("Accounting Data"); break; case 1 : m_editDesc.SetWindowText("Administration Data"); break; case 2 : m_editDesc.SetWindowText("Management Data"); break; } |
Note the use of the CWnd::SetWindowText() function to set the text in the edit control.
Enabling and Disabling Controls
In our discussion of user interface design in Lesson 1 of Chapter 4, we stated that menu and toolbar commands that were not able to perform their function should not be available for selection. The same applies to dialog box controls.
The Connect to Data Source dialog box currently allows the user to attempt to connect to a data source even if no data source is currently selected and no logon ID has been supplied. Rather than use validation functions to handle this situation, it would be better to ensure that the Connect button is not available until sufficient information has been provided. The following exercise shows you how to use the CWnd::EnableWindow() function to make a control available or unavailable, and how control notification handler functions can be used to update the status of a control as the dialog box data is amended by the user.
- On the Member Variables tab of ClassWizard, click the IDOK control ID for the CConnectDialog class. Add a CButton member variable called m_bnConnect.
- On the Member Variables tab of ClassWizard, click the IDC_USERID control ID for the CConnectDialog class. Add a CEdit control member variable called m_editUserID. Click OK to close ClassWizard.
- To the bottom of the CConnectDialog::OnSelchangeDsnlist() function, just before the final closing brace, add the following lines of code to make the Connect button available when a data source is selected and a User ID value has been supplied. (CWnd::GetWindowText() returns the number of characters copied.)
- On the Message Maps tab of ClassWizard, select the IDC_USERID control ID for the CConnectDialog class. Select the EN_UPDATE message and add the OnUpdateUserid() control notification function. Click Edit Code to edit the function implementation.
- Add the following lines of code to the OnUpdateUserid() function:
- To the bottom of the CConnectDialog::OnInitDialog() function, just before the return statement, add the following line of code to ensure that the Connect button appears correctly when the dialog box is first displayed:
- As the validation function for this field is no longer necessary, remove the DDV_Required() function from the ConnectDialog.cpp file, along with its declaration in the ConnectDialog.h file. Remove the call to DDV_Required() from the CConnectDialog::DoDataExchange() function in the ConnectDialog.cpp file. Move the following lines back within the scope of the //{{AFX_DATA_MAP comment block to make them maintainable by ClassWizard (making sure that they are kept together):
- Build and run the MyApp application. Test the Connect to Data Source dialog box to ensure that the Connect button is available only when a data source is selected and an entry is in the UserID edit field.
char tempbuf[8]; if(m_editUserID.GetWindowText(tempbuf, 7)) m_bnConnect.EnableWindow(TRUE); |
char tempbuf[8]; if(m_lbDSN.GetCurSel() != LB_ERR) { if(m_editUserID.GetWindowText(tempbuf, 7)) m_bnConnect.EnableWindow(TRUE); else m_bnConnect.EnableWindow(FALSE); } |
OnUpdateUserid(); |
DDX_Text(pDX, IDC_USERID, m_strUserID); DDV_MaxChars(pDX, m_strUserID, 15); |
Using a Dialog Box to Edit Application Data
In this practice exercise, you will add some member variables to the MyApp application's document class. Remember that in an MFC application, the document class is the proper container for the application data. You will create a dialog box where you can edit the values of the application data variables. You should complete this practice before you proceed, as it lays the foundation for examples and practices in this and subsequent chapters.
- Open the MyApp project. In ClassView, right-click the CMyAppDoc class and click Add Member Variable. Add a public int variable named m_nLines.
- Double-click the CMyAppDoc constructor to edit the code.
- Initialize the m_nLines variable with a value of 20. Assign a string of 60 characters to the m_string variable so that the constructor looks something like this:
- Using the menu editor, add a new command to the top of the Data menu. This command should have the caption &Edit and the prompt string should be "Edit document data." Accept the ID_DATA_EDIT ID that is created by default.
- Use the dialog editor to create a new dialog template with a resource ID of IDD_EDITDATA. The dialog box should be titled Edit Document Data and contain two static text items with the captions Line text: and Number of lines:, which correspond to the edit controls IDC_EDIT_LINETEXT and IDC_EDIT_NUMLINES. The controls should be arranged as illustrated in Figure 5.3. For the IDC_EDIT_NUMLINES control, select the Number checkbox on the Styles property page.
- Use ClassWizard to create a dialog class for the IDD_EDITDATA dialog box. The class should be called CEditDataDialog, and be derived from the CDialog class. Add two value member variables to correspond to the edit controls: a CString variable named m_strLineText and a UINT variable named m_nLines.
- Add the following line of code to the top of the MyAppDoc.cpp file with the rest of the #include statements:
- Use ClassWizard to add a handler function OnDataEdit() for the ID_DATA_EDIT object ID. The function should handle the COMMAND message and be added to the CMyAppDoc class.
- Add the following code to the body of the OnDataEdit() function:
- Build and run the MyApp application. Click Edit on the Data menu to check that the Edit Document Data dialog box appears correctly.
CMyAppDoc::CMyAppDoc() { m_nLines = 20; m_string = "This is a very long string designed to take up lots of space"; } |
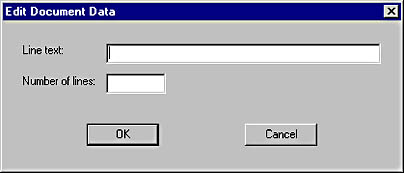
Figure 5.3 The Edit Document Data dialog box
#include "EditDataDialog.h" |
CEditDataDialog aDlg; aDlg.m_nLines = m_nLines; aDlg.m_strLineText = m_string; if(aDlg.DoModal()) { m_nLines = aDlg.m_nLines; m_string = aDlg.m_strLineText; UpdateAllViews(NULL); } |
Implementing Property Sheets
In Chapter 4, you learned that a property sheet is a special kind of dialog box that is generally used to modify the attributes of an object, such as the application or the current selection in a view. The property sheet has three main parts: the containing dialog box, one or more property pages shown one at a time, and a tab at the top of each page that the user clicks to select a page. Property sheets are useful for situations in which you have a number of similar groups of settings or options to change. A property sheet allows a large amount of information to be grouped in an easily understood fashion. A good example of a property sheet is the Project Settings dialog box in the Visual C++ development environment.
MFC implements property sheets through two classes: the CPropertySheet class, which represents the containing dialog box; and the CPropertyPage class, which represents the individual pages of the property sheet. The procedure to create a property sheet using these classes is as follows:
- Create a dialog template resource for each property page. These need not be all the same size, but try as much as possible to maintain a consistent layout for each page to make the property sheet intuitive and easy to use. Dialog template resources for property pages should be created with a Thin style border and should have the Child and Disabled properties set. The caption that you enter will appear on the page tab.
- Use ClassWizard to create a class derived from CPropertyPage corresponding to each property page dialog template.
- Use ClassWizard to create member variables to hold the values for this property page and set up DDX and DDV functions.
- Create a CPropertySheet object in your source code. Usually, you construct the CPropertySheet object in the handler for the command that displays the property sheet. Create one object of each of your property page classes.
- For each page to be added to the property sheet, call the function CPropertySheet::AddPage() and pass the address of each property page as a parameter.
- Create a modal property sheet with the CDialog::DoModal() function, or a modeless property sheet with the CDialog::Create() function.
For modal property sheets, the framework supplies OK, Cancel, and Apply buttons by default, and handles DDX and DDV for the controls on each of the property pages. For a modal property sheet, it is generally sufficient to create a temporary object on the stack, add the CPropertyPage objects, and call DoModal(). If you need to add additional controls to the property sheet, you will need to use ClassWizard to create your own class derived from CPropertySheet. This step is necessary for modeless property sheets because the Create() function does not add any default controls that could be used to close the property sheet.
For more information on this topic, search for the title "Adding Controls to a Property Sheet" in Visual C++ Help. Be sure to select the Search titles only check box at the bottom of the Search tab so that only the topic with the desired title is returned.
In the following exercises, you will create the MyApp Settings property sheet for the MyApp application. This property sheet, illustrated in Figure 5.4, has two pages. The pages will contain mock controls—you will not work with their data in this exercise.
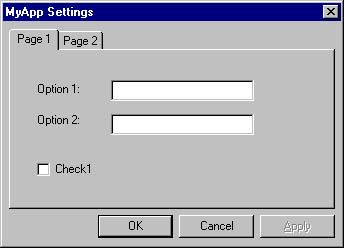
Figure 5.4 The MyApp Settings property sheet
- In the MyApp project, click ResourceView and expand the MyApp resources folder.
- Right-click the Dialog folder. Click Insert Dialog.
- A new blank dialog box appears. Remove the OK and Cancel buttons by selecting them and pressing DELETE.
- Press ENTER to edit the Dialog Properties. In the ID box, type IDD_PPAGE1. In the Caption edit box, type Page 1.
- Click the Styles tab. In the Style box, click Child.
- In the Border box, click Thin.
- Ensure that the Title bar check box is selected.
- Click the More Styles tab. Select the Disabled check box.
- Add a few controls to the page—you can use Figure 5.4 as a guide. Include at least one edit control and give it the ID IDC_EDIT_PP1.
- With the IDD_PPAGE1 dialog box open in the dialog editor, press CTRL+W to open ClassWizard.
- Click OK to open the New Class dialog box.
- In the Name edit box, type CPage1.
- In the Base Class box, click CPropertyPage.
- Click OK to create the CPage1 dialog class.
- Click OK to close ClassWizard. Close the dialog editor.
Create a second property page template. To visually distinguish this template from the first, change its size and add different controls. Give this template an ID of IDD_PPAGE2 and the caption Page 2. Make sure that it has the same style settings as the first page. From this template, create the CPage2 class, derived from CPropertyPage.
You will now set up the property sheet to contain the two property pages that you have created. The property sheet will be displayed by means of a new Settings command on the View menu.
- Using the menu editor, create a new command under the View menu title. Type Setti&ngs as a caption and Application settings as a prompt. Allow the editor to create the ID ID_VIEW_SETTINGS. Close the menu editor.
- Open ClassWizard. To the CMainFrame class, add a command handler named OnViewSettings() for the ID_VIEW_SETTINGS ID.
- Add the following code to the body of the OnViewSettings() function:
- Add the following code to the top of the CMainFrame.cpp file:
- Build and run the MyApp application. Click Settings on the View menu to test the property sheet. Note how the pages are sized to fit the property sheet, and how the captions are used as tab labels. Note, too, how the framework automatically adds an Apply button.
CPropertySheet PropSheet; CPage1 pp1; CPage2 pp2; PropSheet.AddPage(&pp1); PropSheet.AddPage(&pp2); PropSheet.SetTitle("MyApp Settings"); PropSheet.DoModal(); |
#include "Page1.h" #include "Page2.h" |
Handling the Apply Button on a Property Page
The OK button closes the property sheet and exchange and validate data from all the controls on all of the property pages. The Apply button, on the other hand, allows users to exchange and validate the changes that they have made without closing the property sheet. This is useful if users want to save the settings made on one page before proceeding to another.
The Apply button appears unavailable by default. To make the Apply button become available after the user has entered data or changed the state of one of the controls, use a call to CPropertyPage::SetModified(TRUE). Clicking the Apply button will call the CPropertyPage::OnApply() handler function to perform data exchange and validation without closing the property sheet.
If you decide not to use the Apply button on your property pages, you do not have to remove it. Microsoft's design guidelines state that you can leave it available.
The following exercise shows you how to make the Apply button available when the user enters data in an edit control.
- Open ClassWizard and click the Message Maps tab. Click CPage1.
- In the Object IDs box, click IDC_EDIT_PP1. In the Messages box, click EN_UPDATE.
- Click Add Function. Accept OnUpdateEditPp1 as the name for the function.
- Click Edit Code. Replace the // TODO comment in the function implementation with the following line of code:
- Build and run the MyApp application. Type some characters into the edit control that corresponds to the IDC_EDIT_PPI resource. Check that the Apply button is available as you type. Click the Apply button and note how it is automatically made unavailable.
SetModified(TRUE); |
Lesson Summary
You use DDX to set the initial values displayed by the controls in your application's dialog boxes, and to retrieve the data that the user enters into the controls so that you can use it in your application code. DDV allows you to validate the data input by the user before it is passed to the application. The implementation of DDX and DDV is largely automated by the use of ClassWizard.
Standard DDX functionality is added by using ClassWizard to create a member variable in your dialog class that corresponds to the data entered into the dialog box control. Simple DDV functionality can be added by using ClassWizard to specify simple validation criteria as you create the variable. As you add variables and validation rules, ClassWizard will add calls to predefined MFC global functions to the overloaded DoDataExchange() function to perform the tasks of data validation and exchange.
The DoDataExchange() function is called by the CWnd::UpdateData() function. UpdateData() is called by CDialog::OnInitDialog() to initialize the controls, and by CDialog::OnOK() to retrieve data from the controls and perform validation.
You can extend the DDX/DDV functionality by writing your own custom functions. Custom DDX and DDV functions should be placed outside of the blocks of code that are maintained by ClassWizard. All DDX and DDV functions take a parameter to a CDataExchange object, which represents the context of the current data exchange. The CDataExchange class includes a member variable m_bSaveAndValidate, which indicates the direction of the data exchange; and the Fail() function, which is used to abandon the validation process and restore the focus to the control that has failed the validation.
Control initialization that cannot easily be achieved by a DDX function can be performed by overloading the CDialog::OnInitDialog() function in the dialog class. Retrieval of dialog data can also be achieved through an overload of the CDialog::OnOK() function.
MFC provides classes to correspond to each of the Windows common controls. Using ClassWizard, you can create objects of these control classes as data members of your dialog class. These objects are associated with the controls in your dialog box by means of a DDX_Control() function placed in the DoDataExchange() function. You can use these control objects to initialize or update the dialog box controls.
You can use ClassWizard to create functions to handle notification messages that are sent by controls to their parent window (the dialog box). These control notification message handlers are usually implemented as members of the dialog class. A common use of these handler functions is to make controls available or unavailable while the user is interacting with the dialog box.
Property sheets are multi-tabbed dialog boxes that allow information to be grouped in an easily understood fashion. MFC implements property sheets through two classes. The CPropertySheet class represents the containing dialog box, and the CPropertyPage class represents the individual pages of the property sheet. To implement a property sheet, for each page, or tab, you first create a dialog template, and then you create a dialog class derived from CPropertyPage. Create a CPropertySheet object in your source code and add each property page object with a call to CPropertySheet::AddPage(). Usually you create your CPropertySheet object on the stack, in the handler for the command that displays the property sheet.
By default, the framework creates a property sheet with an Apply button that is initially unavailable. The Apply button allows users to exchange and validate the changes that they have made without closing the property sheet. If you choose to implement the Apply button for your application, you should make it become available as soon as the user alters any data in the dialog box controls. You can make the Apply button available with a call to CPropertyPage::SetModified(TRUE).
EAN: 2147483647
Pages: 95