Creating a Diagram
Microsoft Office Specialist To present hierarchical data or other types of information, you can create and insert diagrams in a document. A diagram is a relational representation of information. One common type of diagram is an organization chart. For example, The Garden Company might create an organization chart if it wanted to show the company’s personnel structure.
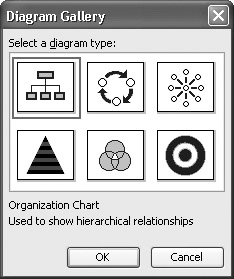
| Tip | In addition to organization charts, you can create cycle diagrams, radial diagrams, pyramid diagrams, Venn diagrams, and target diagrams. |
When you insert an organization chart into a document, the chart has placeholder text that you replace with your own. The boxes and the lines of the organization chart are objects that you can move and change.
In this exercise, you will insert and modify an organization chart.
| BE SURE TO | start Word before beginning this exercise. |
| USE | the OrgChart document in the practice file folder for this topic. This practice file is located in theMy Documents\Microsoft Press\Word 2003 SBS\WorkingGraphic\CreatingDiag folder and can also be accessed by clicking Start/All Programs/Microsoft Press/Word 2003 Step by Step. |
| OPEN | the OrgChart document. |
-
Press [CONTROL]+[END] to move to the end of the document.
-
On the View menu, point to Toolbars, and then click Drawing.

Insert Diagram or Organization Chart
-
On the Drawing toolbar, click the Insert Diagram or Organization Chart button.
The Diagram Gallery dialog box appears, with the Organization Chart option selected by default.
-
Click OK.
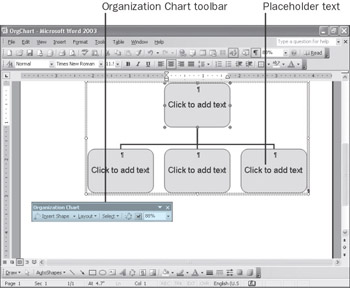
An organization chart is inserted into the document at the insertion point, and the Organization Chart toolbar appears.
-
In the organization chart, click the top box, and type Karen Berg.
-
Click the first box in the second row, type Kim Akers, click the second box, type David Ortiz, click the third box, and then type Gordon Hee.
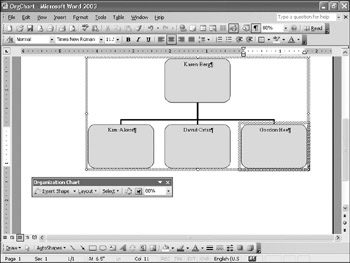
All the boxes now contain names, and the last box is still selected.

Select
-
On the Organization Chart toolbar, click the down arrow to the right of the Select button, and click All Connecting Lines in the drop-down list.
All connecting lines in the organization chart are selected.
-
On the Format menu, click AutoShape.
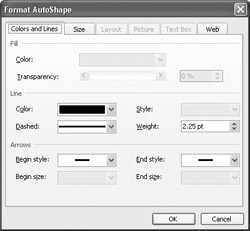
The Format AutoShape dialog box appears.
-
In the Line area, click the down arrow to the right of the Color box, and in the first column of the third row of the color palette, click the Red box.
-
In the Arrows area, click the down arrow to the right of the Begin style box, click the second item in the first row, and then click OK.
The lines in the organization chart are now red with arrows attached.
Autoformat
Tip You can quickly format an organization chart using a predefined style by clicking the Autoformat button on the Organization Chart toolbar.
-
Click the blank area to the right of the organization chart to deselect it.

Save
-
On the Standard toolbar, click the Save button to save the document.
CLOSE the OrgChart document.
EAN: 2147483647
Pages: 156