Changing Settings for All Documents
Microsoft Office Specialist You can change several Word settings to make it faster or easier to do your job. A couple of these settings are relatively easy to change and can save you several keystrokes each time you create a new file.
An organization might want to have one location where all its business templates are stored to make it easy to quickly locate them. You can change the default locations where Word looks for templates so that you don’t have to go searching every time you want to use one as the basis for a new document. You can also change the default locations of other types of files.
If you open a new blank document without basing it on a specific template, Word applies the Normal template to the document and assigns the Normal style to all regular paragraphs. This style produces text in 12-point regular Times New Roman, with left alignment and single line spacing. You might prefer to create most of your documents in a different font or font size, and instead of manually adjusting the font or size in every document you create, you can simply set the font and font size in the Normal template to the setting you prefer.
In this exercise, you’ll change the default location for templates and modify default font settings.
USE the SettingsDoc document in the practice file folder for this topic. This practice file is located in the My Documents\Microsoft Press\Word 2003 SBS\IncreasingEfficiency\ChangingSetting folder and can also be accessed by clicking Start/All Programs/Microsoft Press/Word 2003 Step by Step.
| OPEN | the SettingsDoc document. |
-
On the Tools menu, click Options.
The Options dialog box appears.
-
Click the File Locations tab.
-
In the File types list, click User templates, and then click Modify.
The Modify Location dialog box appears.
Important Before you modify any default setting, it is a good idea to make a note of the original setting in case you want to restore it later. So that you will remember the original location for templates, click the down arrow to the right of the “Look in” box, and write down the current location (probably C:\Documents and Settings\(your name)\Application Data\Microsoft\Templates) before you specify a new location.
-
Click the down arrow to the right of the Look in box, and then click the folder just above the current folder in the list.
If you haven’t changed the default location before, you will click the Microsoft folder above the Templates folder.
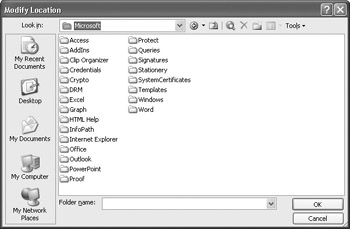
-
Click Cancel to close the Modify Location dialog box without actually changing the default template location, and then click Close to close the Options dialog box.
-
On the Format menu, click Font.
The Font dialog box appears, showing that the current font is Times New Roman, the font style is Regular, the font size is 12, and the font color is Automatic (meaning whatever is specified for the active style in the current template.)
Troubleshooting If you’ve inadvertently clicked somewhere in the document since beginning this exercise, the current font might be Arial, not Times New Roman. Ignore this and go on to step 7.
-
Change the Font to Verdana, the Size to 11, and the Font color to Dark Green.
A sample of the font settings you have selected appears in the Preview box.
-
In the lower-left corner of the dialog box, click Default.
A message box asks you to confirm that you want to change the default font for new documents to the settings currently in the Font dialog box.
-
Click Yes.
Both the message box and the Font dialog box close, and the text of the open document changes to reflect the new default font.

Save
-
On the Standard toolbar, click the Save button.
BE SURE TO restore your previous default font settings (Times New Roman font, Regular style, size 12, and Automatic color) if you don’t want the new settings to apply to your work in Word from now on.
CLOSE the SettingsDoc document.
Add a Custom Dictionary
Microsoft Office Specialist If you work in an industry that uses terms not included in standard dictionaries, such as medicine or law, you can add a specialized dictionary to the supplemental dictionaries Word uses. That way, your industry terms will not be flagged as misspellings. (Supplemental dictionary files should have the file name extension .dic.) If you use this dictionary more than any other, you can make this dictionary the default supplemental dictionary.
To add a custom dictionary and make it the default supplemental dictionary:
-
On the Tools menu, click Options, and click the Spelling & Grammar tab.
-
Click Custom Dictionaries, and then in the Custom Dictionaries dialog box, click Add.
-
Navigate to the folder that contains the dictionary you want to use, and double-click the dictionary’s file name.
Word adds the dictionary to the Dictionary list box
-
If the check box to the left of the dictionary’s name is not checked, select the check box.
-
If you want this dictionary to be the default supplemental dictionary, click the Change Default button.
-
Click OK to close the Custom Dictionaries dialog box.
-
In the Spelling area of the Spelling & Grammar tab of the Options dialog box, make sure that the Suggest from main dictionary only check box is cleared, and then click OK.
EAN: 2147483647
Pages: 156
- Challenging the Unpredictable: Changeable Order Management Systems
- Enterprise Application Integration: New Solutions for a Solved Problem or a Challenging Research Field?
- The Effects of an Enterprise Resource Planning System (ERP) Implementation on Job Characteristics – A Study using the Hackman and Oldham Job Characteristics Model
- Context Management of ERP Processes in Virtual Communities
- Intrinsic and Contextual Data Quality: The Effect of Media and Personal Involvement
- Chapter V Consumer Complaint Behavior in the Online Environment
- Chapter VI Web Site Quality and Usability in E-Commerce
- Chapter VII Objective and Perceived Complexity and Their Impacts on Internet Communication
- Chapter X Converting Browsers to Buyers: Key Considerations in Designing Business-to-Consumer Web Sites
- Chapter XV Customer Trust in Online Commerce