Setting Default Working Times for the Enterprise
Before you can begin adding resources and projects to your Project Server database, you should configure your default calendar, which serves as the basis for task and resource calendars as well. At the very least, you’ll adjust the default calendar to reflect your organization’s standard working hours, hours worked per day, days worked per month, and standard holidays.
To change the default working time, check out the enterprise global and select Tools ![]() Change Working Time. The Change Working Time dialog box displays, as shown in Figure 9-15. The installed default settings provide for an 8-hour day worked from 8:00 a.m. to 12:00 p.m. and then from 1:00 p.m. to 5:00 p.m. An hour is scheduled for lunch between noon and 1:00 p.m. To make a change to time settings that apply globally to all dates, it’s very important that you remember to highlight the calendar days by clicking the column headers. In the figure, the Monday and Tuesday columns are highlighted this way. As you can see, I’ve selected the columns. Make sure that yours are selected too or you’ll end up with unexpected results. These settings drive scheduling.
Change Working Time. The Change Working Time dialog box displays, as shown in Figure 9-15. The installed default settings provide for an 8-hour day worked from 8:00 a.m. to 12:00 p.m. and then from 1:00 p.m. to 5:00 p.m. An hour is scheduled for lunch between noon and 1:00 p.m. To make a change to time settings that apply globally to all dates, it’s very important that you remember to highlight the calendar days by clicking the column headers. In the figure, the Monday and Tuesday columns are highlighted this way. As you can see, I’ve selected the columns. Make sure that yours are selected too or you’ll end up with unexpected results. These settings drive scheduling.
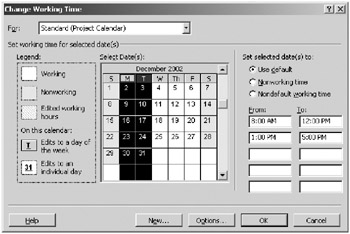
Figure 9-15. The Change Working Time dialog box with the Monday and Tuesday columns selected
Click the Options button in the Change Working Time dialog box to open the Options dialog box, and then select the Calendar tab as shown in Figure 9-16. If you made any changes to the standard calendar, they may be out-of-synch with the Calendar tab. The data on this tab determines how Project calculates duration. Therefore, if your settings on this tab are out-of-synch with the Change Working Time options, you may see confusing durations reported in Project views. This isn’t to say that Project’s handling of durations is not confusing all in itself; however, incongruities in these settings makes it much worse. You can set the options on the Calendar tab by checking out the enterprise global and then selecting Tools ![]() Options
Options ![]() Calendar tab.
Calendar tab.
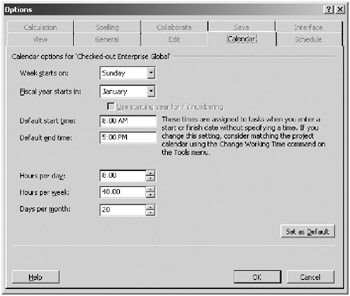
Figure 9-16. Settings on the Options ![]() Calendar tab determine how Project calculates duration.
Calendar tab determine how Project calculates duration.
Project calculates task duration based on the settings in the Options ![]() Calendar tab. Durations displayed in the duration field within a task view are based on these settings and aren’t overridden by resource or task calendars. Changes to the default working time don’t affect duration calculations.
Calendar tab. Durations displayed in the duration field within a task view are based on these settings and aren’t overridden by resource or task calendars. Changes to the default working time don’t affect duration calculations.
While you have the Change Working Time dialog box open, scroll through the coming year and mark each organizational holiday as nonworking time. To do this, find the date of a holiday, click it, and then click the “Nonworking time” radio button to mark the date as nonworking. This action turns the cell gray in the display. You can also create additional base calendars for the enterprise by clicking the New button.
If you’re familiar with Project, then you might be surprised to learn that the only enterprise base calendar available on installation is the standard calendar. If you work offline, the 24-hour and night shift calendars you may be familiar with are available, but not in the enterprise. You can create these types of calendars for the enterprise. The best approach is to configure the standard calendar first and base all your new calendar creation on the standard calendar after you enter the organization’s holidays.
EAN: 2147483647
Pages: 185