Examples
This section shows usage with screen shots of MySQL and Access, each in stand-alone mode. Although you generally will be using the databases through middleware, this material will contribute to your general understanding of databases.
MySQL
Signing on to use MySQL locally requires you to start IIS or its equivalent, and then use the command prompt. Click on the Start button and then the Run option. You will see something resembling the panel shown in Figure 8.1.
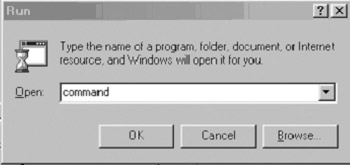
Figure 8.1: Windows Run prompt.
If “command” does not appear in the text box, you can type it in or use the downward arrow to scroll over your past uses of the Run window to find command. Click OK. A window much like Figure 8.2 will appear.
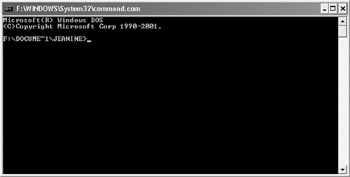
Figure 8.2: Command prompt screen.
This indicates that you are in command mode, in the Desktop folder within the WINDOWS folder. You need to get to the folder for MySQL. For our installation, MySQL is installed in a folder at the topmost level. Therefore, the commands are to back up, so to speak, and then go into the mysql folder. The change directory command is cd. To get into the parent folder of the current folder, you type:
cd ..
Figure 8.3 shows the sequence of commands.
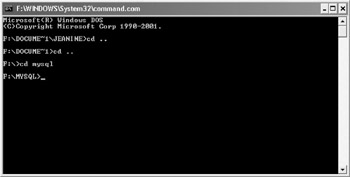
Figure 8.3: Sequence of commands to get to the MySql folder.
You need to make one more change of directory command to get into the bin subfolder, indicated in Figure 8.4.
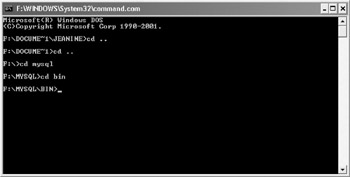
Figure 8.4: Command to reach the bin subfolder.
You now start MySQL by entering mysql as indicated in Figure 8.5.
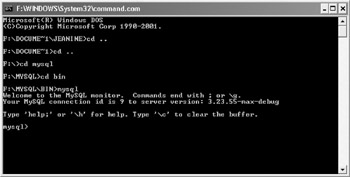
Figure 8.5: Commands to invoke MySQL.
This is the point at which the different options for doing MySQL on the server in different ways or doing it on your own computer all come together.
From now on, all commands are MySQL statements. Most of what will be shown are MySQL versions of the SQL statements described in the previous chapter. You need to put a semicolon to close each statement. Because the semicolon is required, you can spread a statement over several lines.
Your screens will not be exact copies of ours, but you should be able to see a resemblance and understand the pattern. If you type in the command:
show databases;
you will see any databases that you have created (or have been created for you). A typical screen is shown in Figure 8.6.

Figure 8.6: The result of the show databases command.
Notice that there are several databases returned as a table with a heading. This is the format for any recordset returned by SQL statements in MySQL. Notice also that MySQL returns a message indicating the number of rows in the set and the time taken.
To put us now on a similar footing, here is an example of a potentially dangerous command:
drop database test;
It might be appropriate during development if a situation occurs when it makes sense to start over.
The result is shown in Figure 8.7.
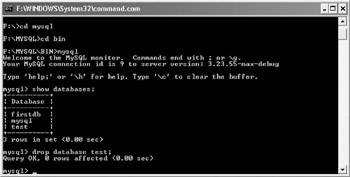
Figure 8.7: The drop database command.
You can use the show command to confirm that the database was dropped. Now let us create a new database, called test by the command:
create database test;
The resulting screen is shown in Figure 8.8.
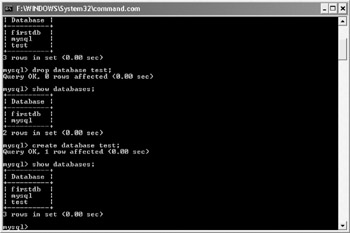
Figure 8.8: The create database test command.
Now at the risk of annoying you, try now to create a table for a product catalog. The fields are to be:
-
Product identifier: Use an integer to be generated by the DBMS.
-
Product name: Use a text field. This field cannot be omitted.
-
Description: Use a text field.
-
Cost: Use a numeric field to hold two decimal places and a number up to 9999.
You need to specify field names and field information. For field names, we suggest concise, but understandable names, all lowercase, using an underscore if you want to use two words. Some DBMSs allow blanks in field names, but then you need to use other symbols to delimit the name—it is easier to avoid that complexity. Some systems store tables as distinct files. If this is true, then you need to worry if the operating system is case-sensitive with respect to filenames. UNIX systems are; Windows systems are not. To avoid potential confusion, use all lowercase.
The field information includes the data type. The terms used for data type differ among DBMS products, but all products support the types indicated for this example.
The screen shot in Figure 8.9 shows an error.
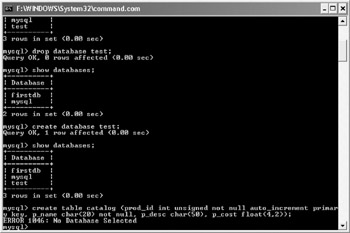
Figure 8.9: A MySQL command with an error.
Even though you would think that MySQL would “know” that you wanted to use the database you just created, you need to enter the command:
use test;
This produces the result shown in Figure 8.10.
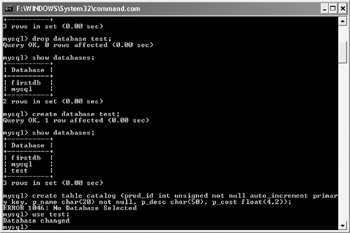
Figure 8.10: The use test command.
Now you can re-enter the create table command. Notice how the command is spread over several lines for clarity in the screen shown in Figure 8.11.
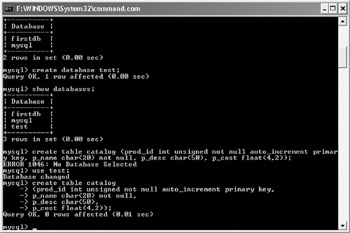
Figure 8.11: Multiline create command.
To check that a table was actually created, you can type in the command:
show tables;
as shown in Figure 8.12.
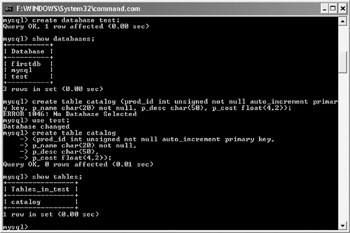
Figure 8.12: The show tables command, with the result
Or, for information on a specific table (so far, there is just one table in the test database):
describe catalog;
The result is shown in Figure 8.13.
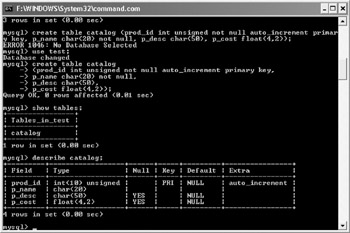
Figure 8.13: The describe catalog command, with the result.
The default value for prod_id being NULL when the NULL column shows that NULL is not allowed is not a particularly good message. However, this is what MySQL returns. Let us enter some data. This is shown in Figure 8.14.
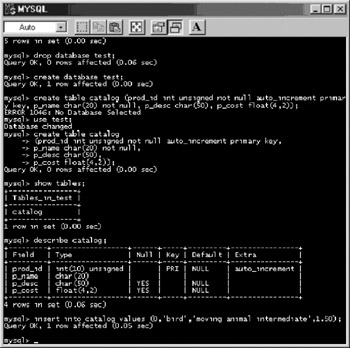
Figure 8.14: An insert command.
One record has been inserted. Note that what we have entered for a description is information that could be a way of categorizing models and, consequently, you can use if you want to redesign the table. Feel free to define products of your own choosing.
Figure 8.15 shows an attempt to add two more entries, demonstrating different forms of the insert statement (and also making a mistake).
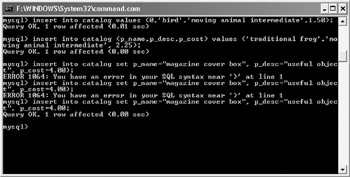
Figure 8.15: More insert commands, including an error.
The first form of insert listed all the fields in the order in which they were created. The second type allowed you to specify for which fields you were supplying values. Since we could leave out the prod_id field, this allowed us to get away with slightly less typing. This was the format used to input the traditional frog. The third form of insert allows you to enter field name and field value pairs. This might be advantageous when interpreting information that has been passed to the program in an unspecified order. However, we made a mistake by typing an extraneous parenthesis. We correct this error by typing the statement again without the extra parenthesis.
At this point, it is appropriate to show another feature of MySQL, which makes the command-line approach tenable. You can use a source file for your SQL statements. Get out of MySQL by typing:
quit;
Then close the command prompt window by clicking on the small X in the upper-right corner.
Open Notepad and enter the code:
insert into catalog set p_name='traditional crane', p_desc='animal intermediate', p_cost=4.00; insert into catalog values (0, 'magazine cover box', 'useful object simple',1.00);
Save this file in the mysql/bin folder under the name input.txt. The choice of file name is up to you.
You did not have to exit MySQL, but we want to show how to resume work. Click on Start and then Run, and, making sure that it indicates command, click OK. You need to get back to the mysql/bin folder and start MySQL again. Then, you need to indicate that you are using the test database. Finally, you will use the source command to indicate the use of a file for SQL input. The whole sequence of commands is shown in Figure 8.16.
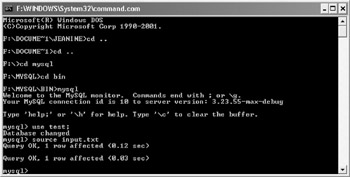
Figure 8.16: Starting MySQL, issuing a use command, and obtaining commands from a source file.
How do we see what is now in the table? You should be able to guess the answer. It is the select statement. To display all the fields of all the records in the catalog table of the database currently in use, type:
select * from catalog;
The screen shot of the result is shown in Figure 8.17.
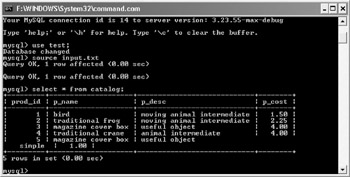
Figure 8.17: Select command with result.
The results display a problem, although not a MySQL error: the magazine cover box is entered twice. This would seem to be a redundant record. In fact, the two magazine cover box entries are not redundant, because the system-generated prod_id fields are different (as well as the costs). However, we do not want the fifth record, and we can demonstrate use of the delete command to remove this record:
delete from catalog where prod_id=5;
We then use the select command again as shown in Figure 8.18.
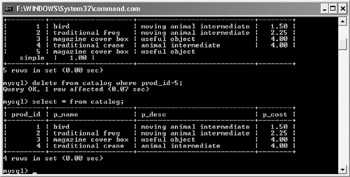
Figure 8.18: Contents of catalog table shown before and after deletion of a record.
The grant command establishes privileges for the designated user on a designated machine identified by a password to do all or a specified set of commands to the indicated tables of a database. The PHP scripts can all use the same username. The computer is “localhost.” During development, assuming the database is named orders, you could enter:
grant all on orders.* to curley@localhost identified by 'z4196q5';
where z4196q5 represents some hard-to-guess pattern. This information will be used in the PHP code to establish the connection to the database for all the scripts. Later, when everything is working, you systematically could determine what each script actually needs and establish a different set of privileges. For example:
grant select, update on orders.customers to groucho@localhost identified by 'b4t2d66';
You can also enter:
revoke alter, create, delete, drop on orders.* from curley@localhost;
Access
Now we move on to MS Access. You probably already have a copy of MS Access on your computer. Open it and choose the option to create a new database using a Blank Access database as shown in Figure 8.19.
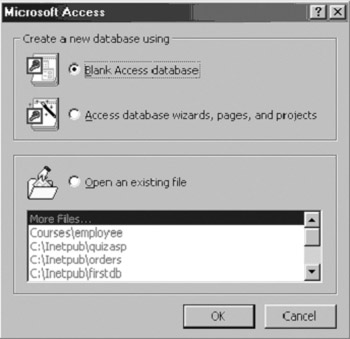
Figure 8.19: Microsoft Access window for creating a new database.
You will be presented with the usual window for saving a file. Change the name of the file: we used “test.” You will then see the window in Figure 8.20.
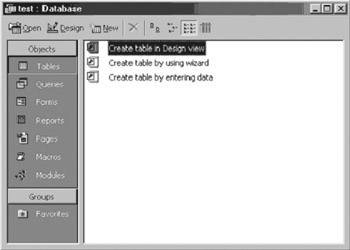
Figure 8.20: Access window for creating a table.
Access databases include tables and other parts of an application such as queries, forms, and reports. Since this database is to be used in a Web application, we focus here just on creating the tables. Click on Enter to accept the option of creating a table in Design view. You will see the window in Figure 8.21.
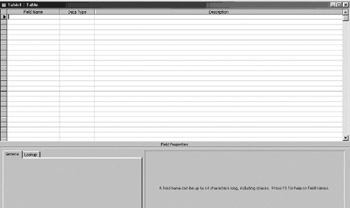
Figure 8.21: Access window for specifying fields in a table.
The task now is to enter in the field names, data types, and descriptions (of the field). This is how you would proceed to create for Access a table similar to the one just described for MySQL.
Type in prod_id into the first Field Name and press Enter. The first choice of data type, Text, will pop up. However, an arrow indicating a drop-down menu also appears. Click on it to see choices for the data type as shown in Figure 8.22.
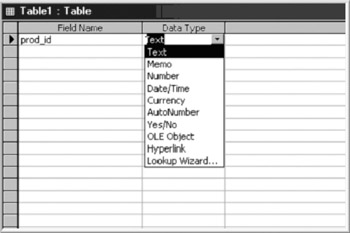
Figure 8.22: Options for data type for field.
Select the choice AutoNumber. For this, and other datatypes, the lower left-hand part of the window has more information about the database as shown in Figure 8.23.
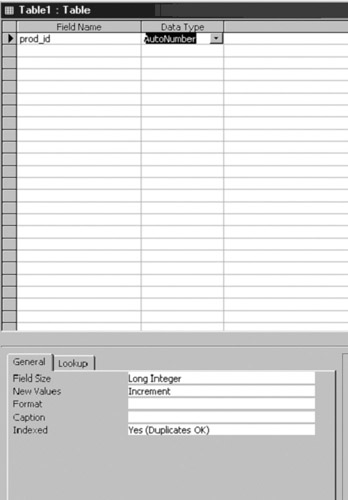
Figure 8.23: Window for defining field information, when datatype is AutoNumber.
The next step for this field is to tell Access that it is the primary key. You do this by clicking on the key icon on the toolbar as shown in Figure 8.24.
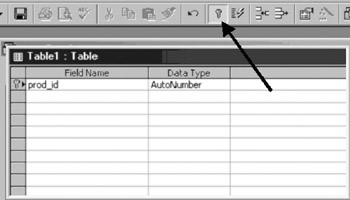
Figure 8.24: Specifying a field as a primary key; arrow indicates icon.
It is good practice to enter something into the Description field, although there is not much else to say about this particular field. Move on to the next field by pressing the Tab key. This time, press Enter to accept the choice of Text. You will see the screen in Figure 8.25.
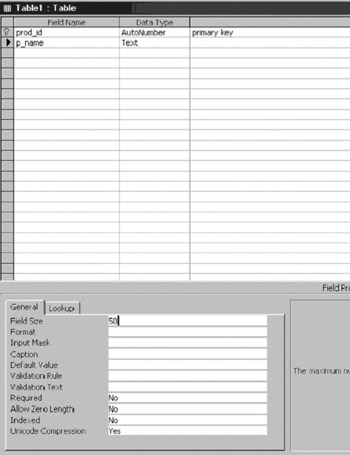
Figure 8.25: Window for defining field when data type is Text.
Change the Field Size to 20 and the Required Field to Yes. Tab to the Description field. If you are doing this work for an organization, it would be appropriate to indicate how the field values are assigned. Figure 8.26 shows a description.
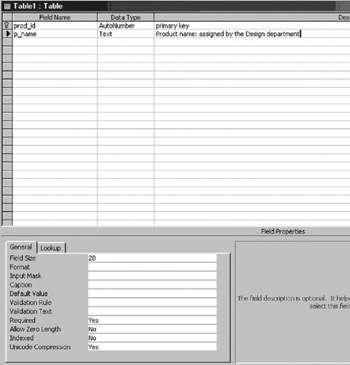
Figure 8.26: Window defining field with description entered.
Figure 8.27 shows the definition of the p_desc field.
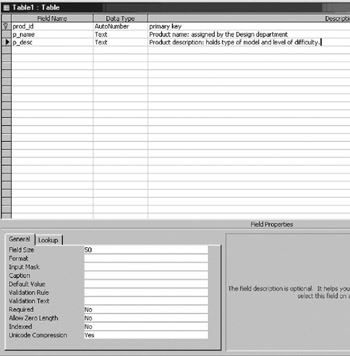
Figure 8.27: Window for defining fields: three fields defined.
Notice that we did not change the default Field Size of 50, nor the setting that the field is not required.
The last field is the product cost. Access provides a currency data type as shown in Figure 8.28.
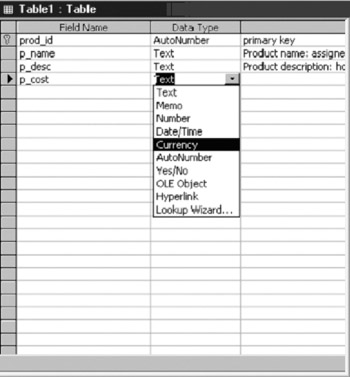
Figure 8.28: Partial screen shot of window defining field, showing currency option.
Figure 8.29 shows the table with the four fields defined.

Figure 8.29: Screen show showing four fields defined.
You need to save what you have done. Click on File and then Save As to get the window shown in Figure 8.30.
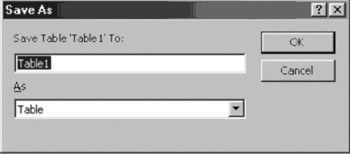
Figure 8.30: Window to save and name table.
Change the file name Table1 to catalog and click OK.
At the bottom of the screen as shown in Figure 8.31, you will see the minimized icon for the database.

Figure 8.31: Icon to return to database.
Click on this to see the window in Figure 8.32.
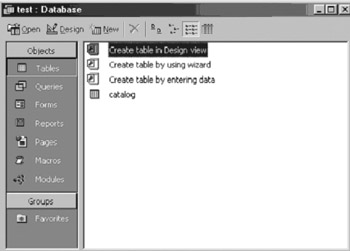
Figure 8.32: Window showing option to create another table or work with catalog table.
The catalog table is now listed under the Create options. Click on this to enter data into the catalog table. You will see a window customized for the table you just defined as shown in Figure 8.33.
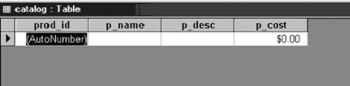
Figure 8.33: Window to enter records into the catalog table.
You can enter data, using the Tab key to move from field to field. Do not enter anything into the AutoNumber field. You will notice that values will appear. Use the products of your own imagination. Figure 8.34 shows data in the table.
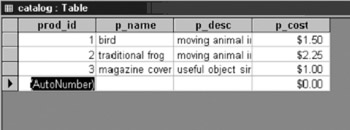
Figure 8.34: The catalog table with sample data.
Access provides a mechanism sometimes referred to as query-by-example for specifying a query. From the database window, click on Queries and choose Create query in Design view as shown in Figure 8.35.
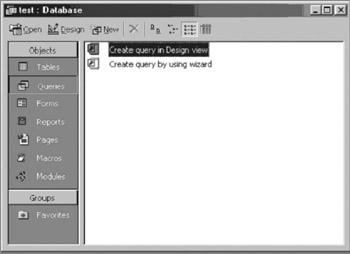
Figure 8.35: Window with options for specifying queries.
You will have a chance to add tables to the query. Since there is only one table, you have no choice except the one catalog table. Click Add, and then close as shown in Figure 8.36.

Figure 8.36: Window for specifying queries.
You will then see the screen shown in Figure 8.37.
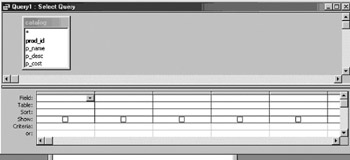
Figure 8.37: Screen showing start of process of defining a query graphically.
The idea here is to put together a query by citing fields in the table or tables that have been added to the area at the top of the window. You can specify criteria. If you double-click on p_name and then p_cost, and then type in >1 or whatever a test would be for our data that selects only some of the records, the query will resemble Figure 8.38.
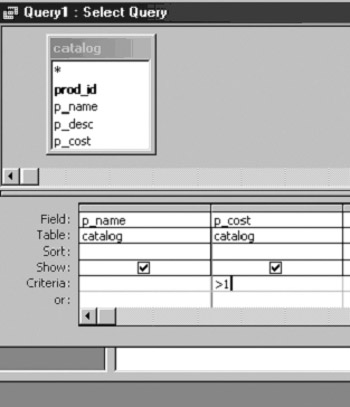
Figure 8.38: Screen shot showing process of defining query.
Run the query by clicking on the exclamation mark on the top toolbar as indicated in Figure 8.39.
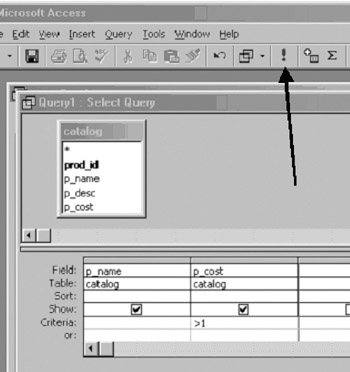
Figure 8.39: Arrow shows symbol to execute query.
Figure 8.40 shows the results of executing the query.
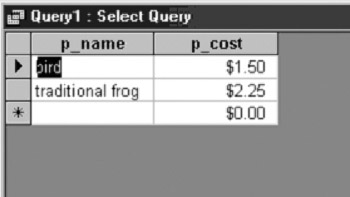
Figure 8.40: Results of query against sample data.
You can take the time to experiment making queries this way. One benefit is that the system will produce the SQL statement for you. Click on the View command and choose SQL View as shown in Figure 8.41.
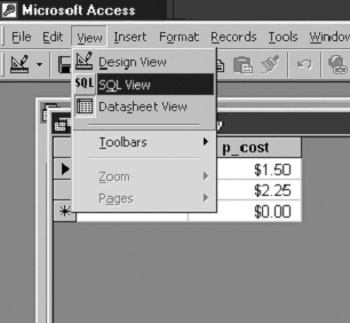
Figure 8.41: Option to obtain SQL representation of query.
You will see a window with the SQL statement corresponding to the query you designed as shown in Figure 8.42.

Figure 8.42: SQL statement representing query generated graphically.
EAN: 2147483647
Pages: 125
- The Second Wave ERP Market: An Australian Viewpoint
- Enterprise Application Integration: New Solutions for a Solved Problem or a Challenging Research Field?
- Intrinsic and Contextual Data Quality: The Effect of Media and Personal Involvement
- Healthcare Information: From Administrative to Practice Databases
- Relevance and Micro-Relevance for the Professional as Determinants of IT-Diffusion and IT-Use in Healthcare