| While the Opacity value is easy to use and does exactly what it says, it affects an entire layer. When you want to make parts of a layer transparent, such as removing a background, the most flexible way is to add a mask to a layer. With a mask, black areas create layer transparency (hiding layer contents), white areas restore layer opacity (revealing layer contents), and gray areas are partially transparent, with darker areas being more transparent. This makes it easy for you to control transparency very precisely. In addition to letting you apply different degrees of transparency to various areas of a layer, using masks for transparency has other advantages: You can control transparency by painting black, white, and gray tones in a mask, using painting tools, fill commands, filters, and retouching features. For example, you can create a soft-edged vignette by painting a white ellipse into a black layer mask and applying a blur filter to the mask. You can change or remove the transparency at any time, without altering the original layer data. All you have to do is edit the mask or delete the mask. This has profound workflow advantages, because you're never stuck with your decisionsif you need to recover an area you made transparent, just paint white back into that area of a mask. You can create simple, hard-edged masks by adding a vector mask and drawing a shape into it.
 | To more easily remember whether to paint black or white in a mask, think of the phrase "Black conceals, white reveals." |
As you've seen in the rest of the book, the real power of a feature in your workflow appears when you combine it with features in other areas of the program, like selections. Let's take a look at a quick example that draws upon features from all over Photoshop to help shape the mask. Suppose I have a layer with a background I want to remove. To do this, I would take the following steps: 1. | On a layer that isn't the Background layer, I select the areas I want to keep visible. In this particular example, I use the Magic Wand and Lasso tools with modifier keys (see "Combining Selections" in Chapter 9) until all of the areas I want to keep are selected (Figure 13.5).
Figure 13.5. 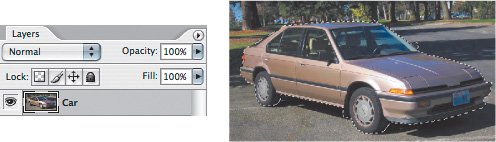
| 2. | I click the Add Layer Mask button in the Layers palette. Because a selection is active, the new layer mask keeps the selection visible and hides everything else (Figure 13.6). If the resulting visible and hidden areas are the opposite of what you want, make sure the layer mask is selected in the Layers palette and choose Image > Adjustment > Invert to make hidden areas visible and visible areas hidden.
Figure 13.6. 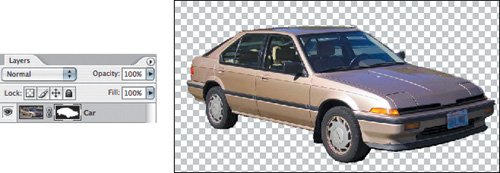
| | | 3. | I select the layer mask, inspect the document, and edit the mask depending on what I see:
If I see additional areas that should be transparent, I paint black in that area of the mask. If I see areas that were made transparent but they should be visible, I paint white in that area of the mask. If the mask needs any other kind of cleanup, I Option/Alt+click the layer mask thumbnail to see only the mask while hiding the rest of the document. That makes it easy to see edges or stray black or white areas that need to be retouched with a brush tool set to black or white (Figure 13.7). Option/Alt+click again on the layer mask icon to display the document normally again.
Figure 13.7. 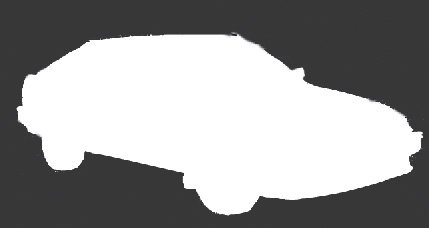
|
| | Layer masks can use the entire range of tones from black to white. To apply partial transparency to a layer, paint shades of gray in a layer maskdarker shades are more transparent. To see how this works, add a layer mask and fill it with a gradient from black to white. |
To add a vector mask: 1. | Select a layer in the Layers palette and choose Layer > Vector Mask > Reveal All.
| 2. | Make sure the vector mask is selected.
| | | 3. | Select a shape tool or the pen tool, make sure the Paths button is selected in the options bar, and draw the shape of the mask (Figure 13.8).
Figure 13.8. 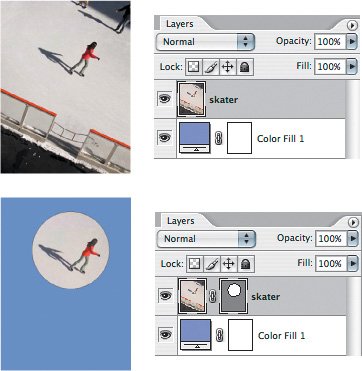
| 4. | If needed, edit the path using the pen tool and the direct selection tool.
|
For a quick reference on how to add a mask and manipulate transparency with a mask, refer to Table 13.2. Table 13.2. Controlling Layer Transparency with MasksTo… | …do this |
|---|
Add a layer mask that leaves the entire layer visible | Click the Add Layer Mask button in the Layers palette | Add a layer mask that hides the entire layer | Option/Alt+click the Add Layer Mask button in the Layers palette | Make an area completely opaque | Paint white on a layer mask | Make an area completely transparent | Paint black on a layer mask | Make an area more transparent | Darken the layer mask | Make an area more opaque | Lighten the layer mask | Disable/enable a layer mask | Shift+click a layer mask | Switch between showing document and layer mask only | Option/Alt+click a layer mask |
 | Opacity, blending modes, and masks aren't just for layers. You can also apply them to layer groups. You can't apply adjustment layers to a mask; they apply only to a layer itself. But you can apply masks to adjustment layers! |
|