Adobe InDesign
| Because Photoshop has a long tradition of processing documents for print, it's only natural that Adobe would work extra hard to streamline the connections between Photoshop and InDesign. If you're used to saving Photoshop documents as TIFF or EPS documents before importing them into a layout program, that isn't necessary with Photoshop documents. Adobe InDesign reads Photoshop documents directly, preserving Photoshop features such as layers and transparency. You can import a Photoshop document into InDesign by dragging and dropping the Photoshop document from the desktop or Adobe Bridge right into an InDesign document window, or in InDesign you can choose File > Place. InDesign preserves any transparency that exists in the Photoshop document (see Chapter 13). Once a Photoshop document is in an InDesign layout, you can modify the Photoshop file to a limited extent within InDesign or make more extensive edits back in Photoshop. Jumping Back to PhotoshopTo open a Photoshop document from InDesign, select a Photoshop document on an InDesign layout and choose Edit > Edit Original. This is handy when you're in InDesign and you want to edit a Photoshop document without having to figure out where it is on disk. When you save the Photoshop document and switch back to InDesign, the Photoshop document updates right on the InDesign layout.
Controlling Photoshop Layer VisibilityYou can use InDesign to control which layers are visible in a placed Photoshop document. This is useful when you've built a Photoshop document that contains different design variations using various layers or combinations of layers saved as layer comps. Instead of having to save, manage, and track several copies of a Photoshop document, you can set up your common elements in Photoshop using layers, place more than one instance of the document in InDesign, and simply hide and show different layers in each placed instance. InDesign also recognizes Photoshop layer comps. To control Photoshop layers from InDesign:
InDesign indicates placed documents with layer overrides in case you want to troubleshoot why an element isn't visible. When layer overrides are applied to a Photoshop document in InDesign, a red eye icon appears next to the Photoshop document name in the Links palette in InDesign. When you preflight the InDesign document (File > Preflight), the Links and Images panel in the Preflight dialog box indicates how many placed documents use layer overrides; to see if a document has layer overrides select it in the list and see what it says for Layer Overrides.
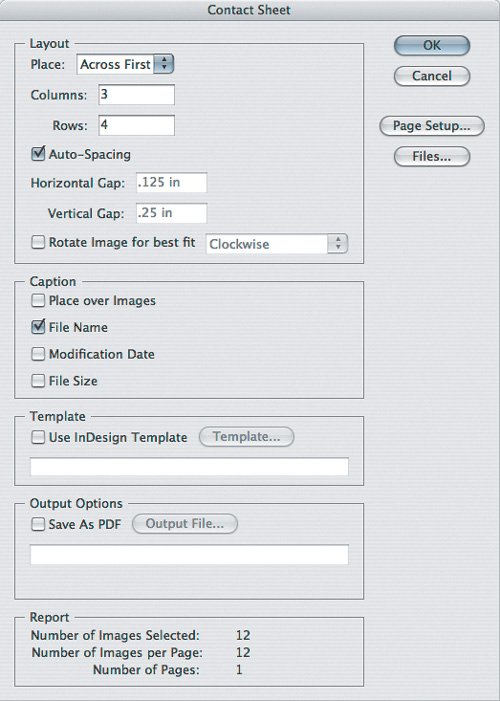
Creating a Contact Sheet in InDesignAlthough you can create contact sheets in Photoshop (File > Automate > Contact Sheet II), you can also use InDesign to make a contact sheet of any documents that are in formats InDesign can import. The file formats that InDesign can place and Photoshop can save include Photoshop native format, JPEG, and TIFF; the file formats InDesign can import are listed in InDesign Help under the Graphics topic. Why would you want to use InDesign instead of Photoshop? When you create an InDesign contact sheet, you have the option of specifying an InDesign template. If your organization's visual identity is built on InDesign templates, you can use InDesign to create a template for contact sheets so that your contact sheets are consistent with your other materials such as business cards and letterhead. Also, if you plan to archive the contact sheets, InDesign documents will take up less disk space than Photoshop contact sheets because they link back to the images you use, instead of copying all of the images into the InDesign document. To create an InDesign contact sheet:
Using an InDesign Layout in PhotoshopThere may be times when you want to use an InDesign layout in Photoshop, such as processing a magazine cover as a graphic for the Web. All you have to do is export the InDesign layout in a file format that Photoshop can import, such as EPS, JPEG, or PDF. Using PDF is a good bet, because it preserves type and vector objects for higher-quality scaling. In InDesign, you create an EPS, JPEG, or PDF document by choosing File > Export and choosing the format from the Format pop-up menu. The PDF presets are the same as those in Photoshop (see Chapter 4). You can then drag the exported document from Bridge or the desktop to the Photoshop program icon (Mac OS X) or program window (Windows XP). If you're using the exported InDesign layout as part of a Photoshop document, in Photoshop choose File > Place so that you can use the InDesign layout as a smart object (see Chapter 10).
|

EAN: 2147483647
Pages: 161
- Getting Faster to Get Better Why You Need Both Lean and Six Sigma
- Success Story #1 Lockheed Martin Creating a New Legacy
- Seeing Services Through Your Customers Eyes-Becoming a customer-centered organization
- Executing Corporate Strategy with Lean Six Sigma
- Raising the Stakes in Service Process Improvement