Section 35. Implementing Blogger s ShowHide Comments
35. Implementing Blogger's Show/Hide Comments
30 Identifying Elements in the Blogger Template Source 35. Implementing Blogger's Show/Hide Comments 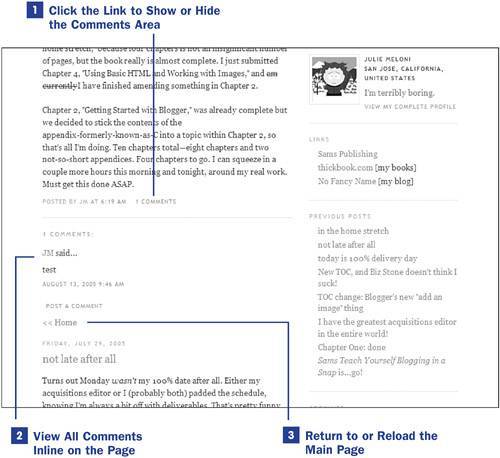 The default method for displaying Blogger comments places the stored comments on the individual post pageeven if your Comments settings are set to show comments in a pop-up window. When you click the comments link in the footer area of a post, you will either see a pop-up window containing the existing comments or you will be taken to a separate page for entering comments like the one shown in 34 Using Blogger's Commenting System. So, if you want to see just the comments attached to a post and not the entire commenting interface, you must click the post's permalink and view the individual post pageunless you implement a hack provided by Blogger to dynamically show or hide comments inline on the page. Modifications to several areas of your template are necessary to implement what are called peek-a-boo comments. To begin, log in to Blogger and click the Change Settings icon in the Blogs section of the Blogger Dashboard. Click the Template tab to display navigational items; Edit Current is the default landing page and, in this instance, is where you should be.
Before making modifications to your template, be sure to save a backup copy of your current template. If something goes awry while making changes to the template, you can quickly replace the messed-up version with the backup version. The first modification sets up two additional CSS classes: commenthidden and commentshown. These classes set the display styleeither none or inlinefor the element containing the comment text. Within the <style></style> tag pair, place these two lines: .commenthidden {display:none} .commentshown {display:inline} The next modification calls for the addition of a JavaScript function. Type the following code after the opening <head> tag, anywhere before the closing </head> tag: <script type="text/javascript"> function togglecomments (postid) { var whichpost = document.getElementById(postid); if (whichpost.className=="commentshown") { whichpost.className="commenthidden"; } else { whichpost.className="commentshown"; } } </script> This script is used to trigger the change in display for the element that holds the stored comments. When invoked, the script will change the element's display style to Inline if it is currently None, and to None if it is currently Inline. The next step in the implementation process requires some changes within the template code itself, which is found between the <Blogger></Blogger> tag pair. Scroll through your template code and look for the <BlogItemCommentsEnabled> opening tag. It will be followed by additional comments-related template tags before the closing </BlogItemCommentsEnabled> tag is used. This chunk of code should be surrounded by the <MainOrArchivePage></MainOrArchivePage> conditional tag pair. Remove both the opening and closing MainOrArchivePage links around this chunk of code. Doing so ensures that the element containing the comments can be visible on all pages, not just the individual post pages. Next, look for the <BlogItemCommentsEnabled> opening tag. In it you will see the HTML for a hyperlink, which is surrounded by the <a></a> tag pair, perhaps something like this: <a href="<$BlogItemPermalinkURL$>#comments"> You must change the value of the href attribute for this link to: javascript:togglecomments('c<$BlogItemNumber$>') The link should end up looking something like this:
Scroll a bit further in your template and you will see another set of <BlogItemCommentsEnabled></BlogItemCommentsEnabled> tags, this time surrounded by the <ItemPage></ItemPage> conditional tags. The final edit to your template is to replace the opening <ItemPage> tag with this line of code: <span > Replace the closing </ItemPage> tag in this area with a closing span tag: </span>. Click the Save Template Changes button and republish your entire blog.
|

 TIP
TIPEAN: 2147483647
Pages: 124